
Yes, you can export your expenses to CSV: sign in to your app or bank, open your transactions or expenses list, choose Export or Download, pick CSV, and save the file. CSV works well for reports, transfers, and tax prep. Always download from a signed-in, authenticated session, never a third-party scraping tool.
TL;DR:
- Export your expenses in smaller date ranges, such as monthly or quarterly, to prevent timeouts and manage file sizes effectively.
- Ensure CSV files are encoded in UTF-8 to avoid garbled characters or symbols during import or export processes.
- Always verify key fields like date, amount, payee, and transaction ID are correctly captured, especially when dealing with multi-currency or split expenses.
- Download CSV exports directly from your secure, signed-in session rather than through third-party scraping tools to maintain data security.
- Use consistent naming conventions for your exported files and keep raw, unedited backups to simplify tax preparation and record keeping.
Table of Contents
- How to export your expenses step by step
- What columns show up in an expenses CSV
- Keeping exported financial data secure and audit ready
- Fixing common CSV export problems
- Building a tax-ready export habit
- CSV export or automated sync: which one fits you
- Get tax-ready exports without the manual work
- Sources
- FAQ
How to export your expenses step by step
Most expense apps and bank portals follow a similar pattern, even if the exact button names differ. Once you know the flow, you can find it almost anywhere.
- Sign in and go to your transactions, expenses, or activity list.
- Set a date range or apply filters (account, category, or tags) to narrow the results.
- Look for an Export, Download, or Download Statement option, usually near the top or bottom of the list.
- Select CSV as the file type (some tools also offer JSON or PDF).
- Choose which columns to include, if the option is available.
- Save the file somewhere you will remember, like a labeled folder for tax records.
Bank portals often hide this under “Statements” or “Download Activity” rather than “Export.” Expense apps tend to label it more plainly, sometimes as “Export to CSV” or “Download Report.” If your list has thousands of rows, export in smaller date-range chunks (monthly or quarterly) rather than pulling a year at once. This keeps files manageable and avoids timeouts or truncated exports. If you need to preserve nested data, like line items inside a single transaction, JSON can capture that structure better than a flat CSV.
Pro Tip: Export the same date range twice a few minutes apart and compare row counts. If they match, your export is complete.
What columns show up in an expenses CSV
A typical expenses CSV includes a consistent set of fields, though naming varies slightly by source.
- Date: when the transaction happened or posted.
- Amount: the transaction value, sometimes split into debit and credit columns.
- Currency: the currency the transaction was recorded in.
- Payee or merchant: who was paid.
- Category: how the expense is classified (travel, meals, software, etc.).
- Tax or tax rate: applicable tax amount, if tracked.
- Payment method: card, bank transfer, or cash.
- Receipt URL: a link to an attached receipt image, when supported.
- Transaction ID: a unique identifier for the record.
- Notes: free text for context or purpose.
If a purchase was made in a different currency than your account’s default, look for both an original currency and a payment currency field. This avoids confusion at tax time. For split expenses, check whether the export shows your share only or the full group total. Before importing into bookkeeping software, rename headers to match the software’s expected format and drop any columns you do not need.
Keeping exported financial data secure and audit ready
Export directly from an authenticated session inside your bank’s app or website, never through a tool that asks for your banking password to scrape data on your behalf. The CFPB’s final rule on personal financial data pushes providers toward machine-readable data access and limits the use of screen scraping, which is a safer direction for consumers. Financial institutions covered by the FTC Safeguards Rule are required to maintain administrative, technical, and physical safeguards for customer information, which is one reason unofficial scraping tools carry more risk than official export features.
For tax-ready records, your export should let you confirm:
- Payee name
- Date of the transaction
- Amount paid
- Proof of payment (receipt or statement line)
- A short description of the business purpose
The IRS states that electronic records must meet the same standards as paper records, so keep your original raw CSV unedited and store a backup copy. Encrypt sensitive files before sharing them, and limit access to only the people who need them.
Fixing common CSV export problems
Most CSV headaches come down to a handful of predictable issues.
- Garbled characters or symbols: save or import the file as UTF-8 encoding, which handles currency symbols and accented characters correctly.
- Columns merged into one: check whether the file uses a semicolon instead of a comma as the delimiter, common in some regional exports, and adjust your import settings accordingly.
- Dates showing as text or wrong format: set the date column format explicitly in Excel or Google Sheets rather than letting it auto-detect.
- Missing or cut-off rows: re-export with all columns selected, or split the export into smaller date ranges and combine the files afterward.
Once imported, spot-check a handful of rows against your original statement and compare total row counts to catch anything that did not come through. Following the CSV formatting conventions in RFC 4180 helps too, since consistent field counts and proper quote escaping are the main reasons one program’s export sometimes confuses another program’s import. If problems persist across multiple exports, reach out to your provider’s support team or check whether an API option is available instead.
Building a tax-ready export habit
Keep one unedited copy of every export you download, then work from a separate copy when cleaning up categories or adding notes. Map your expense categories to the tax lines you actually use, so nothing gets reclassified at the last minute. If receipts are stored as links, keep that column intact rather than deleting it for tidiness.
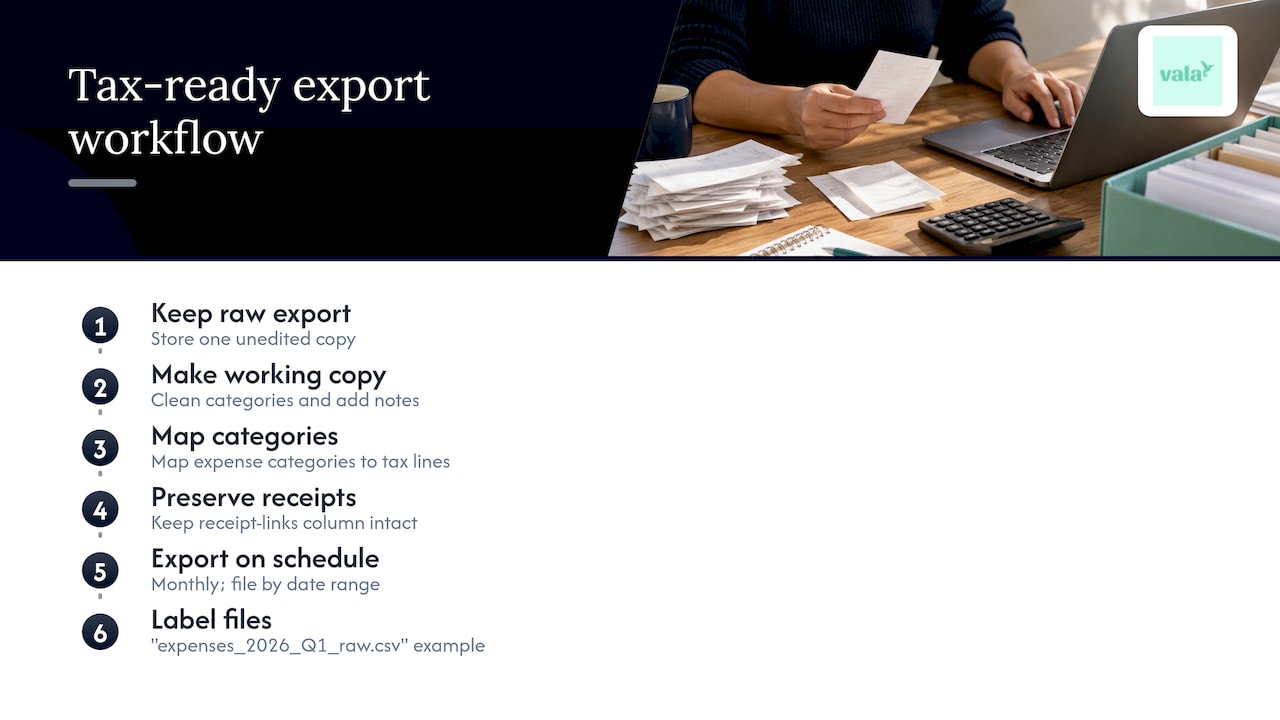
Freelancers and small groups benefit from exporting on a set schedule, monthly works well, and filing each export by date range. This turns tax prep into a quick review instead of a scramble. For a more detailed system, Vala’s guide to freelancer expense tracking walks through category mapping in more depth.
Pro Tip: Label your raw export files with the date range in the filename, like “expenses_2026_Q1_raw.csv,” so you never mix up versions later.
CSV export or automated sync: which one fits you
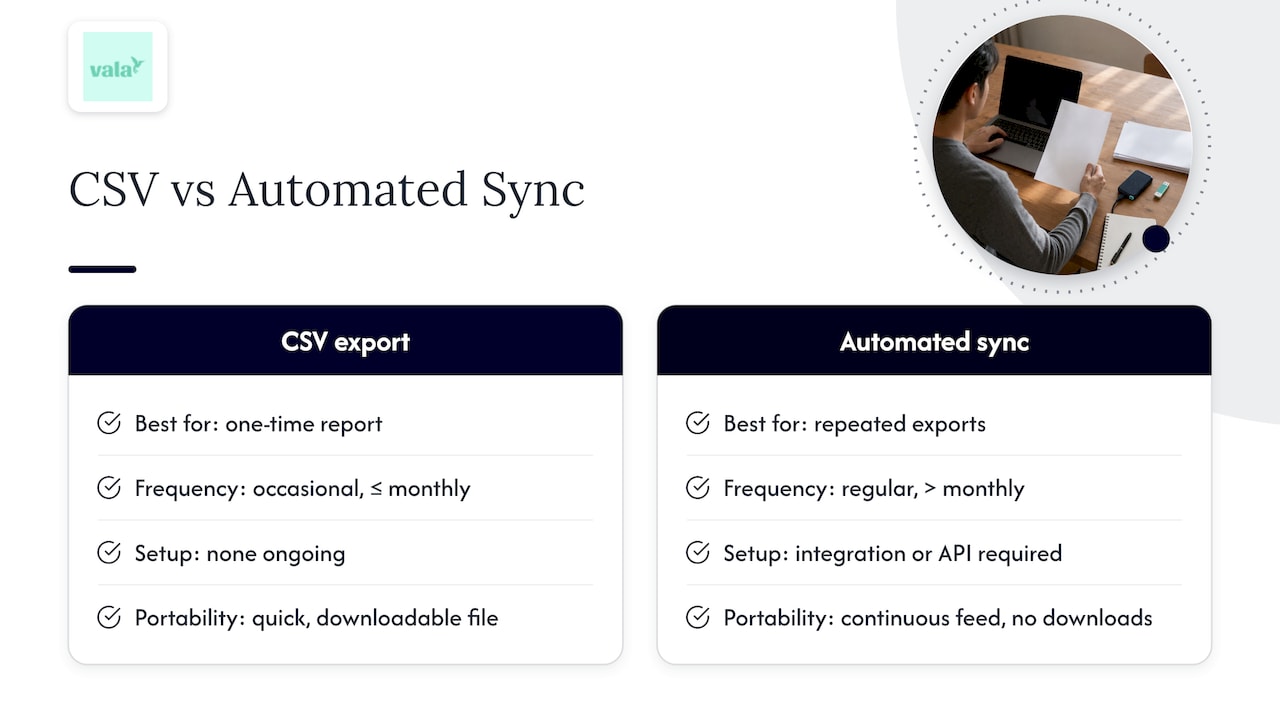
CSV exports are the right call for a one-time report, a tax filing, or handing data to an accountant. They are quick, portable, and need no ongoing setup. Once you are exporting the same data every week or every month, though, manual downloads start costing more time than they save.
Frequent syncing is better handled through integrations or APIs, which pull data automatically without repeated logins. Accountants generally prefer a consistent feed over a pile of monthly CSVs, since it cuts down on version mixups. If you are exporting more than once a month, that is usually the signal to move toward an automated connection instead.
— SaverStride
Get tax-ready exports without the manual work
Vala handles the export part for you: automated transaction tracking, category mapping built for tax prep, and shared expense splitting that keeps group costs clear from the start. Instead of piecing together monthly CSVs by hand, Vala keeps your records organized as you go, so tax season means a quick review instead of a cleanup project.

If you split costs with a partner or a group, Vala’s shared expense tools keep everyone’s share straight without a separate spreadsheet. Try the Money Leak Check to see where automated tracking could save you time, or explore SaverPro to unlock full budgeting and export tools.
Sources
These are the primary references used above:
- FTC Safeguards Rule: What Your Business Needs to Know | Federal Trade Commission
- What kind of records should I keep | Internal Revenue Service
- RFC 4180 — Common Format and MIME Type for CSV Files
FAQ
What does it mean when it says export to CSV?
Exporting to CSV means saving your data as a plain text file where each value is separated by commas, following a common format described in RFC 4180. It lets you open the file in spreadsheet or accounting software without special tools.
How can I convert my bank statements to CSV for free?
Most banks let you download statements directly as CSV from your online banking portal at no cost, usually under a “Statements” or “Download Activity” menu. Look for authenticated, official download options rather than third-party converters that ask for your login credentials.
How do I export something as a CSV file?
Open the list you want to export (transactions, expenses, or a report), find the Export or Download option, and choose CSV as the file type. Save the file to your device, then open it in a spreadsheet program to review the columns.
Can you export bank statements as CSV?
Yes, most banks offer CSV as one of the download formats for statements, alongside PDF or OFX in some cases. Regulatory efforts like the CFPB’s data access rule are pushing providers toward more standardized, machine-readable formats for this kind of data.