Organize Expenses in 30 Minutes: Tags + 8–12 Categories That Stick

Categories answer one question: what was the money for? Tags answer a different set of questions: why, for whom, or for which project. Use categories for budgets, reports, and taxes because they need one stable answer per transaction. Use tags for trips, clients, and reimbursements because those situations change and often overlap.


TL;DR:

  • Maintaining a small set of 8 to 12 stable categories ensures consistent budget and tax reporting without overcomplicating the logging process.
  • Using a limited number of well-defined tags, such as client names or trip identifiers, provides flexible ways to analyze transaction data without fragmenting reporting filters.
  • Regularly merging similar tags and renaming inconsistent ones, along with setting automatic rules for recurring expenses, keeps the system efficient and reliable.
  • Over-categorizing or creating temporary categories for one-time expenses can lead to system breakdowns and logging fatigue.
  • Setting up the system in 30 minutes by defining categories, creating starter tags, and applying rules prevents the need for constant manual adjustments later.

Valapoint
Keep Every Expense in View
Vala helps individuals, couples, and groups track expenses, manage budgets, and uncover spending patterns that reveal financial leaks.

Explore Vala

Table of Contents

Expense Tags vs Categories: What Categories Actually Do

A category is a single, fixed bucket. Every transaction gets exactly one, and that’s by design. “Groceries,” “Rent,” or “Software Subscriptions” don’t bend depending on context. That rigidity is the whole point: categories feed your budget totals, your profit and loss statement, and, if you’re self-employed, the line items on Schedule C.

Keep your primary list to a small set of categories, typically around eight to a dozen. Fewer categories mean less friction every time you log a purchase, and less friction means you actually keep doing it. Navan’s glossary describes categories as the standardized classifications that travel-and-expense systems rely on to generate consistent reports, and Expensify’s guidance makes the same point for small business owners: consistency now saves you recoding work later, especially around tax season.

A few rules to keep your category list working for you:

  • Change categories only once or twice a year, ideally at the start of a new tax year.
  • Add a subcategory only when a single category regularly hides more than 20% of your spending.
  • Never create a category for something temporary. That’s a tag’s job.

Expense Tags vs Categories: How Tags Add Flexibility

A tag is a flexible label you can stack on top of a category. One dinner receipt can carry the category “Meals & Entertainment” and the tags “ClientSmith,” “Q1Trip,” and “Reimbursable” at the same time. Nothing about your budget structure changes. You just gained three new ways to slice that one transaction later.

Common uses for tags include:

  • Client or project names for freelancers billing multiple accounts.
  • Trip identifiers like “Denver2026” to total travel costs instantly.
  • Status markers such as “Reimbursable” or “TaxDeductible.”
  • Household splits like “SharedRent” for couples or roommates dividing bills.

Naming discipline matters here more than people expect. Relentify’s guide to tags and categories points out that tags stay useful only when they don’t fragment. “ClientSmith” and “Client Smith” look identical to you but read as two separate tags to any filter or report. Pick one format and write it down somewhere you’ll actually check.

Pro Tip: Keep a short “tag glossary” note in your phone or spreadsheet. Anytime you’re tempted to create a new tag, check the list first. Most situations you think are new have already been tagged once before.

Real Examples: One Transaction, Category Plus Tags

Seeing this on real transactions makes the logic click faster than any definition.

  1. Business dinner with a client in another city. Category: Meals & Entertainment. Tags: ClientSmith, Denver2026, Reimbursable.
  2. Flight booked for a work trip. Category: Travel. Tags: Denver2026, Reimbursable.
  3. Grocery run split with a roommate. Category: Groceries. Tags: SharedApartment, Roommate50.
  4. Software subscription used for two side projects. Category: Software Subscriptions. Tags: ProjectA, ProjectB.

When you filter your data by the tag “Denver2026,” you instantly get the true cost of that trip, meals and flight combined, without touching your category totals. Filter by “Roommate50” instead, and you see every shared cost waiting to be split. Same transactions, two completely different views.

How Many Categories and Tags Do You Actually Need?

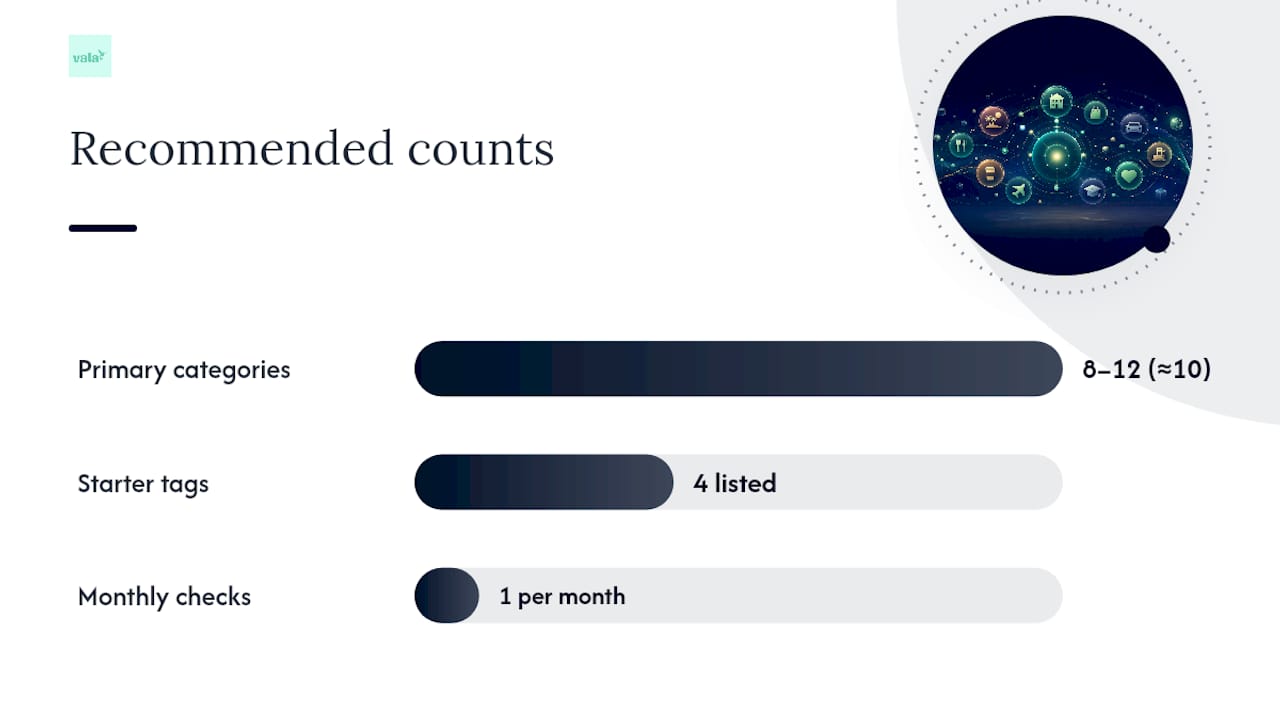
Stick to 8 to 12 primary categories: Housing, Groceries, Transportation, Utilities, Insurance, Subscriptions, Meals & Entertainment, Health, Personal, and a catchall Miscellaneous covers most households and solo businesses. Add a subcategory only when it earns its place through real spending volume, not because it sounds tidy.

For tags, start with a small starter set instead of inventing new ones as you go:

  • Person or client name
  • Project or trip name
  • Reimbursable status
  • Tax year or quarter

Run a 30-day consistency check once a month. Scan your last 30 days of transactions, look for tags you spelled two different ways, and merge them. Retire any tag you haven’t used in 90 days.

Mixed personal and business expenses need one more rule: split by percentage, not by best guess. SmartReceipts recommends exactly this kind of documented allocation, since a consistent split holds up far better than a rough estimate if you’re ever asked to explain it.

Pro Tip: Set a recurring 10-minute calendar reminder for the first of each month. That’s genuinely all the housekeeping this system needs once it’s running.
How Many Categories and Tags Do You Actually Need? — overview diagram

Common Mistakes That Break the System

Over-categorizing is the number one reason people quit. Twenty-five categories sound thorough, but nobody remembers which one “Home Improvement” versus “Household Supplies” is supposed to be, so logging becomes a chore and eventually stops entirely.

  • Don’t create a category for a one-time project. That’s what a tag is for.
  • Don’t let tag names drift (“Client-Smith,” “ClientSmith,” “Smith Client” are three tags, not one).
  • Consolidate similar categories down to your 8 to 12 core list.
  • Rename inconsistent tags in one sitting rather than patching them as you notice them.
  • Write your naming rule down once so future-you follows it too.

How to Set This Up in 30 Minutes

  1. Pick your 8 to 12 categories and write them down somewhere permanent, whether that’s a spreadsheet tab or a note app.
  2. Pre-create 4 to 6 starter tags for active clients, ongoing projects, or upcoming trips before you need them.
  3. Scan your last 30 days of transactions and assign a category plus any relevant tags to each one.
  4. Set merchant rules so recurring purchases, like a specific coffee shop or your phone carrier, auto-categorize going forward.

If you’re spreadsheet-based, an AI budget template can automate some of this categorization logic for you. If you’d rather understand the accounting logic behind your category list, BeanHawk’s explanation of a chart of accounts is a solid primer. Either way, the goal is the same: get through the backlog once, then let rules handle the repeat work.

How Vala Applies Categories and Tags

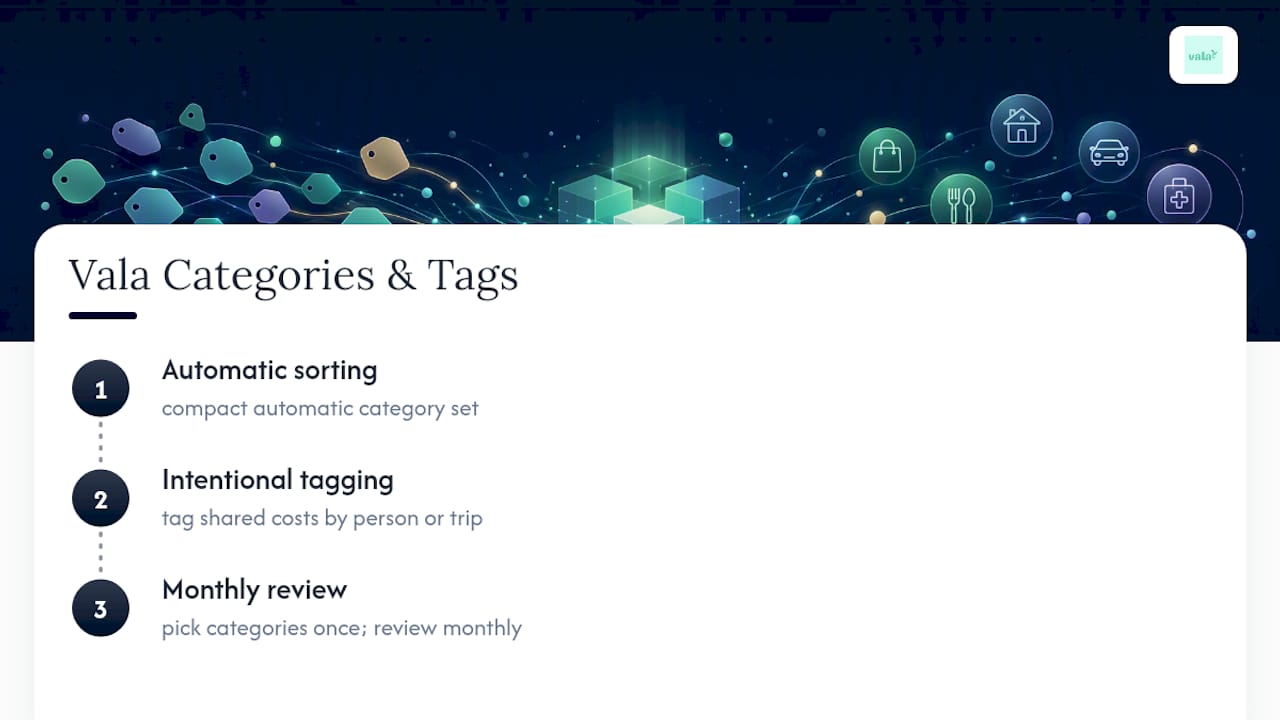
The app pairs a compact, automatic category set with flexible tags you control. Automatic categorization handles the routine sorting, while split-expense tools let you tag shared costs by person or by trip. Even if you never open the app, the checklist holds: pick your categories once, tag with intent, and review monthly.
Automatic categories and flexible tags workflow

Why This Simple System Actually Sticks

Most organizing systems fail because they ask you to think too hard every time you log a purchase. Categories plus tags work because the thinking happens once, upfront, and after that you’re just applying a rule you already made. Try it for 30 days with the compact list above, then look back at what you’d actually change. You’ll probably remove more than you add.

— SaverStride

A Simpler Way to Keep Tags and Categories Consistent

Building this system by hand works, but staying consistent every single month is where most people slip. The app is built around exactly the structure this article describes: a compact category set that stays stable, plus flexible tags for trips, clients, and shared costs, applied automatically as transactions come in.
Valapoint

Instead of re-tagging the same recurring subscription every month or manually splitting a shared grocery run with your roommate, automatic categorization and group-expense splitting can do that work in the background. You still set the rules. The app just keeps applying them.

If you want to see how this looks with your own accounts connected, start with Vala’s personal finance app and try the categorization and tagging tools on your real spending for a week.

Sources

For deeper detail beyond this guide, the Consumer Financial Protection Bureau’s consumer tools cover general budgeting guidance, while FDIC’s consumer resources explain how organized tracking supports broader financial health.

Recover $200+ in 20 Minutes With an App for U.S. Money Recovery

Money recovery means finding and reclaiming wasted or lost personal funds and stopping the leaks that caused them. Start with a 15 to 30 minute audit of your last two bank statements, flag anything that looks unauthorized, and note any large fees or subscriptions you forgot about. If you spot fraud, call your bank the same day. Regulation E gives you a limited window to act, and every day you wait shrinks your odds of a full refund.


TL;DR:

  • Regularly reviewing two to three months of bank statements can uncover forgotten subscriptions, duplicate services, and small recurring charges that add up over time.
  • Disputing credit card charges is often more favorable than debit refunds, and filing complaints with the CFPB can speed up unresolved disputes.
  • Canceling subscriptions requires identifying the billing source and sending written requests; disputing fraudulent or withheld refunds should be directed to your card issuer.
  • Automated expense management tools can prevent future leaks through subscription detection, low-balance alerts, and scheduled quarterly audits, saving time and money annually.

Table of Contents

What Is a Fast Money Audit and How Do You Run One?

A money audit is a focused sweep of your spending, not a full budget overhaul. You’re hunting for anything that shouldn’t be there: charges you don’t recognize, fees you didn’t expect, and subscriptions you forgot to cancel.

Pull your last 60 to 90 days of bank and credit card statements. That window is long enough to catch quarterly subscriptions but short enough that you won’t drown in data.

Work through your statements in this order:

  1. Scan for unauthorized transactions first. Anything unfamiliar gets flagged immediately, even if the amount is small.
  2. Look for large one-off fees: overdraft charges, wire fees, late fees, or ATM surcharges that stack up.
  3. Search for recurring charges under names you don’t recognize. Streaming bundles, app-store subscriptions, and “membership” services often disguise themselves under a parent company’s billing name.
  4. Check for duplicate services, like two cloud storage plans or overlapping meal-kit subscriptions.
  5. Note anything that seems small but repeats monthly. A $4.99 charge you missed for a year adds up to almost $60.

Once you have your list, prioritize by what’s actually recoverable:

  • Unauthorized charges and bank fees, because they carry legal recovery timelines.
  • Recurring subscriptions you’re not using, because canceling them stops the bleeding immediately.
  • Small one-off refunds, because they matter but rarely need urgent action.

This is exactly the kind of scan an expense-tracking tool speeds up, since it groups transactions automatically instead of making you scroll through a PDF statement line by line. You can also check common examples of hidden recurring charges to know what to look for before you start.

How Do You Get Money Back From an Unauthorized Bank or Card Charge?

The first hour after you spot fraud matters more than almost anything else you’ll do. Freeze or replace the affected card, change your online banking password, and write down the exact date you noticed the problem. That date starts the clock on your legal protections.

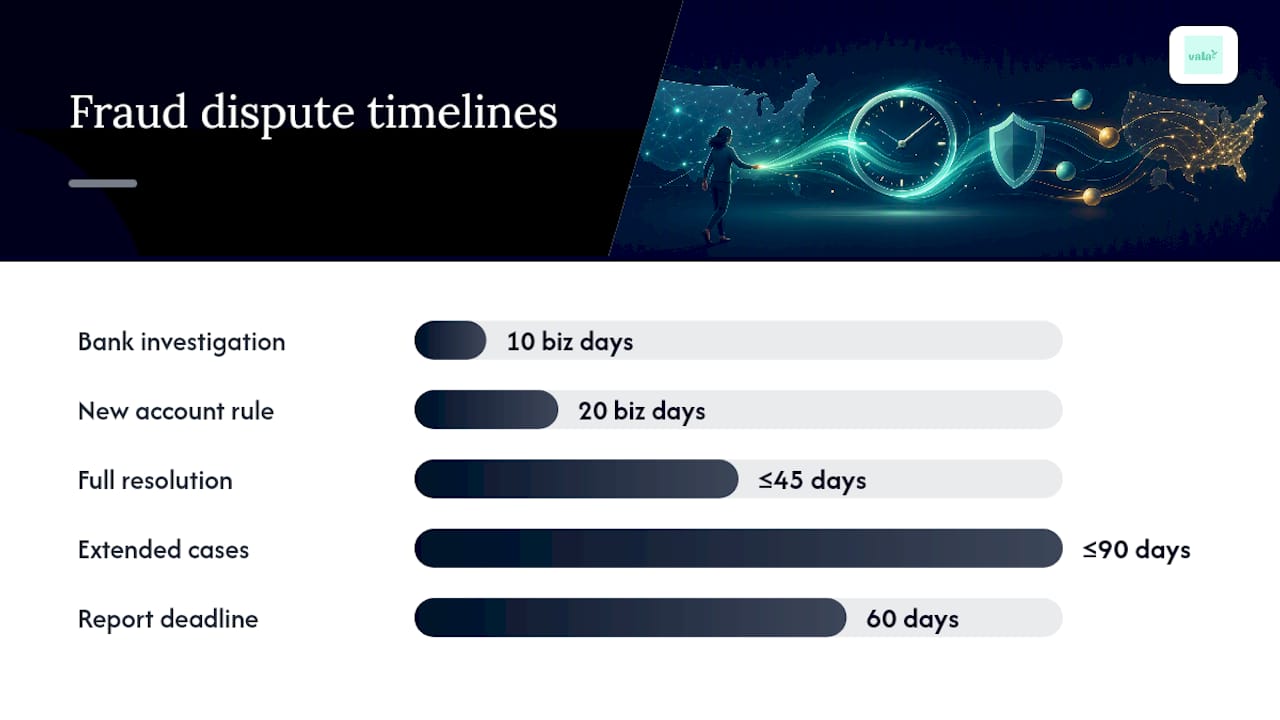
Under Regulation E, your bank generally has 10 business days to investigate an unauthorized transaction (20 if the account is less than 30 days old). If the bank needs more time, it must issue provisional credit while it finishes the review, and full resolution can take up to 45 days, or 90 days in certain cases. You must report the error within 60 days of the statement that shows it, or you risk losing those protections entirely.

Credit card disputes work differently and often favor you more. The Fair Credit Billing Act lets you withhold payment on a disputed amount while the issuer investigates, and you’re not out real cash the way you are with a debit card pull from checking. That’s one reason many financial experts recommend routing recurring payments through credit rather than debit whenever possible.

When you file a dispute, include:

  • The exact date and amount of the charge
  • A short, factual description of why it’s unauthorized
  • Any supporting statements showing the fee cascade it triggered (overdrafts caused by fraud should be reversed too)

If your bank drags its feet or denies a legitimate claim, file a complaint with the CFPB. It forwards your complaint directly to the bank and forces a response within 15 days, which tends to move things along faster than a phone call ever will.

Pro Tip: Keep a simple timeline document, just the date, the action, and who you spoke with. If your case escalates to a CFPB complaint, that log becomes your strongest piece of evidence.

How Do You Get Money Back From an Unauthorized Bank or Card Charge? — overview diagram

How Do You Cancel Subscriptions and Get Merchant Refunds?

Before you can cancel anything, you need to know where the charge originated. Check whether it’s billed through your bank directly, through an app store like Apple or Google, or through the merchant’s own account portal, because the cancellation path is different for each one.

  1. Log into the account tied to the charge and look for a cancellation or subscription-management page first.
  2. If you can’t find one, check your app store’s subscription settings, since many recurring charges route through Apple or Google billing even when the app itself is a smaller company.
  3. Send a written cancellation request if there’s no clear button. Something as simple as “Please cancel my subscription effective immediately and confirm in writing” creates a paper trail.
  4. Call and ask directly for a supervisor if the company stalls. This is common enough that consumer reporting has documented the pattern of companies making cancellation intentionally slow.
  5. If the merchant refuses a fair refund, or you never received what you paid for, dispute the charge with your card issuer instead of continuing to argue with the merchant.

The FTC requires sellers to ship within the promised time or refund you, and you’re never obligated to pay for unordered merchandise that shows up unexpectedly.

Pro Tip: If a company only offers cancellation by phone, call first thing in the morning. Hold times are shortest right when call centers open.

How Can an Expense App Stop Future Money Leaks?

Recovering money once is useful. Stopping the next leak before it starts is what actually protects your budget long term.

The most effective prevention tools automate the boring parts:

  • Automatic subscription detection that flags every recurring charge, even ones disguised under odd merchant names
  • Trial-ending reminders sent a few days before a free trial converts to a paid plan
  • Low-balance alerts that warn you before a transaction triggers an overdraft
  • Overdraft prediction that flags a risky week before it happens, not after the fee posts

Pair those automations with a simple habit: a quarterly five-minute review of every recurring charge, timed to your calendar so it actually happens. Scheduled subscription audits paired with automated reminders are consistently cited as the most reliable defense against subscription creep.

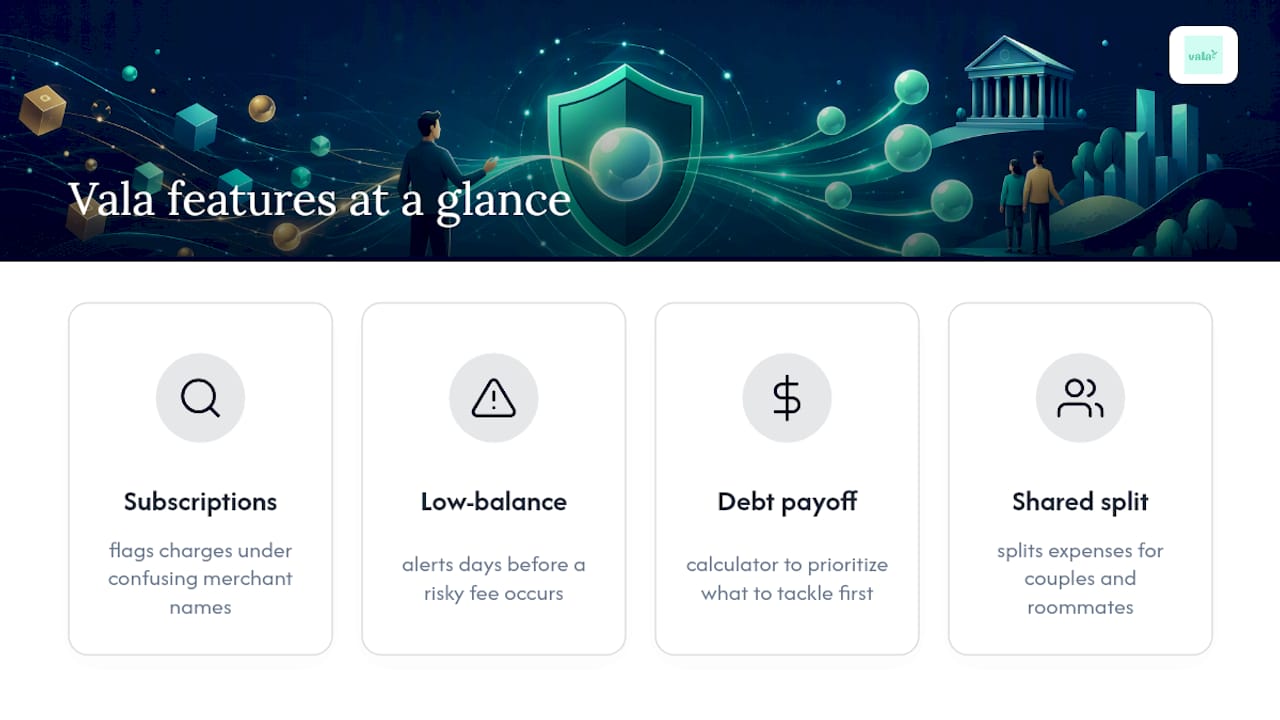
Vala builds several of these directly into the app: AI-driven spending insights that surface subscriptions you forgot about, a Debt Payoff Calculator for prioritizing which balances to clear first, overdraft prediction before a low-balance day hits, and shared expense splitting for couples or roommates managing costs together.

Banks waive an estimated 30 to 50 percent of fees when customers simply ask, especially for first-time occurrences, which makes a habit of checking your statement monthly worth far more than the five minutes it takes.

When you connect bank accounts to any finance app, use multi-factor authentication and confirm the connection is read-only. A read-only link means the app can see transactions but can’t move money, which keeps your recovery tools from becoming a new point of risk. Small, avoidable leaks like ADHD-related impulse spending or forgotten renewals respond especially well to automated reminders, since they remove the reliance on remembering in the first place.

A 20-Minute Audit That Found Over $200

A quick review of two months of statements turned up three forgotten subscriptions, a duplicate streaming service, and an overdraft fee triggered by a subscription renewal that hit before payday. Canceling the duplicates and disputing the fee recovered just over $200 in about three weeks.

The one change that stuck afterward: a recurring calendar reminder every first Sunday of the month to scan for new charges. It takes less time than making coffee, and it’s caught two more forgotten trials since.

If you haven’t run this kind of check in the last few months, block 20 minutes this week. Most people are surprised by what they find.

— SaverStride

Let Vala Handle the Recovery Legwork for You

Vala turns the manual audit you just read about into something that runs in the background. Instead of scrolling through statements once a quarter, you get automatic subscription detection, recurring-payment tagging, and low-balance alerts that catch a problem before it becomes a fee.

Valapoint

Every feature in this guide maps to something built into the app: subscription discovery that flags charges under confusing merchant names, a Debt Payoff Calculator for prioritizing what to tackle first, and overdraft prediction that warns you days before a risky transaction hits. Couples and roommates get shared expense splitting on top of it, so joint recovery efforts don’t fall apart over who forgot to cancel what.

If you want to see where your own money is leaking, start with Vala’s free tier and connect your accounts through a secure, read-only link. Explore the full set of personal finance tools, including the budget and subscription calculators, to see exactly how much your forgotten charges are costing you this year.

Let Vala Handle the Recovery Legwork for You — overview diagram

Where to Go for Official Dispute Help

For unauthorized transactions and dispute timelines, start with the CFPB’s guidance on unauthorized transactions. For undelivered or unordered merchandise, the FTC’s billing guidance covers your rights directly, and ReportFraud.ftc.gov handles scam reporting.

Sources

Protect Your Money: Five Minute Security Checklist for Budgeting Apps

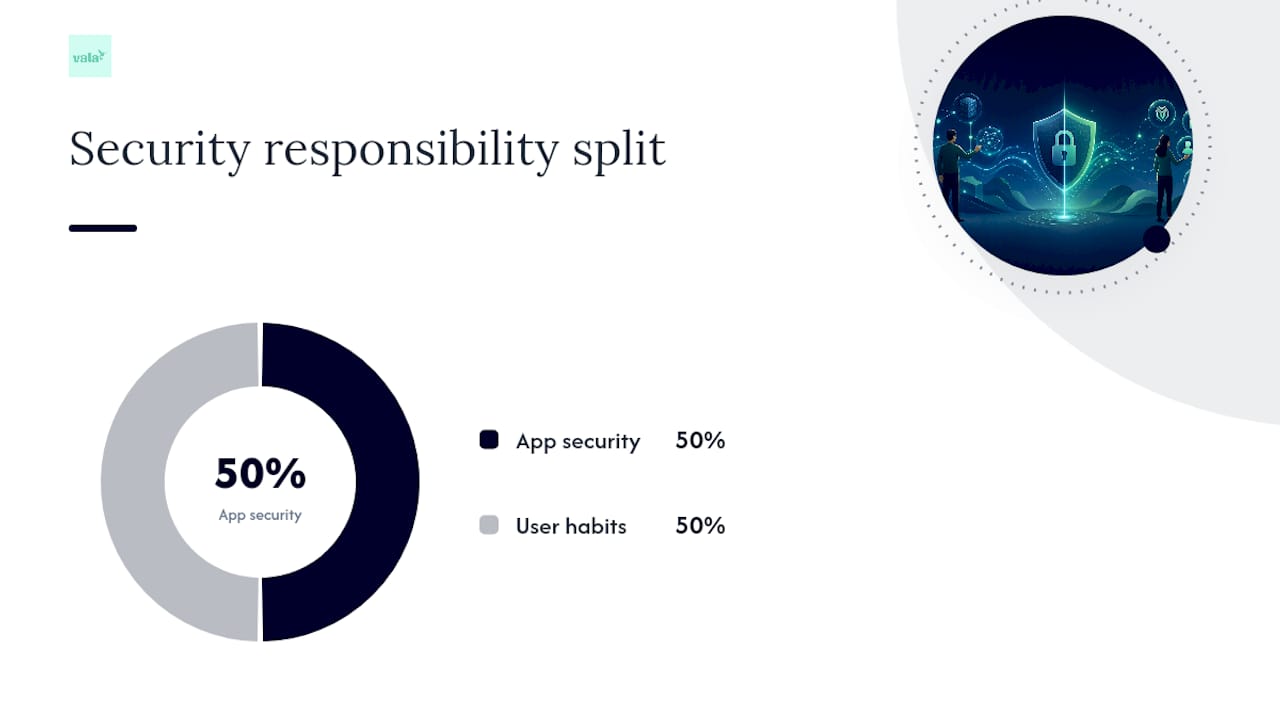
Yes, budgeting apps are generally safe when they use bank-level encryption, read-only access, and multi-factor authentication. No digital tool is completely risk-free, and your own habits, like password reuse or ignoring alerts, matter as much as the app’s design. The next section breaks down exactly how these apps connect to your bank in the first place.


TL;DR:

  • Modern API connections with tokenization are safer than screen-scraping, which stores encrypted login details and carries higher risk.
  • Security certifications like SOC 2 Type II and ISO 27001 indicate a company’s commitment to verified security controls and transparency.
  • The primary risks come from user lapses such as phishing, malware, or neglecting to regularly check accounts rather than app breaches.
  • Using strong, unique passwords, enabling biometric and multi-factor authentication, and revoking access when unused significantly reduce vulnerabilities.
  • Budgeting apps are most suitable for users who regularly monitor accounts and prefer consolidated visibility over manual tracking methods.

Table of Contents

How Budgeting Apps Actually Access Your Bank Data

Your budgeting app almost never talks to your bank directly. It connects through a third-party aggregator, and Plaid is the name you’ll see behind the scenes most often. These aggregators sit between your bank and the app, moving your transaction data through an encrypted pipeline.

There are two main ways this connection happens:

  • OAuth token flow (the modern, safer method): Your bank redirects you to its own login page, you authenticate there, and the aggregator receives a token instead of your password. The app never sees your actual credentials.
  • Screen-scraping with stored credentials (the older method): When a bank lacks a modern API, the aggregator may need to store your encrypted login details to keep pulling data. It’s more common than most users realize, and it’s a modestly higher-risk configuration than a token-based redirect.

“Read-only” is the term that should calm your nerves the most. It means the app can view your balances and transactions but can’t initiate a transfer, payment, or withdrawal. Most well-known budgeting apps stick strictly to this model, which is why reputable apps can’t move your money even if someone compromised your login.

What Actually Makes a Budgeting App Trustworthy

Security isn’t one feature. It’s a stack of overlapping safeguards, and you want to see several of them working together before you hand over your financial life.

Encryption comes first. TLS protects your data while it’s traveling between your phone and the app’s servers, and AES-256 (or an equivalent standard) protects it while it’s sitting in storage. Together, these two layers mean your data is scrambled at every point where it could be intercepted.

Authentication is your second line of defense. Look for:

  • App-based multi-factor authentication (not just SMS codes, which are easier to intercept)
  • Biometric login through your phone’s fingerprint or face recognition
  • Automatic session timeouts that log you out after inactivity

Organizational trust signals tell you the company backs up its claims. SOC 2 Type II certification means an independent auditor verified the company’s security controls over time, not just on paper; see examples of trusted security and certification pages to know what organizational trust signals look like. ISO 27001 and ISO 27701 cover information security and privacy management specifically. Aggregators like Plaid publish audit results and certifications on dedicated trust pages, and you should expect the same transparency from any app holding your data.

Pro Tip: A company willing to show you its certifications and audit history usually has nothing to hide. One that goes vague when you ask is a warning sign worth taking seriously.

Popularity cuts both ways here. Research on data collection patterns shows that larger apps tend to gather more data points on average than smaller ones, even when their security architecture is solid. Strong security and low data collection are different things, and you should evaluate both.

The Real Risks: Where Things Actually Go Wrong

Breaches at the vendor level get headlines, but they’re not the most common way people get hurt. The bigger risk usually starts with you, not the app.

  • Phishing and fake login pages trick you into typing your real bank credentials somewhere they shouldn’t go.
  • Malware or a stolen, unlocked phone exposes whatever your budgeting app has cached locally.
  • Aggregator transparency gaps have drawn real scrutiny. Plaid faced litigation over how clearly it disclosed its data practices, a reminder that even widely trusted infrastructure providers get challenged on disclosure.
  • Monitoring lapses cause more day-to-day damage than any of the above. Financial experts point out that the real risk usually comes from not checking your accounts regularly, which lets errors, duplicate charges, or overdrafts slide by unnoticed.

None of this means budgeting apps are dangerous. It means the risk profile looks different than most people expect: less “the app got hacked,” more “I didn’t notice something for three weeks.”

How to Vet a Budgeting App in Five Minutes

You don’t need a computer science degree to check whether an app deserves your bank login. Run through this before you connect anything:

  1. Open the privacy policy and search for “share” and “sell.” If the language is vague about third-party data sharing, that’s your answer.
  2. Look for security certifications. SOC 2 Type II, ISO 27001, or mention of independent penetration testing all signal the company invests in verified security, not just marketing copy.
  3. Ask how it connects to your bank. A modern API redirect with tokenization beats a screen-scraping setup that stores your credentials.
  4. Confirm two-factor authentication is available, and check that you can revoke the app’s access to your accounts whenever you want.
  5. Search recent reviews for complaints about unauthorized charges or data misuse, then email support directly and ask how they handle security. Their answer, or their silence, tells you plenty.

Pro Tip: Try asking a support team, “Do you use bank redirects or stored credentials?” Apps that answer clearly and quickly are usually the ones being straight with you about everything else, too. Comparing a few personal finance apps side by side before committing can make this checklist even easier to apply.

Everyday Habits That Keep Your Data Safe

The app’s security architecture only covers half the equation. The rest is on you.

  • Use a unique password for every financial app, ideally generated and stored in a password manager.
  • Turn on app-based multi-factor authentication, and enable biometric login on your phone if it’s available.
  • Skip public Wi-Fi for anything financial, or route through a trusted VPN if you have no choice.
  • Keep your apps and your phone’s operating system updated. Security patches close holes faster than most people realize.
  • Set up bank alerts for transactions over a set amount, and check your accounts weekly at minimum. This habit alone catches more problems than any app feature. Predicting a shortfall before it hits, like spotting an overdraft before payday, depends entirely on you actually looking.
  • Revoke access for any app you’ve stopped using. Old, forgotten connections are unnecessary exposure.

Pro Tip: Set a recurring monthly reminder to review which apps still have access to your bank accounts. Most people have two or three they forgot about entirely.

The FTC’s consumer guidance backs up nearly all of this: strong unique passwords, multi-factor authentication, and regular software updates remain the baseline defense against hackers and scammers, regardless of which app you’re using.

Everyday Habits That Keep Your Data Safe — overview diagram

What a Privacy-Minded Budgeting App Looks Like in Practice

Vala was built around the same principles this article just walked through. The app uses secure bank integration designed around encryption and access control, so your data moves through protected channels rather than sitting exposed.

Here’s how that translates to daily use:

  • Real-time tracking and spending insights run on read-only access, meaning Vala can surface where your money is leaking without ever touching your ability to move it.
  • Group and shared expense splitting keeps sensitive account details compartmentalized, even when multiple people are involved in a shared budget.
  • Automated bill reminders and subscription reviews reduce the monitoring burden that experts flag as a significant real-world risk.

Ask any app’s product team the same five questions from the vetting checklist above. Their answers will tell you more than their marketing page ever will.

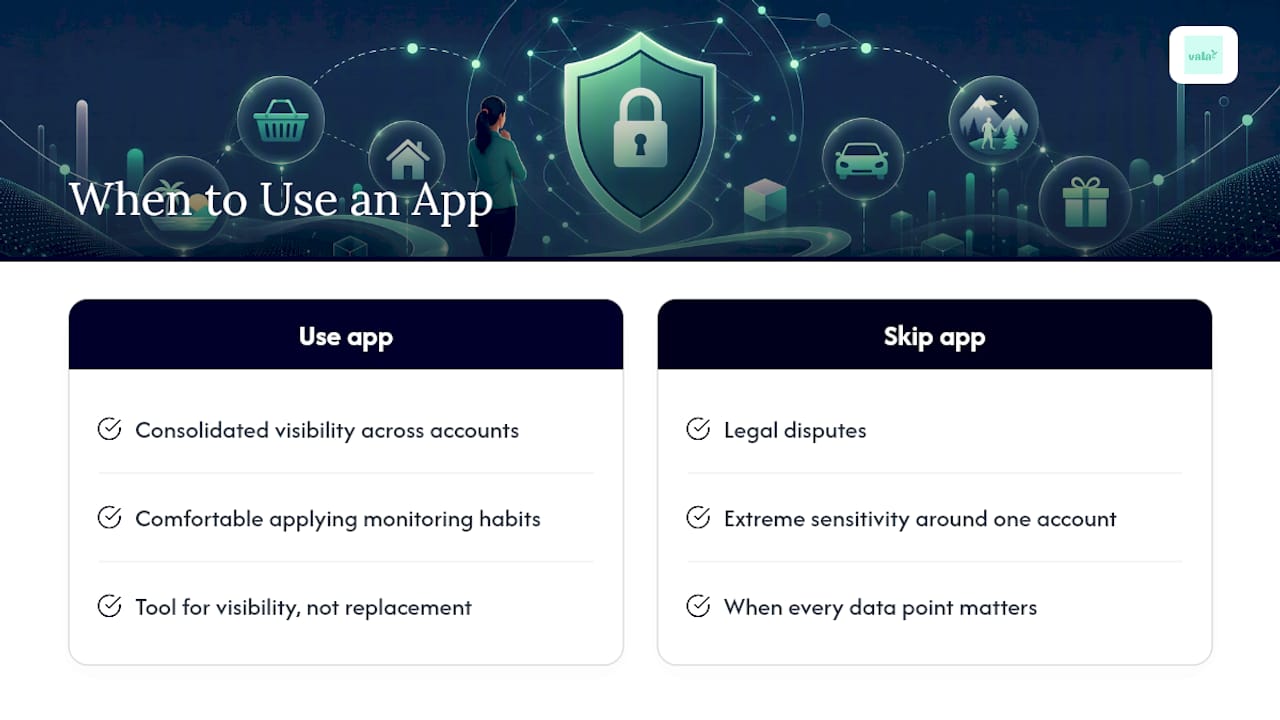
When an App Makes Sense, and When It Doesn’t

Use a budgeting app when you want consolidated visibility across accounts and you’re comfortable applying the monitoring habits above. Skip it, or lean on manual tracking and your bank’s native alerts, if you’re dealing with a legal dispute, extreme sensitivity around one account, or a situation where every data point matters. An app is a tool for visibility, not a replacement for paying attention.

When an App Makes Sense, and When It Doesn't — overview diagram

A Practical Next Step for Safer Budgeting

If everything above sounds like the bar you want an app to clear, Vala’s personal finance app was built with that exact bar in mind. It combines AI-driven spending insights with secure bank integration, so you get automated budget tracking, bill reminders, and subscription reviews without manually cross-checking every transaction yourself.

Valapoint

Where a lot of finance apps stop at showing you numbers, Vala goes further by flagging the hidden spending patterns and recurring charges that quietly drain your budget between paychecks. For couples and small groups, shared expense splitting keeps everyone’s contributions clear without a shared spreadsheet or an awkward group text. If you want to see how your own accounts look once someone else is watching for the leaks, start with a free analysis and connect your accounts to see what Vala finds.

Where to Read More

For official guidance, see the FTC’s data protection guide and USA TODAY’s app safety explainer.

Sources

Start With $25: Automate the 50/30/20 Budget to Make It Stick

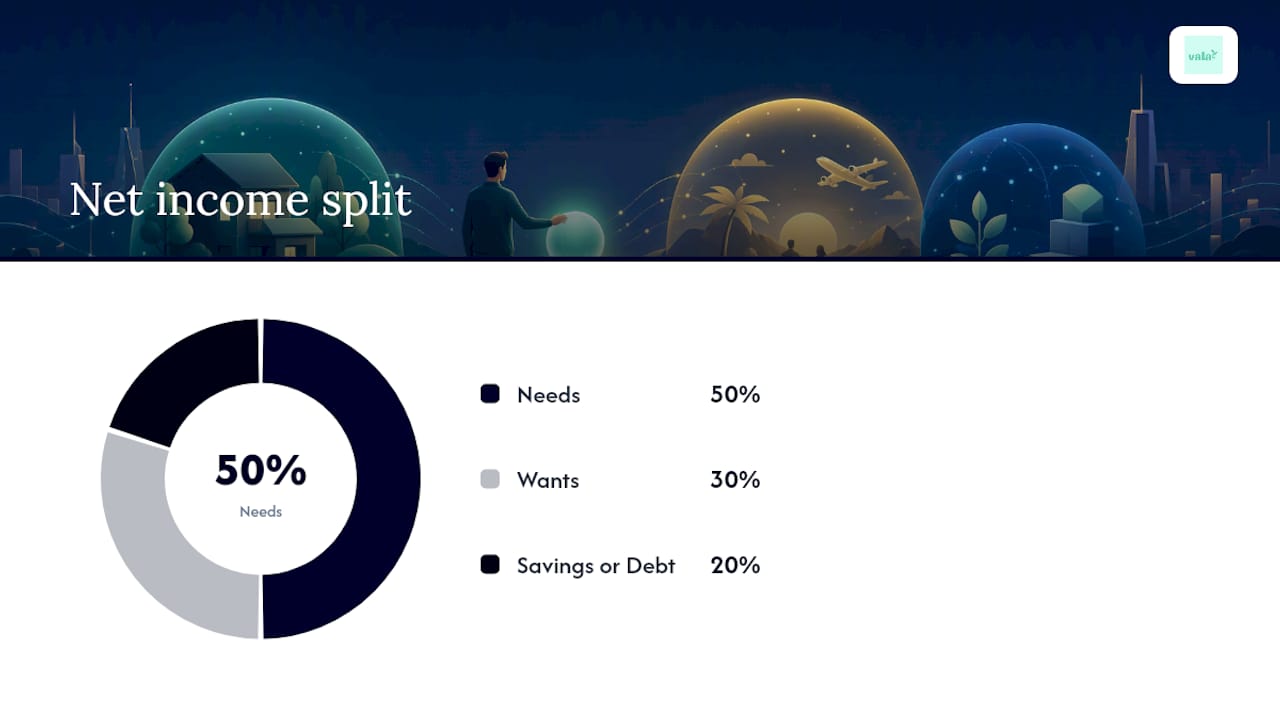
The 50/30/20 budget puts 50% of your after-tax income toward needs, 30% toward wants, and 20% toward savings and debt payoff. It works as a starting framework for most people, especially if you’ve never budgeted before. It only breaks down when your fixed essentials already eat past half your paycheck or your income swings month to month.


TL;DR:

  • The 50/30/20 rule requires accurate calculation of net income, including voluntary deductions like 401(k) contributions, for proper budgeting.
  • Automating transfers to savings and adjusting spending on wants are effective strategies to maintain the ideal budget split over time.
  • Expenses such as minimum debt payments and regular bills are needs, while discretionary spending like subscriptions and dining out are wants, with clear classifying rules.
  • The rule should be adjusted when fixed expenses surpass half of income or in cases of significant income fluctuation, using alternative ratios for better alignment.
  • Starting small with automatic transfers of $25 or less builds sustainable habits, and specialized apps can simplify tracking and automation for the 50/30/20 budget.

Table of Contents

What Is the 50/30/20 Budget and How Do You Calculate It?

Every version of the 50/30/20 rule starts with one number: your net income, not your salary. That’s your take-home pay after taxes, and according to Investopedia, it’s the base you split into three buckets: needs, wants, and savings or debt repayment.

50 30 20 budget category proportions

Here’s where most people trip up. If you contribute to a 401(k) or pay for health insurance through payroll, that money left your paycheck before it hit your bank account. For budgeting purposes, UNFCU recommends adding those voluntary deductions back into your income figure. Otherwise your targets look impossible, when really you’re just under counting cash you’re already directing toward savings.

To find your working number:

  1. Pull your last 1 to 3 months of pay stubs and bank statements.
  2. Add up your actual take-home deposits.
  3. Add back voluntary deductions like 401(k) contributions and health savings account transfers.
  4. That total is your net income for budgeting purposes.

Say your take-home pay is $3,400 a month, and you contribute $200 to a 401(k). Your working net income is $3,600. Your targets become $1,800 for needs, $1,080 for wants, and $720 for savings and debt, according to the math NerdWallet’s budget calculator uses.

How Do You Put the 50/30/20 Rule Into Practice?

Knowing the percentages is the easy part. Making your real spending match them takes a short, repeatable process.

  1. Track two months of real spending. Tag every transaction as a need, a want, or savings/debt. Don’t guess. Pull it from your bank and card statements.
  2. Tally each bucket. Add up your totals and compare them to your 50/30/20 targets. This is where most people find their gap.
  3. Cut or shift recurring costs. Streaming subscriptions, unused memberships, and forgotten trial charges usually live in the “wants” pile and are the fastest wins.
  4. Automate the split on payday. Set up an automatic transfer to savings the day your paycheck lands, schedule your bill payments, and let a “pay yourself first” rule handle the rest.

Here’s a quick calculator-style example you can copy by hand. Take your net income of $3,600. Multiply by 0.50 for needs ($1,800), 0.30 for wants ($1,080), and 0.20 for savings and debt ($720). If your actual spending on wants is $1,300, you know exactly where $220 needs to come from before the month starts, not after you’ve already spent it.

Pro Tip: Automate the smallest bucket first. It’s easier to build the habit of moving $50 to savings automatically than to overhaul your entire spending pattern in one week.

Needs vs. Wants: How Do You Classify Gray-Area Expenses?

Needs keep your life running. Wants make it more enjoyable but aren’t required to function. The split sounds simple until you hit an expense that could belong in either bucket.

  • Needs: rent or mortgage, groceries, utilities, minimum debt payments, insurance, transportation to work.
  • Wants: dining out, streaming services, new gadgets, upgraded phone plans, vacations, hobby gear.
  • Minimum debt payments count as needs because skipping them damages your credit and triggers fees.
  • Extra debt paydown beyond the minimum belongs in your savings and debt bucket, since it’s a choice, not an obligation.
  • Health care premiums and routine medical costs count as needs; elective procedures or premium gym memberships lean toward wants.
  • Annual or irregular expenses, like car registration or holiday gifts, should be divided by 12 and set aside monthly so they don’t blow up your budget in the month they hit.

The gray areas matter less than consistency. Pick a rule for each recurring expense once, and stick with it every month.

When Should You Adjust the 50/30/20 Split?

When Should You Adjust the 50/30/20 Split? — overview diagram

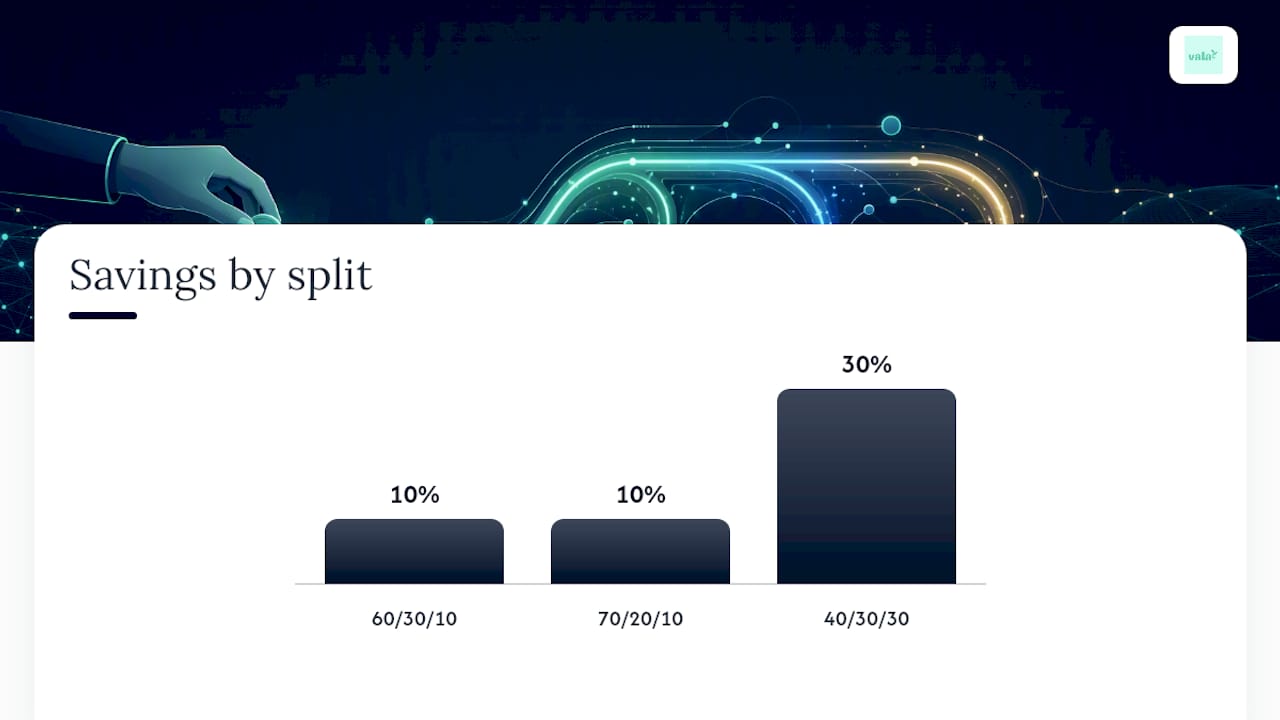
The 50/30/20 rule is a starting point, not a law. Forbes Advisor points out that it needs adjustment when your fixed essentials already exceed half your income, when you’re carrying heavy debt, or when your paychecks vary from month to month.

Common alternative splits include:

  • 60/30/10: for high cost of living areas where rent alone eats into the 50% needs bucket.
  • 70/20/10: for aggressive early debt payoff or months when essentials spike unexpectedly.
  • 40/30/30: for high earners who want to accelerate savings beyond the standard 20%.

Rather than guessing which split fits, run a short test. Pick an alternative ratio, apply it for one to two months, and check whether you hit your targets without constant stress. Adjust again if you didn’t.

What Tools and Automation Habits Make the Split Stick?

Automation removes the willpower problem entirely. Investopedia points to automatic transfers on payday as one of the most effective ways to keep a budget on track, because the decision only has to be made once instead of every single pay period.

A few tool categories worth setting up:

  • Bank paycheck-split rules, so a set percentage routes to savings before you ever see it.
  • Budgeting apps with auto-categorization, so needs, wants, and savings tally themselves instead of you doing it by hand each week.
  • Auto-transfer savings rules, tied to specific goals rather than one generic savings account.

To set this up, decide your transfer amount for each bucket, schedule it for payday, turn on category spending alerts, and set one small savings goal you can hit within 60 days. Vala, our own budgeting app, handles this exact workflow: it auto-categorizes transactions into needs, wants, and savings, then flags recurring charges you may have forgotten about.

Pro Tip: Set your savings transfer for the same day your paycheck lands, not the day after. A 24 hour delay is often enough time to spend the money on something else.

SaverStride’s Take: Start Smaller Than You Think

Most people try to fix their whole budget in one weekend and quit by week two. Skip that. Automate one small transfer, say $25 per payday, before you touch anything else. Cancel one forgotten subscription this week. Small, automatic wins build the habit that makes the 50/30/20 split actually last.

— SaverStride

How Vala Helps You Run the 50/30/20 Budget on Autopilot

There are personal finance apps that implement everything covered above by mapping your accounts to the three buckets automatically, so needs, wants, and savings show up as running totals instead of a spreadsheet you have to update yourself.

Valapoint

Here’s the workflow: connect your accounts, set your payday split (50/30/20 or your own adjusted ratio), let the app auto-categorize each transaction as it posts, and watch your savings goal progress update in real time. If you’re carrying subscriptions you forgot about, a recurring-charge review feature can usually surface them in the first week. Readers who want to start with the tracking side alone can explore the budget tracking app before turning on full automation. When you’re ready to set up the paycheck split and savings goals described above, the personal finance app is where that setup actually happens.

Where to Go for More on Budgeting

For the original breakdown and examples, see Investopedia. For a hands-on calculator, try NerdWallet. If you want a short-term spending reset, the No Spend Reset Challenge offers a structured behavioral program worth trying alongside your budget.

This article is general information, not a substitute for advice from a qualified financial advisor. Consult a qualified financial professional about your own circumstances before acting on anything here.

Sources

10 Minute Setup: 3 Ways to Import Bank Data Automatically in the U.S.

The fastest way to import bank transactions automatically is to link your bank through a built-in connector for ongoing syncing, or a third-party scheduled sync when your bank isn’t supported natively. File imports (CSV, OFX, QFX, or PDF) work best for backfilling old history or when a connector breaks. You’ll need your online banking login and possibly a multi-factor authentication step ready before you start. If your sync stalls later, the troubleshooting steps below will get you back on track.


TL;DR:

  • Bank connectors provide near-complete automation but depend on ongoing compatibility with your bank’s website and security updates.
  • Manual file imports, though less automatic, reliably handle past data and unsupported banks without risking synchronization failures.
  • Third-party scheduled sync tools enable multi-account aggregation with flexible scheduling but require extra setup for privacy-conscious users.
  • Reauthentication is the most common fix for stopped imports, often caused by password changes, MFA prompts, or bank platform updates.
  • Regular balance reconciliation and secure credential management are essential to maintain data accuracy and protect privacy in automated banking imports.

Table of Contents

What are the main ways to import bank transactions automatically?

You have three real options, and each one trades off automation against control.

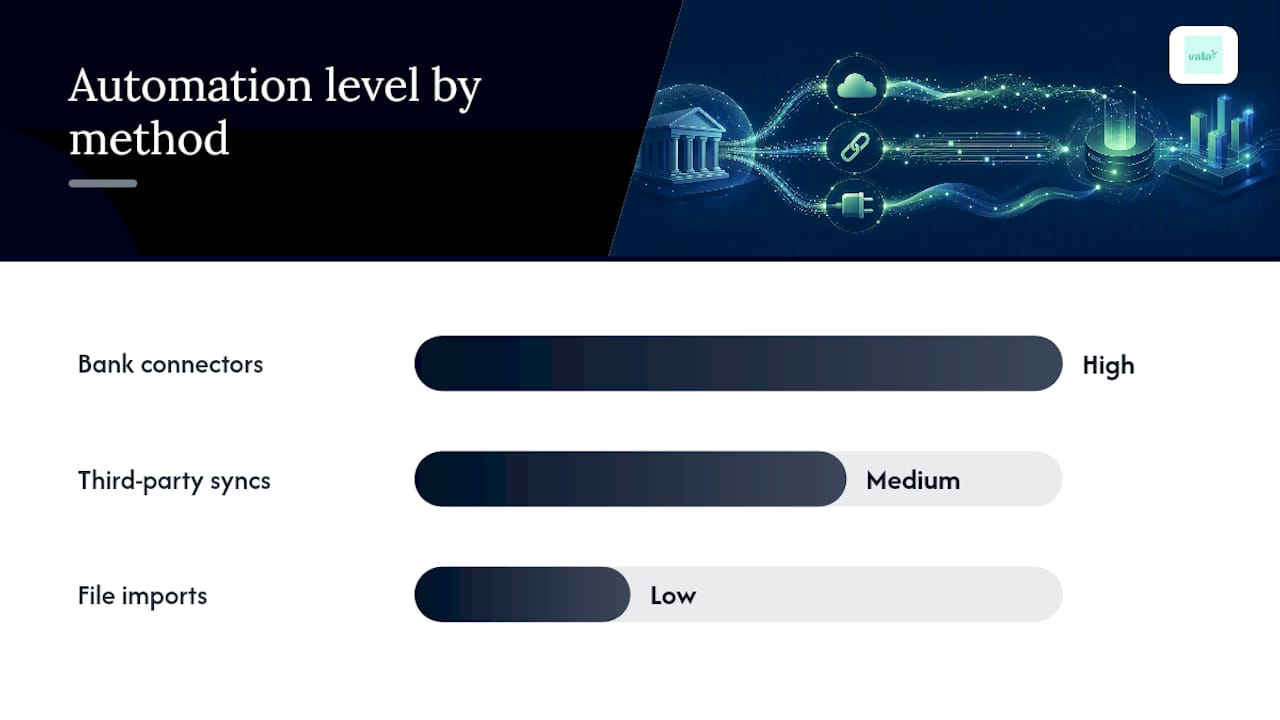
Three ways to import bank data automatically

Bank connectors link directly to your financial institution using your online banking credentials, then pull new transactions on a schedule without you touching anything again. This is the closest thing to true automation. The tradeoff is that you’re dependent on the connector staying compatible with your bank’s website, and any password or security change on the bank’s end can interrupt the flow.

File imports mean exporting a CSV, OFX, QFX, or PDF statement from your bank and uploading it yourself, or through a folder-watching script. They’re not automatic in the moment-to-moment sense, but they’re the most reliable fallback when a bank isn’t supported or a connector has failed.

Third-party scheduled syncs sit between the two. Tools built specifically for this job can pull transactions on a set cadence and push them into a spreadsheet or accounting system, even when your core software’s native connector can’t reach that bank.

  • Everyday tracking: use a connector for automatic, hands-off ingestion.
  • Unsupported banks or backfills: use file imports.
  • Extra scheduling control or multi-tool aggregation: use a third-party sync.

How do you set up an automatic bank connection?

Getting connected takes ten minutes if you have the right information ready.

Prerequisites to gather first:

  1. Your online banking username and password (never your card PIN).
  2. Access to your MFA method, since most banks now text or email a one-time code during setup.
  3. The account numbers or last four digits for each account you want to link, so you can match them correctly if you have several accounts at the same bank.
  4. A rough sense of how far back you need transaction history, in case the connector’s backfill doesn’t reach far enough.

Steps to connect:

  1. Choose “add account” or “link bank” in your finance app and search for your institution by name.
  2. Enter your credentials and complete any MFA prompt when asked.
  3. Select which specific accounts to import, since one login often covers checking, savings, and credit cards together.
  4. Confirm the account nicknames or numbers match what you see on your actual bank statement, so nothing gets mapped to the wrong account.
  5. Let the initial sync run. Connectors commonly backfill history in batches, and how far back that history reaches varies by bank and provider, sometimes taking longer than a single session for a full pull.

Once transactions land, spot-check a handful against your actual bank statement, categorize anything left uncategorized, and set a low-balance or large-transaction alert if your app supports one.

Pro Tip: Do your first sync a day before you actually need clean numbers. That gives the backfill time to finish and gives you a chance to fix any mapping issues before you rely on the data for a budget decision.

How do you import transactions from CSV, OFX, QFX, or PDF files?

File imports are the manual fallback that never breaks, as long as you follow a few rules.

Most software expects four columns at minimum: date, description, amount, and an account identifier. OFX and QFX files carry this structure automatically since they’re built for financial data. CSV files need you to check the columns yourself, and PDFs almost always require a parsing step or manual reentry since they’re built for reading, not importing.

  1. Log into your bank’s website and export the statement in whichever format your software prefers, usually CSV or OFX.
  2. Open the file and check that dates and amounts follow a consistent format. A date read as month/day in one file and day/month in another is a common source of scrambled records.
  3. Upload the file into your software and use its field-mapping screen to match each column to date, description, amount, and account, previewing the results before you confirm.
  4. Pick a date range that does not overlap with transactions you’ve already imported. CSV imports generally do not deduplicate on their own, so overlapping ranges create duplicate entries you’ll have to clean up by hand.

For recurring file imports, some small businesses set up an SFTP folder or a scheduled script that watches a download folder and imports new files automatically, which removes the manual upload step while keeping the reliability of file-based data.

Can third-party connectors and self-hosted tools automate more?

Yes, and they solve two different problems: convenience for aggregating multiple banks, and privacy for people who don’t want their credentials sitting with a third party.

Dedicated sync tools built for spreadsheets or budgeting apps typically offer:

  • Scheduled runs on an hourly or daily cadence rather than only on app launch.
  • Field mapping so transaction data lands in the right spreadsheet columns automatically.
  • Multi-account aggregation, pulling several banks into one destination at once.

BankSync’s own documentation describes exactly this pattern: scheduled feeds with configurable field mapping that push data into a spreadsheet on a recurring basis.

If privacy matters more than convenience, self-hosted or command-line tools are worth a look. Open-source projects can run imports through a script or cron job so your bank data never leaves your own machine, which some privacy-conscious users prefer over a hosted service holding their credentials. The tradeoff is setup effort. You’re managing the automation yourself instead of clicking “connect.”

Pro Tip: If you’re aggregating five or more accounts, watch for transaction caps or rate limits on free connector tiers. Hitting one mid-sync is a common reason imports appear to “stop” without any error message.

Why do automatic bank imports stop working, and how do you fix it?

Interrupted syncs are almost always one of four things: a changed password, a new MFA prompt, a change on the bank’s side, or a temporary outage at the connector.

Common causes:

  • You changed your online banking password and the connector’s stored credentials are now stale.
  • Your bank added a new MFA or security question step that the connector can’t answer automatically.
  • The bank redesigned its login page or moved to a new banking platform, breaking the connector’s access.
  • The connector service itself is having an outage, unrelated to your account.

Quick fixes, in order:

  1. Reauthenticate the connection with your current password and complete any MFA step it asks for.
  2. Check the app’s import log or connection status page. Most flag a specific account as “needs attention” rather than failing silently.
  3. If the account reconnects but is missing days of history, re-run a backfill or manually upload a CSV to cover the gap.
  4. Watch for duplicates after restoring a connection. Because reconnections sometimes re-pull a few days of overlapping data, reconcile that window against your account before trusting the totals.

Documentation from major platforms confirms this is expected behavior, not a bug: credential or security changes pause imports until you reauthenticate, by design, to protect your account.

If reauthentication doesn’t resolve it after two attempts, that’s your signal to pull the connection logs and contact support rather than keep retrying blind.

How do you keep imported bank data private and accurate?

Automation only helps if you trust the data it produces, so a few habits matter more than any single tool choice.

  • Favor connectors that use tokenized, read-only access rather than ones that store your raw password, and understand how often they’ll ask you to reauthenticate.
  • If you’re moving files manually, use a secure transfer method like SFTP and delete exported statements from your downloads folder once the import completes.
  • Reconcile imported balances against your actual bank statement on a regular schedule, not just after setup.
  • Rotate credentials periodically, especially after any breach notice from your bank, and re-link connectors afterward.

Pro Tip: Set a recurring 10-minute reconciliation check once a month. It’s the single habit that catches duplicate transactions and mapping errors before they distort a budget.

Why automating transaction imports matters for individuals and small businesses

Automating imports gives you back hours you’d otherwise spend on manual entry, and it gives you a clearer, real-time read on cash flow than a monthly bank statement ever could. The catch is that automation without regular reconciliation can quietly drift, especially after a large backfill or a reconnection that repeated a few days of data. Set it up, then check it.

— SaverStride

Get your imported transactions working for you, not just sitting in a list

A synced feed of transactions is only useful if something turns it into a clear picture of where your money actually goes. That’s a gap some personal finance apps address. Instead of leaving you to sort a raw import yourself, Some apps automatically categorize transactions, flag recurring subscriptions, and surface spending patterns to help users analyze their spending.

Valapoint

Some apps handle the math automatically for couples or small groups splitting shared costs, eliminating the need for separate spreadsheets. If you already use a spreadsheet-based sync or a connector for backfills, Vala’s secure bank integration is built to pick up right where that leaves off, turning imported data into an actual budget instead of a longer list. Try the personal finance app and see your categorized transactions the first time your accounts sync.

Sources

5 Practical Ways to Split Expenses Unevenly Without Starting a Fight

Split uneven costs proportionally by what each person ordered or used, and lean on income- or room-value weighting for recurring bills like rent. Calculators and apps handle the tax, tip, and settlement math automatically, which removes most of the friction. If you want that automation built into a tool you already use for budgeting, Vala is a solid default.


TL;DR:

  • Proportional-by-amount splits are ideal for restaurant bills and event costs, where each person pays based on their actual order or usage.
  • Income-based splits work best for long-term household expenses like rent, requiring regular recalibration to reflect income changes.
  • Digital tools such as Vala automate uneven calculations, apply tax and tip, and easily settle payments, reducing errors and manual effort.
  • Netting following expense calculations minimizes the number of individual transactions, simplifying settling up among multiple people.
  • Clear, written agreements on tracking, review frequency, and payment consequences help prevent conflicts over uneven expense sharing.

Table of Contents

Which Split Method Fits Your Situation?

Five practical methods cover almost every shared-expense situation you’ll run into.

  • Equal split: divide the total by headcount. Use it when everyone ordered or used roughly the same amount, like a coffee run. Fast, but unfair the moment orders vary.
  • Proportional-by-amount: each person pays for exactly what they ordered or consumed. Best for restaurant bills, event tickets, or anything with a clear per-person cost. Requires a bit more tracking.
  • Income-based: each person contributes a share proportional to their income. Works well for couples or long-term roommates with different earnings. Needs trust and occasional recalibration.
  • Usage-based: costs split by how much someone actually used a shared resource, like utilities tied to room size or data usage on a family phone plan. Fair, but only if usage is easy to measure.
  • Hybrid/custom: a blend, such as room-value weighting plus a small income adjustment for rent. Takes more setup but tends to feel fairest for the people involved.

Proportional splits work best for one-off events; income-based splits tend to dominate recurring household costs, according to guides that track how groups actually settle bills.

How Do You Calculate an Uneven Split Step by Step?

For a restaurant bill, follow this sequence:

  1. List each person’s subtotal before tax and tip.
  2. Add up the full pretax total.
  3. Divide each person’s subtotal by the total to get their percentage share.
  4. Apply that percentage to the tax and tip, so each diner covers their proportional slice rather than splitting those extras evenly.
  5. Add each person’s item cost plus their share of tax and tip for their final total.

For income-proportional splits (rent, subscriptions, joint bills):

  1. Add both incomes together.
  2. Divide each person’s income by the combined total to get their percentage.
  3. Multiply that percentage by the total bill.

Statistic Callout: A widely cited restaurant field experiment found that diners order significantly more food when they know the bill will be split evenly, compared to when they know they’ll pay for exactly what they order. Proportional splitting isn’t just fairer on paper. It changes behavior before the check even arrives.

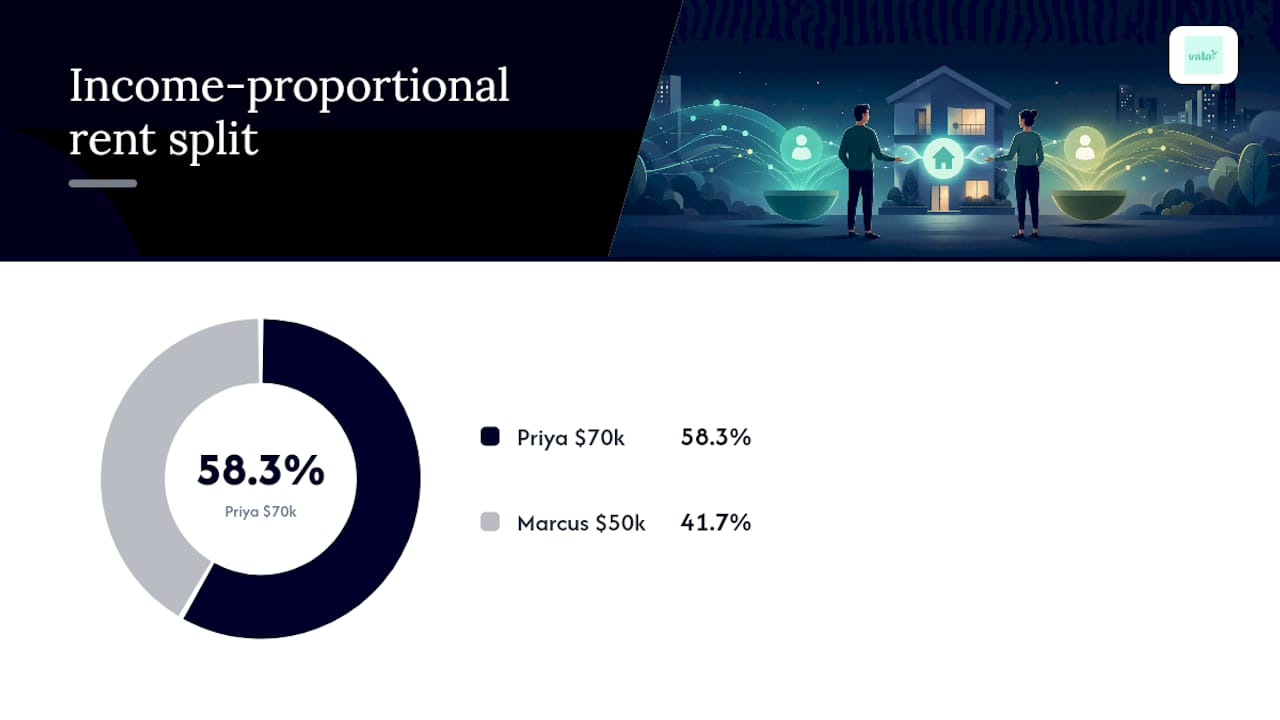
Say Priya earns $70,000 and Marcus earns $50,000. Combined income is $120,000. On a $1,000 rent bill, Priya pays $580 and Marcus pays $420.

Income proportional split of rent bill

What Tools Actually Handle Uneven Splits Well?

Three categories of tools exist, and they’re not interchangeable.

  • One-off calculators: fine for a single dinner or trip. No memory, no history, no pattern tracking.
  • Group-expense apps: built specifically for splitting, often with itemized “plates” for restaurant bills and settlement links to pay instantly.
  • Personal finance apps with shared-ledger features: track ongoing shared costs alongside your budget, so recurring uneven splits (rent, subscriptions, groceries) don’t require a separate app every month.

When comparing options, check for itemized plate support, proportional tax and tip handling, receipt scanning, and direct settlement links that minimize the number of transfers needed to close out a balance. For anything recurring, an integrated app that already sees your budget and spending patterns beats a standalone calculator you have to remember to open every time.

How Do You Settle Up Without Ten Venmo Requests?

Settling up gets messy fast when four people all owe each other different amounts. The fix is netting: calculate each person’s overall balance first, then have only the people who owe money pay the people who are owed, skipping the in-between transfers entirely.

  • Sum every expense and every payment made per person to get one net number for each participant.
  • Have the person with the largest deficit pay the person with the largest surplus first, then work down the list.
  • Use instant P2P transfers for one-time events and scheduled pulls from a shared account for recurring bills like rent.
  • For a missed payment, set a short grace window (48 to 72 hours) before flagging it, rather than letting it quietly become someone else’s problem.

This O(n) settlement-netting approach can shrink a tangle of six or seven payments down to two or three.

How Do You Propose an Uneven Split Without Starting a Fight?

Before you finalize anything, agree on three things: who tracks the numbers, how often you’ll review the arrangement, and what happens if someone can’t pay their share on time. Guides on fair bill splitting consistently recommend revisiting the agreement whenever income or household composition changes, not just once a year on autopilot.

Pro Tip: Write the agreement down, even if it’s just a shared note. “He said, she said” is where most roommate and couple money fights actually start.

Real Examples You Can Copy This Week

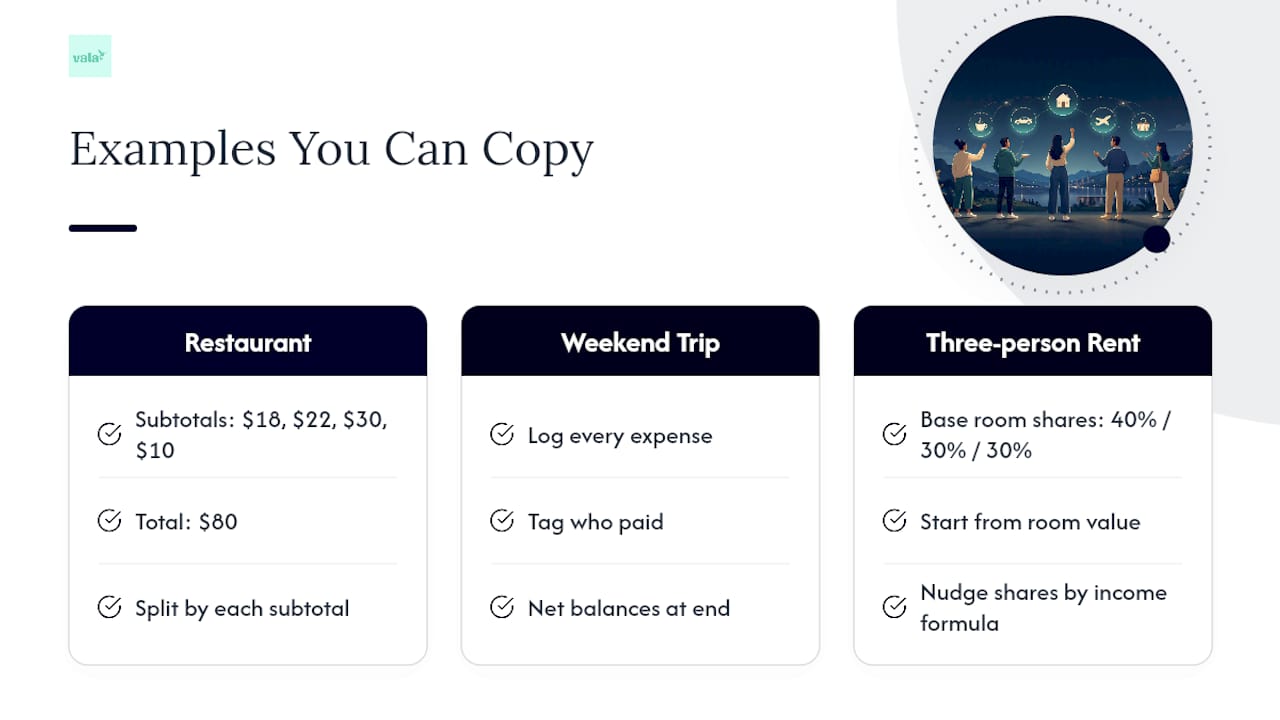
Restaurant with four friends: subtotals are $18, $22, $30, and $10 ($80 total).

Weekend trip with three people: log every expense the moment it happens, tag who paid, and assign participants to each cost (not everyone joins every meal). At the end, net the balances instead of settling each expense individually.

Three-person rent split: combine room value and income. If Room A is worth 40% of the unit’s value and Room B and C are each worth 30%, start there, then nudge each share up or down slightly based on income differences using the income-proportional formula.

Real Examples You Can Copy This Week — overview diagram

How I Actually Use These Methods

I split a lake house week with five people using a hybrid: proportional-by-amount for groceries and restaurant runs, straight equal split for the shared cabin rental. It cut arguments to almost zero because nobody had to negotiate every transaction.

The lesson: keep the rules simple enough that you can explain them in one sentence. Complicated fairness formulas fall apart the moment someone’s tired or distracted. Vala’s roommate splitting guide has templates if you want a starting point instead of building one from scratch.

— SaverStride

Let Vala Handle the Uneven Math for You

Vala is built for exactly the situations covered here: uneven restaurant bills, income-weighted rent, and shared trip costs that don’t split evenly by headcount. It calculates proportional shares automatically, applies tax and tip based on what each person actually ordered, and generates settlement links so nobody has to do mental math at the table.

Valapoint

Beyond one-off splits, Vala tracks recurring shared costs inside your regular budget, so income-based rent shares or hybrid roommate arrangements update automatically instead of requiring a fresh calculation every month. That’s the real advantage over a standalone calculator: Vala already knows your spending patterns, so uneven splits stay accurate as incomes or living situations change.

If you’re managing shared costs with a partner, roommates, or a travel group, try the split bills app with your group this week and see how much time it saves at settlement.

Practical Resources and Calculators

Sources

Maximize Your Money: Top Personal Finance Apps

So, you want to get a better handle on your money, huh? That’s a smart move. In today’s world, there are some really handy tools out there – personal finance apps – that can make managing your cash a whole lot easier. Think of them as your digital sidekick for everything from tracking spending to planning for the future. The best ones will give you a clear picture of where your money is going, help you spot opportunities to save, and even nudge you towards your financial goals.

Understanding What a Personal Finance App Does

Before we dive into specific apps, let’s just quickly nail down what these things are all about. At their core, personal finance apps are designed to help you understand and control your money. They do this by:

  • Connecting to your accounts: This is the big one. Most apps will securely link to your bank accounts, credit cards, and even investment portfolios. This pulls in all your transactions automatically, saving you the headache of manual entry.
  • Tracking your spending: Once your transactions are in the app, they’re usually categorized. So, you can see exactly how much you’re spending on groceries, entertainment, bills, and so on.
  • Budgeting: Many apps allow you to set spending limits for different categories. They’ll then alert you as you get close to or exceed your budget.
  • Setting financial goals: Whether it’s saving for a down payment, paying off debt, or building an emergency fund, these apps can help you track your progress towards these milestones.
  • Providing insights: Beyond just showing you numbers, good apps offer analysis and summaries of your financial habits, pointing out trends or areas where you could improve.
  • Bill management: Some can remind you of upcoming bills and even facilitate payments, helping you avoid late fees.

Essentially, they aim to bring order to the often-messy world of personal finances, making it less daunting and more actionable.

This is where most people start, and it’s arguably the most crucial aspect of personal finance. Knowing where your money is actually going is the first step to making any meaningful changes.

Deeper Dives into Spending Tracking

Most apps will automatically categorize your transactions, but the real power comes from how you interact with this data.

Automatic Categorization and Its Nuances

When you link your accounts, the app uses algorithms to guess what each transaction is for. For example, a purchase from “Safeway” will likely be categorized as “Groceries.” However, these algorithms aren’t perfect.

  • Review and refine: It’s important to regularly check these categorizations. You might find a coffee shop purchase miscategorized as “Business Expenses” or a returned item still showing as a purchase. Most apps allow you to easily reassign categories or create custom ones.
  • The power of custom categories: Need to track your “Dog Walking” or “Subscription Boxes” separately? Many apps let you create these niche categories. This gives you a much more granular view of your spending habits, which can be eye-opening. For instance, you might realize you’re spending more on streaming services than you thought.
  • Merchant recognition: Some apps are better than others at recognizing specific merchants. This can lead to more accurate categorization over time as the app “learns” from your corrections.

Visualizing Your Financial Landscape

Numbers on a screen are one thing, but charts and graphs make the information much more digestible.

  • Pie charts and bar graphs: These are standard for showing spending breakdown. Seeing your biggest spending areas visually can be a strong motivator for change.
  • Trend analysis: Good apps will show you how your spending in certain categories changes over weeks, months, or even years. Are you consistently spending more on dining out than last year? This historical data is invaluable for long-term planning.
  • Net worth tracking: This involves linking all your assets (savings accounts, investments, property value) and liabilities (mortgages, loans, credit card debt). The app then calculates your net worth, which is a key indicator of your financial health. Seeing this number grow over time can be incredibly motivating.

Budgeting Made Smarter, Not Harder

Budgeting often gets a bad rap. Many people associate it with deprivation and strict limitations. But a good personal finance app can transform budgeting from a chore into a strategic tool.

Different Approaches to Budgeting within Apps

Not all budgeting methods are created equal, and thankfully, apps cater to a variety of preferences.

The Zero-Based Budget Approach

This method involves assigning every single dollar of your income a job. Income minus expenses (including savings and debt payments) should equal zero.

  • How apps facilitate it: Apps that support zero-based budgeting often have a dedicated section where you allocate your income to specific spending categories. They’ll then track your spending against these allocations.
  • Benefits: It forces you to be intentional with your money and can help you identify areas where you might be overspending without realizing it.

The Envelope System (Digital Edition)

This is a more traditional method where you allocate a certain amount of cash to different spending categories (like “Groceries,” “Entertainment”). Once the money in an envelope is gone, you stop spending in that category.

  • App implementation: Many apps allow you to set up virtual “envelopes” with specific dollar amounts. As you spend, the app deducts from the relevant envelope. You’ll get alerts when an envelope is running low or depleted.
  • Psychological impact: This can be very effective for controlling impulsive spending, as you have a clear visual of your remaining budget for a category.

The 50/30/20 Rule

This popular guideline suggests allocating 50% of your after-tax income to Needs, 30% to Wants, and 20% to Savings and Debt Repayment.

  • App support: Many apps have built-in tools that allow you to track your spending against these broader categories. You can see at a glance if you’re sticking to the recommended percentages.
  • Flexibility: This is a more flexible approach than zero-based budgeting, making it easier to adopt for many people.

Rollover Budgeting

Some apps allow you to “rollover” any unspent money from one budget period to the next for a specific category.

  • Example: If you budget $300 for groceries and only spend $250, the remaining $50 can be added to next month’s grocery budget, giving you $350.
  • Encourages saving: This can be a great way to build up a buffer for categories where spending can fluctuate, or to encourage saving for larger purchases.

Beyond the Basics: Advanced Features and Tools

personal finance app

Once you’ve got a handle on tracking and budgeting, these apps often offer more sophisticated features to help you optimize your financial life.

Investment Tracking and Management

For those who have investments, being able to see them alongside your everyday finances is a significant advantage.

Portfolio Overview

  • Consolidated view: Most investment-tracking apps can connect to your brokerage accounts (e.g., Fidelity, Vanguard, Robinhood) to provide a single dashboard of all your holdings.
  • Performance metrics: You can see your overall portfolio performance, individual stock or fund performance, and asset allocation. This helps you understand how your investments are performing relative to your goals.
  • Real-time updates: Many will provide near real-time updates on market values, so you can see the impact of market fluctuations on your net worth.

Asset Allocation and Diversification

  • Visualizing your spread: Apps can show you how your investments are spread across different asset classes (stocks, bonds, real estate, etc.).
  • Risk assessment: Understanding your asset allocation is crucial for managing investment risk. Some apps even offer tools to assess if your current allocation aligns with your risk tolerance.
  • Rebalancing nudges: Over time, your asset allocation can drift as certain investments outperform others. Some apps can alert you when your portfolio is out of balance and suggest rebalancing actions.

Dividend Tracking and Tax Implications

  • Income monitoring: For dividend-paying investments, apps can help you track the income you receive.
  • Tax considerations: While not usually providing direct tax advice, some apps can help you understand the tax implications of your investment activities, such as capital gains.

Debt Management and Payoff Strategies

Debt can be a major hurdle for financial freedom. Apps that help you tackle it effectively are invaluable.

Snowball vs. Avalanche Method

These are two popular debt payoff strategies.

  • Snowball method: You pay off your smallest debts first, regardless of interest rate, while making minimum payments on others. The psychological wins of quickly eliminating debts can be highly motivating.
  • Avalanche method: You prioritize paying off the debt with the highest interest rate first, while making minimum payments on others. This method saves you the most money on interest over time.
  • App support: Many debt management apps allow you to input all your debts and then choose which payoff method you want to follow. They’ll then create a personalized payoff plan and track your progress.

Interest Savings Calculators

  • Visualizing the savings: Some apps offer calculators that show you how much interest you’ll save by paying extra on your debts or by using a specific payoff strategy. Seeing these numbers can be a powerful motivator.
  • Loan consolidation impact: If you’re considering consolidating your debts, these calculators can help you assess the potential savings.

Goal Setting and Progress Tracking

Financial goals aren’t just vague wishes; they’re concrete targets that require a plan.

SMART Goal Integration

Many apps encourage or even require you to set SMART goals (Specific, Measurable, Achievable, Relevant, Time-bound).

  • Breaking down large goals: A goal like “Save for a house” is too broad. An app might prompt you to define it as “Save $50,000 for a down payment on a house in the next 5 years.”
  • Visual progress bars: Seeing a progress bar fill up as you contribute to your goals is incredibly motivating.

Automated Savings

  • Round-ups: Some apps automatically round up your purchases to the nearest dollar and transfer the difference into a savings account or towards a specific goal.
  • Scheduled transfers: You can set up automatic weekly or monthly transfers from your checking to your savings or investment accounts. This “set it and forget it” approach ensures consistent progress.

Security and Privacy: Your Money’s Digital Fortress

Photo personal finance app

When you’re entrusting an app with access to your financial information, security is paramount.

Encryption and Authentication

This is the bedrock of financial app security.

  • Data encryption: All data transferred between your device and the app’s servers, and the data stored on those servers, should be encrypted. This means it’s scrambled and unreadable to unauthorized parties. Look for industry-standard encryption like AES-256.
  • Multi-factor authentication (MFA): Beyond just a password, MFA adds extra layers of security. This could be a code sent to your phone, a fingerprint scan, or a security token. It significantly reduces the risk of unauthorized access if your password is compromised.

Read-Only Access

Most reputable personal finance apps utilize read-only access to your bank accounts.

  • What this means: They can view your transaction history, balances, and account details, but they cannot initiate transfers, make payments, or change any of your account settings. This is a crucial security feature.
  • Why it matters: It prevents the app from accidentally or maliciously draining your accounts.

Regular Audits and Compliance

  • Third-party audits: Many financial institutions and app developers undergo regular security audits by independent third parties to ensure their systems meet rigorous security standards.
  • Regulatory compliance: Apps operating in the financial sector often need to comply with various regulations (e.g., GDPR in Europe, CCPA in California) that dictate how user data is handled and protected.

User Responsibility in Security

While apps have robust security measures, users also play a role.

  • Strong, unique passwords: Don’t reuse passwords across different services. Use a password manager to help you create and store strong, unique passwords for all your accounts.
  • Phishing awareness: Be wary of unsolicited emails or messages asking for your login credentials or personal information. Legitimate financial institutions will rarely ask for this information via email.
  • Keep software updated: Ensure your phone’s operating system and the finance app itself are always updated. Updates often include critical security patches.

Choosing the Right App for You

Metrics Value
Number of Downloads 5 million
User Retention Rate 70%
Monthly Active Users 500,000
App Store Rating 4.5/5

With so many options out there, picking the best personal finance app can feel a bit overwhelming. It’s not a one-size-fits-all situation.

Assessing Your Personal Needs

The most important factor is what you want the app to do for you.

Beginner vs. Advanced User

  • For beginners: If you’re just starting out and primarily want to understand where your money goes, a simple, user-friendly app with good auto-categorization and basic budgeting features is ideal. Overly complex apps might just confuse you.
  • For advanced users: If you’re already comfortable with budgeting and want to manage investments, track net worth precisely, or optimize debt repayment, you’ll look for apps with more robust features in these areas.

Specific Financial Goals

  • Debt repayment focus: If paying off debt is your absolute priority, look for apps that excel at debt management strategies, payoff calculators, and progress tracking.
  • Investment growth focus: If you’re focused on growing your wealth through investments, prioritize apps with strong investment tracking, portfolio analysis, and potentially even robo-advisor integrations.
  • General budgeting and saving: If your main goal is simply to get a clearer picture of your spending and save more consistently, a well-rounded budgeting app will be your best bet.

Key Features to Look For

Beyond the core functionalities, consider these extras:

Ease of Use and Interface

  • Intuitive navigation: Can you find what you’re looking for easily? Is the layout clean and uncluttered? A clunky interface will make you less likely to use the app regularly.
  • Customization options: Can you tailor the app to your specific needs, like creating custom categories or setting personalized alerts?

Account Integration Capabilities

  • Supported institutions: Does the app connect with all your banks, credit cards, and investment accounts? Check their list of supported financial institutions.
  • Reliability of connection: Are there frequent connection issues? Reviews can often shed light on this.

Cost and Value Proposition

  • Free vs. Paid: Many excellent personal finance apps offer a free version with core features. Paid versions (often called “premium” or “pro”) usually unlock advanced features like investment tracking, custom reports, or priority support.
  • Subscription models: Understand the pricing structure. Is it a monthly or annual subscription? Does the value of the paid features justify the cost for your needs?

Customer Support and Community

  • Help resources: Is there a comprehensive help center, FAQs, or tutorials available?
  • Customer service responsiveness: If you encounter an issue, how easy is it to get help? Some apps offer chat support or email support.
  • User reviews and forums: What are other users saying about the app? Online communities and app store reviews can provide candid feedback.

By considering these aspects, you can move from a general search to identifying a few apps that genuinely fit your financial life and help you maximize your money.

Avoid Late Fees: Set Autopay 3–5 Days Early, U.S. Playbook

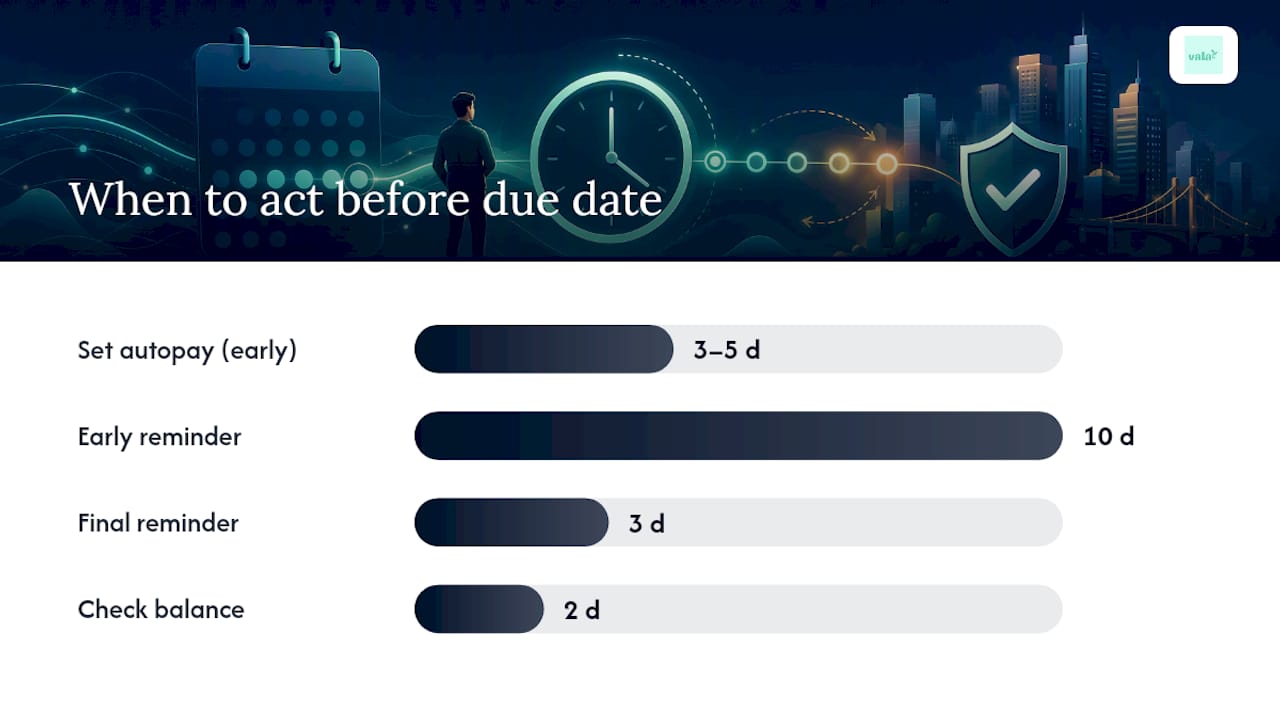
Set autopay for at least the minimum payment and schedule it 3 to 5 days before your due date. This one step eliminates most late-fee risk by covering delays in payment processing. If a payment does slip past due, pay it immediately and call your issuer before you hit 30 days late to request a waiver and protect your credit report.


TL;DR:

  • Setting autopay at least three to five days before the due date and choosing statement balance payment minimizes late fee risks from processing delays.
  • Confirm your account balances two days before autopay and maintain backup payment methods to prevent missed payments due to cash-flow issues.
  • Aligning your due date after your payday reduces cash-flow problems, and using consistent autopay and reminder routines makes late payments less likely.
  • Payments made through direct issuer portals are faster and more reliable than mailed checks or bank bill pay, decreasing accidental late postings.
  • If you miss a payment, paying immediately and requesting a goodwill waiver can help prevent credit report damage, especially if caught before 30 days late.

Table of Contents

What Causes a Late Fee, and Why Does Timing Matter?

A late fee is a charge your card issuer adds when your payment arrives after the due date on your statement. Fees vary by issuer, but federal rules cap them so they can never exceed your minimum payment amount for that billing cycle. Most issuers also build in a grace period, meaning you owe no interest on new purchases if you pay your full balance by the due date each cycle.

Timing trips people up more than forgetfulness does. The Consumer Financial Protection Bureau notes that payments received by 5 p.m. on the due date, in the time zone printed on your statement, generally count as on time. But that clock is stricter than it looks. Payments made through bank bill pay or mailed checks often take 1 to 3 business days to clear, so a payment submitted the morning of the due date can still post late.

The bigger risk sits at the 30-day mark. Issuers typically don’t report a late payment to credit bureaus until it’s 30 days past due, and that kind of mark can sit on your credit report for up to seven years. A few days late costs you a fee. Thirty days late can cost you years of credit score recovery.

Your Step-by-Step Plan to Prevent Late Fees

Here’s the sequence that actually works, in the order you should tackle it.

1. Turn on autopay and schedule it early.
Set autopay through your card issuer’s portal, not a third-party bill-pay service, and choose a payment date 3 to 5 days before your actual due date. That buffer absorbs processing delays without you having to think about it again. Most issuers let you pick from a few autopay amounts:

  • Minimum payment due: protects you from late fees but leaves interest accruing on the remaining balance.
  • Statement balance: pays off everything you owed at the last billing cycle close, avoiding interest entirely if you don’t carry a balance.
  • Fixed amount: useful if you’re paying down a balance faster than the minimum requires, but risky if it ever falls short of the minimum.

For most people trying to avoid fees without overthinking it, statement balance autopay is the safest default.

2. Build layered reminders on top of autopay by setting up automated notifications; this approach is explained in detail in the guide to invoice payment reminders to help SMBs and individuals avoid missed payments.
Autopay fails sometimes. Cards get replaced, banks flag transactions, linked accounts get unlinked. A second layer of reminders catches what automation misses. Set one alert 10 days before your due date and another 3 days before. That combination of an early flag and a final reminder catches most failures before they become fees. Calendar apps, your bank’s text alerts, and your card issuer’s app notifications all work, and using more than one costs you nothing.

3. Align your due date with your paydays.
If your due date consistently lands a week before payday, you’re setting yourself up for a cash-flow problem, not a memory problem. The CARD Act requires issuers to keep your due date consistent from month to month, and most issuers let you request a due-date change through their app, phone line, or online account settings. Moving your due date to two or three days after a paycheck lands removes the guesswork entirely.

4. Check your balance before autopay pulls, and keep a backup.
Two days before an autopay date, glance at your checking account. If a paycheck got delayed or an unexpected expense drained your buffer, you want to know before the payment bounces, not after. Keep a backup payment method, like a second checking account or a debit card, on file with your issuer so a failed transfer doesn’t automatically become a missed payment.

5. Keep one master list of every due date.
If you’re juggling more than two or three cards, due dates blur together fast. A single running list, whether it’s a spreadsheet, a notes app, or a dedicated bill reminder tool, keeps every payment visible in one place instead of scattered across five different apps and inboxes. Pair that list with a monthly bill-check routine: pick one day a month, review every upcoming due date, and confirm autopay is active on each account.

Pro Tip: Set your autopay date to the same day every month, like the 5th, regardless of when each card’s due date actually falls. One consistent day is far easier to remember and audit than five different dates scattered across the calendar.

Your Step-by-Step Plan to Prevent Late Fees — overview diagram

Cutoff Times and Payment Methods That Trip People Up

Cutoff times aren’t uniform across issuers, and that inconsistency is where a lot of “on time” payments accidentally become late ones. One issuer’s online cutoff might be 8 p.m. Eastern, while another closes the window at 5 p.m. Pacific. Because cutoff times and processing windows vary by issuer, your cardmember agreement or the fine print on your monthly statement is the only place to confirm your exact deadline. Don’t assume it matches your last card.

Payment method matters just as much as timing:

  • Mailed checks are the slowest and least predictable option, subject to postal delays you can’t control.
  • Bank bill pay routes through a third party before it reaches your issuer, which adds a processing lag.
  • Direct payment through the card’s own portal or app is usually fastest since the funds move within the issuer’s own system.
  • Autopay set directly with the issuer is generally the safest choice because it removes manual timing risk entirely, since payments through the card’s own portal post faster than third-party routes.

Redundancy is what separates people who occasionally get hit with a fee from people who never do. That means a backup funding source linked to your account, an alert set for autopay failures, and a quick manual balance check a day or two before the payment date. After any payment posts, whether automatic or manual, check your account online and save or screenshot the confirmation. If a fee ever shows up on a payment you know was on time, that confirmation is your proof when you call to dispute it.

What to Do If You Already Missed a Payment

A missed payment isn’t a crisis yet, but the clock is working against you. Move fast and follow this order.

  1. Pay the overdue amount immediately. Every day that passes adds risk, and paying before you hit 30 days past due keeps the missed payment off your credit report entirely.
  2. Call your issuer and ask for a goodwill waiver. Reference your account history directly. Many issuers will grant a one-time courtesy waiver for customers with a track record of on-time payments, and a calm, specific request works better than a vague apology.
  3. Ask whether a penalty APR applies. Some issuers raise your interest rate after a missed payment. Ask directly whether reinstatement to your regular rate happens after a set number of consecutive on-time payments, which is often several months out.
  4. Save every confirmation and check your credit report afterward. Keep records of the payment date, the waiver request, and any written confirmation from the issuer, then monitor your credit report to confirm nothing was reported incorrectly.

How Automation Closes the Gaps Manual Tracking Misses

Autopay and reminders handle most of the work, but they still depend on you noticing a low balance, a canceled card, or a subscription quietly draining your account before a payment date. That’s the gap automation software is built to close. Tools that forecast balances ahead of a due date and scan for recurring subscriptions cut down on the insufficient-funds scenarios that cause autopay to fail in the first place.

An app-based approach helps most in situations where manual tracking breaks down:

  • Shared bills across roommates or partners, where nobody’s sure who paid what.
  • Irregular income, where a due date might land during a low-cash week.
  • Subscription creep, where small recurring charges quietly erode the balance you were counting on for autopay.

If you’re evaluating a personal finance app for this purpose, look for four things: autopay scheduling, syncing across multiple accounts, balance forecasting before due dates, and stored payment confirmations you can pull up later.

Pro Tip: Set up one automated rule first: a low-balance alert triggered three days before your largest autopay date. That single rule catches the majority of insufficient-funds surprises before they turn into a fee.

Why Timing Discipline Beats Willpower Every Time

Most advice on late fees leans on willpower: be more organized, remember your due dates, pay attention. That framing misses the actual problem. People don’t miss payments because they’re careless. They miss payments because processing delays, inconsistent cutoff times, and cash-flow timing work against them in ways no amount of good intention fixes.

The overlooked detail here is the buffer, not the reminder. Reminders help you notice a due date. A buffer, autopay scheduled days early instead of on the due date itself, protects you even when you don’t notice. That distinction is why the CFPB’s guidance on cutoff times matters more than it first appears: it tells you exactly how much margin you’re working with, and margin is what a missed reminder can’t replace.

If you take one thing from this, prioritize the buffer over the memory trick. Set autopay early, confirm your balance before it pulls, and let the calendar reminders serve as backup rather than your main defense.

— SaverStride

A Simpler Way to Stay Ahead of Every Due Date

Valapoint gives you one place to see every bill, due date, and account balance instead of piecing it together across five different bank apps and a mental checklist. Where autopay alone still leaves you exposed to low-balance surprises, Vala’s forecasting flags a shortfall before your payment date arrives, and its subscription scan catches the small recurring charges that quietly eat into the cash you were counting on.

Valapoint

That matters most if you’re managing shared bills with a partner or roommates, dealing with income that doesn’t land the same day every month, or simply juggling more cards than you can track in your head. The Vala bill reminder app syncs your accounts, layers reminders on top of your existing autopay, and stores payment confirmations so you’re never scrambling for proof if a fee shows up by mistake.

Start with the personal finance app and set up your first low-balance alert today. It’s the single rule most likely to save you from your next fee.

A Simpler Way to Stay Ahead of Every Due Date — overview diagram

This article is general information, not a substitute for advice from a qualified financial advisor. Consult a qualified financial professional about your own circumstances before acting on anything here.

Sources

No Passwords: Securely Link Multiple Bank Accounts for Everyday Users

Yes, you can connect multiple bank accounts, whether they sit at the same bank, different banks, or across a mix of checking, savings, and credit accounts. Most connections give you visibility through aggregation, not automatic money movement. What you can actually do after connecting, view balances, transfer funds, or split shared costs, depends on whether the link uses a secure token/API connection or an older, password-based method.


TL;DR:

  • Connecting accounts at different banks typically requires ACH micro-deposits verification, which takes one to three business days for transfers to finalize.
  • Secure token/API connections are safer and more flexible, allowing read-only access and reducing security risks compared to older password-based or screen scraping methods.
  • Regularly reauthorize third-party links every few months, and revoke access for accounts no longer needed to minimize security vulnerabilities.
  • Most connections enable account aggregation with view-only capabilities, while fund transfers often require specific bank-supported APIs or ACH verification.
  • Proper management involves giving each linked account a specific role, setting automation with caution, and conducting periodic checks to prevent forgotten or broken connections.

Table of Contents

What Happens When You Connect Multiple Bank Accounts?

Linking accounts doesn’t automatically mean you can move money between them. There’s a real difference between aggregation (seeing everything in one place) and consolidation (actually transferring funds), and mixing up the two is where most people get confused.

Account aggregation pulls balances and transaction history from multiple financial accounts into a single view. It’s typically read-only. The aggregator shows you what’s happening across your accounts, but it doesn’t move a dollar on its own. Transfers usually require your bank’s own transfer tools or an ACH verification process.

The three connection types you’ll run into:

  • Same-bank linking: Your checking and savings accounts at one institution can usually be linked instantly for internal transfers, often with same-day or immediate posting.
  • Different-bank linking: Moving money between banks generally requires ACH micro-deposit verification (two small test deposits you confirm) or a bank-hosted API flow, with transfers landing in 1 to 3 business days.
  • Third-party aggregators: Budgeting and finance apps connect either through a secure token/API system or, less commonly now, through screen scraping, which requires storing your login credentials directly.

Each method carries different risk and different capability. A same-bank link might let you set up automatic transfers. A third-party aggregator might only let you see your balance. Knowing which one you’re dealing with before you connect saves you a headache later.

How Do You Connect Multiple Bank Accounts Step by Step?

Linking accounts isn’t complicated, but skipping a step is how people end up with a failed connection or, worse, a security gap. Here’s the order that works.

  1. Prepare your information. Enable multi-factor authentication (MFA) on every account you plan to link, and have your routing number, account number, and a government ID handy in case identity verification is required.
  2. Same-bank connections: Log into your bank’s online portal or app, find the internal transfer or account linking section, and set up transfer rules or auto-sweeps if you want money to move on a schedule.
  3. Different-bank connections: Choose a bank-hosted API flow if your bank offers one (faster and generally more secure), or initiate ACH micro-deposit verification. Check your statement in 1 to 3 business days for the two small deposits, then enter those exact amounts to confirm ownership.
  4. Third-party app connections: When linking to a budgeting or aggregation app, you’ll typically be routed through a secure redirect window, similar to the Plaid-style flow many U.S. banks now support, where you log in directly on your bank’s page, not the app’s. Select which accounts to share and review the requested scopes carefully.
  5. Confirm the permission level. Some connections are read-only; others allow transaction initiation. Know which one you’re granting before you approve it.
  6. Set a reconnect cadence. Bank security updates occasionally break aggregator links. Plan to check your connected accounts every month or two.

Pro Tip: Before you approve any third-party connection, look for language like “view-only access” or “read-only” in the permission screen. If an app asks for the ability to initiate transfers and you only wanted visibility, stop and reconsider what you’re granting.

Many banks now offer this linking process directly inside their mobile apps, which mirrors the in-app account linking flows that have become standard across most major banking apps.

Is It Safe to Connect Multiple Bank Accounts?

Safety comes down to one core distinction: how the connection accesses your data, as detailed in this token-based account connections overview. Token-based API connections, the kind used by Open Banking-style providers, let an app view your account information without ever storing your actual username and password. GoCardless explains that this token model is now the industry-preferred pattern precisely because it limits what a breach could expose.

Screen scraping works differently. It requires the app to hold onto your login credentials directly, which means a single security failure on that app’s end could expose your actual bank password. Screen scraping is an older method, and most reputable providers have moved away from it for exactly this reason.

Here’s how to reduce your risk regardless of which connection type you’re using:

  • Use unique, strong passwords for every bank account, not variations of the same one.
  • Turn on MFA everywhere it’s offered, especially for accounts you’re linking to third-party apps.
  • Grant read-only access when that’s all you need. Don’t approve transaction permissions out of convenience.
  • Revoke access for apps you no longer use. Old, forgotten connections are a common attack surface.
  • Set up balance and login alerts so you notice unusual activity immediately.
  • Read the privacy policy before connecting. It tells you exactly what data is collected and for how long.

The CFPB ordered the operator of Cash App to pay $175 million over fraud and consumer protection failures. That enforcement action is a useful reminder: even large, well-known fintech companies can fall short on security. Pick providers with clear track records and transparent disclosures, not just the flashiest app icon.

Best Practices for Managing Multiple Linked Accounts

Once your accounts are connected, the real work starts: keeping them organized so the connection actually helps you instead of adding clutter.

Give each account a job. A “bills” account, a “taxes” account, a “emergency fund” account, whatever fits your life, works better than one undifferentiated pile of money. Set automation rules for accounts where the transfer logic is reliable, like a fixed weekly sweep into savings, but avoid full automation on accounts where balances fluctuate unpredictably.

  • Reauthorize third-party connections every few months, since bank-side security updates can quietly break a link.
  • Keep a buffer in checking accounts that fund automatic transfers, so a timing gap doesn’t trigger an overdraft.
  • Remember ACH transfers can take a day or two to post, so don’t schedule a transfer expecting instant availability.
  • For shared households, connect accounts separately and use a shared financial goal dashboard rather than handing over a login and password to a partner.

Pro Tip: If you’re tracking money across five or six linked accounts, a single dashboard view saves far more time than logging into five or six separate apps every week. That’s the whole point of aggregation.

What to Do When a Bank Account Connection Fails

Connections break more often than people expect, usually for boring reasons.

  1. Check for a password or login change. Most broken connections trace back to you changing your bank password or MFA settings without updating the linked app.
  2. Re-verify micro-deposits if it’s been more than 3 business days. If the two test deposits never arrived, contact your bank first. If they arrived but the verification still failed, reinitiate the process from the app side.
  3. Watch your transfer limits. Many banks cap daily ACH transfers or flag large transactions for manual review; business accounts often have different limits and support than personal ones.
  4. Know who to call. If money never left your account, contact your bank. If your balances aren’t updating in an app, contact that app’s support team, the issue usually lives on the connection side.

Sharing your bank data with a budgeting or aggregation app means trusting a third party with sensitive financial information, and that trust should be earned, not assumed.

Start by checking whether the provider uses token-based access or older credential-sharing methods. Token connections mean the app never actually sees or stores your bank password, only a permissioned data feed. That’s a meaningfully smaller attack surface than an app holding your real login.

Read what the app actually does with your data once it has access. Does it sell aggregated data to advertisers? Share it with data brokers? Retain transaction history indefinitely, or purge it after you disconnect? Reputable providers spell this out in plain language, not buried in dense legal text. If a privacy policy is vague about data retention or third-party sharing, that’s worth noticing.

Pay attention to scope, too. An app asking for read-only access to check your spending patterns is a very different request from one asking for the ability to initiate transfers on your behalf. Grant the narrowest permission that still lets the app do what you need.

Finally, check whether the provider has any regulatory history worth knowing about. A pattern of enforcement actions or unresolved complaints is a signal to look elsewhere, no matter how polished the app’s marketing looks.

Who Sees Your Data When You Link Accounts to Third-Party Apps? — overview diagram

Removing a connected account is usually faster than setting one up, but people skip it more often than they should, leaving old, forgotten links quietly sitting active for years.

Start inside the third-party app itself. Most budgeting and aggregation apps have an account settings or “linked accounts” section where you can disconnect a specific institution with a couple of taps. This revokes the app’s access token, cutting off its ability to pull new data.

It’s worth doing this from the bank’s side too. Many banks maintain a “connected apps” or “third-party access” page in their online portal, separate from the app’s own settings, where you can see every service currently pulling data from your account and revoke access directly. This is useful because it shows you connections you might have forgotten existed entirely.

After unlinking, confirm the disconnection actually worked. Log back into the third-party app and check that the account no longer appears or shows as “disconnected.” If you’re closing a bank account entirely, unlink it from every connected app first, since a closed account with an active token can sometimes cause syncing errors elsewhere.

Do a periodic sweep, maybe twice a year, of every app with access to your accounts. If you haven’t opened it in six months, that’s a reasonable signal to revoke access rather than leave the door propped open.

How Do You Unlink a Bank Account You No Longer Need Connected? — overview diagram

See All Your Linked Accounts in One Place with Vala

Reading through connection methods and security checklists is one thing. Actually managing five linked accounts without losing track of any of them is another. That’s the gap Valapoint built its app to close.

Valapoint

Vala uses secure, token-based connections, the same API approach recommended throughout this guide, to pull your balances and transactions into one personal finance dashboard without ever storing your actual bank login. Once your accounts are connected, Vala’s automated budgets flag overspending before it becomes an overdraft, its subscription review catches recurring charges you forgot about, and its shared expense splitting handles the math when you’re managing money with a partner or roommates.

Getting started takes about the time it takes to read this sentence twice. Download the Vala app, link your accounts through the secure in-app flow, and set your first savings goal. From there, Vala keeps watching your accounts so you don’t have to check five apps every morning.

When Aggregation Is Enough, and When It Isn’t

Most people don’t need full account consolidation. They need visibility, and a monthly gut check on where their money actually went. If you’re running a side gig, splitting rent with a partner, or just trying to keep tax money separate from spending money, aggregation across accounts solves the real problem: not knowing where you stand.

Consolidation into one platform earns its keep when you’re actively automating, splitting shared goals, or managing enough accounts that manual tracking becomes its own chore. Pick one approach and test it for a full budgeting cycle before deciding it’s not working.

— SaverStride

This article is general information, not a substitute for advice from a qualified financial advisor. Consult a qualified financial professional about your own circumstances before acting on anything here.

Sources

Test Real‑Time Budgeting in 30 Days: Pick a Truly Live Tool

Real-time budgeting means your budget updates as your bank transactions happen, not days later, so you always know the exact amount you can safely spend right now. The main payoff is a live “safe-to-spend” number instead of a raw account balance that hides upcoming bills. Not every app that claims “real-time” actually delivers it. Some just sync your balance faster while still treating every dollar in your account as spendable.


TL;DR:

  • A truly real-time budgeting app updates your available balance instantly by automatically reserving funds for upcoming bills and obligations before showing what is safe to spend.
  • Handling pending transactions accurately is critical, as delays in showing these charges can cause overspending; the best apps update these within a few hours.
  • Features like automatic bill reservation, forward-looking cash flow forecasts, and shared expense support improve financial clarity and prevent budget failures caused by confusion.
  • Sync frequency depends on your bank’s data update schedule, not just the app’s design, so some discrepancies in real-time tracking can occur.
  • Effective tools should explicitly state their handling of pending transactions and refresh cadence, avoiding vague marketing claims of “real-time” without supporting infrastructure.

Table of Contents

What Is Real-Time Budgeting, and Why Does It Matter?

Most people overspend not because they’re careless, but because they’re staring at the wrong number. Your bank app shows $1,400 in checking. That looks like $1,400 you can spend. In reality, $600 of it is already committed to rent due in four days, $80 to a streaming bundle you forgot about, and $150 to a credit card payment that posts Thursday. You don’t have $1,400 to spend. You have $570.

This is the single-balance trap, and it’s the core problem real-time budgeting is built to solve. A genuine real-time system doesn’t just show your balance faster. It reserves money for bills and obligations before telling you what’s actually safe to spend.

Raw balance versus safe-to-spend amount

The behavioral case for this is straightforward, as shown in building a financial dashboard in Power BI that finance teams trust. When people can see a true “available to spend” figure instead of a raw balance, they naturally overspend less, because the temptation to treat reserved money as free money disappears. Confusion between balance and availability is one of the most common reasons budgets fail. Not lack of discipline. Lack of clarity.

Bills timing makes this worse than most people realize. A subscription that renews on the 3rd, a car payment due the 15th, and a quarterly insurance premium due the 28th all pull from the same pool of money, but your bank statement doesn’t organize them for you. Without a system that reserves those funds ahead of time, you’re mentally tracking five or six due dates while your balance quietly misleads you.

Here’s what changes when a budget updates continuously instead of retroactively:

  • You see the impact of a purchase within minutes, not at the end of the week when it’s too late to adjust.
  • Reserved bill money gets subtracted automatically, so your “safe-to-spend” number never includes cash you already owe someone else.
  • Pending charges show up before they clear, closing the gap where people spend twice against the same money.
  • Irregular expenses (annual renewals, quarterly payments) get flagged early instead of surprising you the week they hit.

None of this requires more willpower. It requires better information delivered at the moment you need it, which is exactly the gap that dynamic budgeting methods are designed to close.

Core Features to Expect From a Genuine Real-Time Budgeting Tool

“Real-time” gets used loosely in app marketing. Some tools apply the label to features that are closer to next-day reporting than live tracking. Knowing what to actually look for keeps you from picking a tool based on branding instead of function.

A real-time expense tracking system worth paying for should include:

  • Automatic bank sync with a defined refresh cadence. Not “syncs periodically.” A specific interval, whether that’s near-instant or every few hours.
  • Pending transaction visibility. The app should show charges that haven’t posted yet, not just cleared ones, because pending charges are where safe-to-spend numbers usually break down.
  • Bills reservation or envelope-style buckets. Money for rent, subscriptions, and debt payments gets set aside automatically before it shows up as available.
  • Forward-looking cash flow forecasts. A useful tool tells you what your balance will look like after your next three bills hit, not just what it looks like today.
  • Shared or group budget support: if you split costs with a partner, roommate, or family member.
  • Spending controls, including alerts when you’re close to a limit and the ability to lock or reserve funds for a specific goal.

The pending-transaction piece deserves extra attention because it’s where a lot of “real-time” claims quietly fall apart. A charge that shows as pending on your bank’s own app but doesn’t show up in your budgeting tool for a day or two isn’t giving you real-time information. It’s giving you yesterday’s information with a live-looking interface. Real-time expense management depends on catching that gap, not just displaying a fast-updating balance.

Product roundups that test and rank budgeting apps tend to evaluate exactly these traits: sync reliability, forecasting accuracy, and how well a tool handles joint accounts. That’s a useful shortlist to run any tool through before you commit to it.

Pro Tip: Test pending-transaction handling before you trust an app with your full budget. Make a small purchase, then check how long it takes to appear as “pending” versus how long until it affects your safe-to-spend number. A gap of more than a few hours is a sign the sync isn’t as live as advertised.

How Real-Time Budgeting Actually Works Behind the Scenes

Understanding the mechanics helps you set realistic expectations, because “real-time” in personal finance software is a spectrum, not a switch you flip on.

  1. Bank connectivity runs through an aggregator. Most apps don’t talk to your bank directly. They connect through a data aggregation layer, similar to the Plaid-style aggregation that many modern finance apps use to pull transaction data from thousands of institutions. Manual entry still exists in some tools, but it defeats the purpose of “real-time” if you have to type in every purchase yourself.
  2. Pending and posted transactions are handled differently. A pending transaction is a charge your bank has authorized but hasn’t finalized. A posted transaction has cleared and is final. Good budgeting software factors in both, because waiting for a charge to post before it counts against your budget means you could overspend in the gap.
  3. Refresh cadence varies by bank, not just by app. Some financial institutions push data to aggregators multiple times a day. Others batch updates once every 24 hours. This means two people using the same app can get noticeably different “real-time” experiences depending on which bank they use, since refresh cadence still depends on bank data availability on the institution’s end, not just the app’s design.
  4. Your “available to spend” figure is calculated, not observed. The app takes your raw balance, subtracts reserved bill money, subtracts pending charges, and factors in scheduled transfers. That math is what makes the number trustworthy, and it’s also where cheaper tools cut corners.
  5. Security checks matter before you connect anything. Confirm the app uses bank-level encryption, doesn’t store your actual bank login credentials in plain text, and has a clear data-sharing policy. If you can’t find this information in under two minutes on their website, that’s worth noting.

Some well-known finance tools, like Mint’s tracking and insights model, were built around monthly categorization and after-the-fact review rather than a live safe-to-spend calculation. That’s not a knock on those tools. It just means they solve a different problem than real-time budgeting does.

Who Benefits Most From Budgeting in Real Time

Real-time budgeting helps everyone to some degree, but the benefit scales sharply for certain financial situations where a delayed or static budget actively causes problems.

  • Gig workers and variable-income earners benefit most from real-time forecasting, since income arrives unevenly and a live cash flow view prevents committing to spending before a payment actually clears.
  • Couples managing shared expenses need shared budget visibility above almost everything else. Without it, one partner can unknowingly spend money the other has already mentally allocated to rent or a joint goal.
  • Students on tight, fixed budgets get the most value from bill reservation and low-balance alerts, since a single missed subscription cancellation can wipe out a week’s worth of spending room.
  • People juggling five or more recurring subscriptions benefit most from automatic recurring-payment detection, because manually tracking that many renewal dates is where most budgets quietly break down.

Consider two people with the same monthly income. One checks their bank balance before buying groceries and sees an amount that seems available, so they feel fine spending a small extra amount. The other checks a real-time budget that already subtracted rent, a car payment, and three subscriptions, and sees a lower available amount. Same income, same bank, completely different decision, because one number was actually accurate and the other wasn’t. If you split costs with roommates or a partner, a tool built for tracking group spending closes that same gap for shared accounts.

How to Choose a Real-Time Budgeting Tool

Picking the right tool comes down to asking the right questions before you connect your bank account, not after you’ve already committed a month of transaction history to it.

Selection criteria that actually matter

  • Data refresh reliability. Does the app specify how often it pulls new transactions, or does it just say “automatically”?
  • Pending-transaction accuracy. Are pending charges reflected in your safe-to-spend number, or only after they post?
  • Bills reservation logic. Can you set up recurring bills to be automatically set aside before they’re due?
  • Privacy and security practices. Is bank-level encryption clearly stated, and is there a readable privacy policy?
  • Shared budgeting support. If you split expenses, does the app handle joint visibility without forcing a single shared login?
  • Support quality. Is there a real support channel, or just a help center with generic articles?

Questions to ask before you commit

Ask directly: “How often does your data refresh?” and “How do you treat pending transactions?” A tool that can’t answer both clearly in its FAQ or support documentation probably hasn’t built real infrastructure around either one.

Red flags worth walking away from

  • Marketing language that says “real-time” but the app’s own help documentation never mentions pending transactions at all.
  • Manual-only transaction entry marketed as a modern budgeting solution.
  • Fee structures that aren’t listed clearly on the pricing page, or that require you to enter payment information before you see any pricing.
  • Vague or missing answers about data encryption and how your bank credentials are stored.

The “real-time” label itself has become common enough in app store listings that it’s lost some of its meaning. That’s exactly why running a tool through these specific questions matters more than trusting the name of the app.

Pricing usually breaks down one of two ways. Freemium models let you track basic spending and see a simple balance for free, then charge for automatic bank sync, forecasting, or shared budgets. Straight subscription models charge from the start but typically include the full feature set immediately. Free tiers of many popular tools limit automatic syncing or forecasting, which is worth checking before you assume a free plan covers what you actually need. If you want a broader sense of how pricing tends to shake out across the market, a full budgeting app comparison is a useful next read.

Roundups that rank budgeting apps consistently use sync reliability and forecasting accuracy as their core evaluation metrics rather than relying on marketing descriptions, which tells you those are the two traits worth testing yourself before you pay for anything.

Getting Started: Your First 30 Days With Real-Time Budgeting

The first month is where most people either build a habit that sticks or abandon the app within two weeks. A little structure early on makes the difference.

  1. Connect your accounts and set up buckets. Link your checking account, then create envelopes or buckets for rent, utilities, groceries, and any recurring subscriptions you can identify from the last statement.
  2. Reserve every recurring bill you can find. Go through your last 30 days of transactions and flag anything that repeats. Set each one to be automatically reserved ahead of its due date.
  3. Watch pending transactions closely during week one. Make a few normal purchases and track how quickly they show up as pending, then how long until they post and update your safe-to-spend figure.
  4. Set alerts for low balances and unusual charges. This catches both overspending and any bank connectivity hiccup before it becomes a bigger problem.
  5. Run a weekly review starting week two. Fifteen minutes, same day each week, checking what you spent against what you planned, and adjusting buckets that were too tight or too loose.
  6. Add a savings or goal nudge by week three. Once your bills are reserved and your spending categories feel accurate, direct any leftover safe-to-spend cushion toward a specific goal instead of letting it sit unassigned.
  7. Troubleshoot sync issues as they appear. Duplicate transactions usually mean a pending charge posted and both versions briefly showed up. Missing pending items usually mean your bank batches updates less frequently than the app refreshes, which is a bank limitation, not an app failure.

Pro Tip: Don’t try to perfect every budget category in week one. Get your bills reserved and your pending transactions tracking accurately first. Fine-tune your spending categories in week two once you trust the numbers you’re looking at.

Free calculators for budgeting, savings, and debt planning can help you rough out your bucket amounts before you even connect a bank account, which makes that first setup session faster.

How Vala Builds Real-Time and Intelligent Budgets

Vala was built around the exact gap this article has been describing: the difference between a fast-updating balance and a genuinely accurate safe-to-spend number. That distinction shapes how the app handles every piece of the criteria covered above.

Here’s how Vala’s approach maps to those selection criteria:

  • Bank sync and refresh: Vala connects securely to your accounts and keeps spending data current, so your budget reflects what’s actually happening in your accounts rather than a snapshot from days ago.
  • Pending transaction handling: Charges factor into your available balance as they move through your accounts, closing the lag that makes some “real-time” tools misleading in practice.
  • Bills reservation: Recurring bills and subscriptions get identified and set aside automatically, which is the mechanism behind an accurate safe-to-spend figure rather than a raw balance display.
  • AI-driven insights: Vala’s intelligent budgeting engine surfaces spending patterns and hidden financial leaks, like forgotten subscriptions or creeping category overspend, without requiring you to dig through months of transaction history manually.
  • Shared expense tracking: Couples and groups can split and monitor shared costs without one person losing visibility into what the other has already spent.
  • Privacy and security: Bank connections run through secure, encrypted infrastructure, addressing the privacy criteria that any real-time tool should meet before you connect a live account.

Every one of these features exists because the alternative, guessing at what’s “probably” safe to spend, is precisely the problem real-time budgeting was designed to fix.

What Real-Time Budgeting Can’t Fix on Its Own

Real-time budgeting removes uncertainty, but it doesn’t remove your actual financial constraints. If your expenses genuinely exceed your income, a live safe-to-spend number will tell you that clearly and immediately, which is valuable, but it’s not the same as solving the underlying gap. That still takes a change in income, spending, or both.

Technical limits are worth expecting, not treating as app failures. Banks process transactions on their own schedules, and delays of a few hours to a full day are normal, not a sign of broken software. Merchants sometimes batch charges together, which can make a single purchase show up as several smaller pending amounts before settling into one. Credit card holds, especially for hotels, gas stations, and rentals, often show a higher pending amount than what eventually posts, which can make your safe-to-spend number look tighter than it will end up being.

None of this makes real-time tracking less useful. It just means “real-time” describes the flow of information, not a guarantee that every number will be instantly perfect. The behavioral habits, checking your budget before big purchases, reviewing weekly, adjusting buckets when life changes, still do most of the actual work. The tool just makes those habits easier to sustain.

— SaverStride

Try Real-Time Budgeting With Vala

Vala gives you what a raw bank balance can’t: a live, accurate picture of what you can actually spend after bills, subscriptions, and shared expenses are already accounted for. Where other tools update your balance but leave you to do the mental math on what’s really available, Vala reserves that money automatically and shows you the number that matters.

Valapoint

The free tier lets you connect your accounts and start tracking spending right away, so you can see how your everyday purchases compare to a real safe-to-spend figure instead of a raw balance. Upgrading unlocks the deeper layer: AI-driven spending insights that catch subscription creep and hidden leaks, shared budgeting for couples and groups, and savings goal tracking that adjusts as your income and bills shift. If you’re ready to stop guessing and start seeing your actual available balance in real time, start with Vala’s personal finance app and connect your first account today.

Sources