Copyable Math to Split Rent With Roommates and an App to Keep It Fair

If your rooms and bills are basically the same, split rent evenly and call it a day. When rooms, closets, or private bathrooms differ, use a room-size or envy-free calculator instead. Either way, fold utilities into the same conversation, and write the final numbers down before anyone pays a deposit.


TL;DR:

  • Room-size weighted splits better reflect usage when rooms differ significantly in size or amenities, but require precise measurements and adjustments.
  • Income-based splits are fairer when roommates have widely varying earnings and prevent lower-income tenants from strain or resentment.
  • Envy-free calculators reduce disputes by ensuring no roommate prefers another’s room and share preferences beyond just size or rent.
  • Using shared expense apps like Vala automates recurring payments and maintains transparent records to minimize ongoing rent disputes.
  • Regularly reviewing and renegotiating rent splits every six months helps accommodate changes like raises, room swaps, or added amenities, avoiding long-term resentment.

Valapoint
Keep Shared Spending Clear
Vala helps roommates track expenses, manage shared budgets, split group costs, and see spending patterns in one place.

Explore Vala

Table of Contents

The Best Methods to Split Rent With Roommates

Every roommate household eventually asks the same question: what’s actually fair? The answer depends on how different your rooms and incomes are, not on some universal formula. Here’s how the main approaches stack up.

  • Even split. Divide total rent by the number of roommates. It’s the fastest method and works well when rooms are close in size and everyone shares common spaces equally. Multiple how-to guides list this as one of the three standard approaches, alongside room-size and income splits.
  • Room-size weighted split. Measure or estimate each room’s square footage, then adjust the total using those numbers. Add a premium for private bathrooms, walk-in closets, or extra windows, and offset it by trimming everyone else’s share slightly.
  • Income-based split. Instead of dividing rent equally, you divide it proportionally to what each person earns. This matters most when incomes vary a lot, since an equal split can quietly strain the lower earner’s budget every single month.
  • Envy-free split. Each roommate picks rooms at different price points until nobody would rather trade rooms and prices with someone else. This method handles subjective preferences, like natural light or noise, that square footage alone misses.

Couples sharing one bedroom, or a roommate who’s rarely home, change the math too. A couple often pays a bit more for a shared room since two people use it, while a low-usage roommate might negotiate a small discount. Neither adjustment is standard, so talk it through before signing anything.

Step-by-Step Math You Can Copy

Numbers settle arguments faster than opinions do. Here’s how to run each method with real figures, using a $2,000 total rent across three roommates as the working example.

  1. Even split. Divide the total rent equally among roommates. Simple, and fine when rooms are nearly identical.
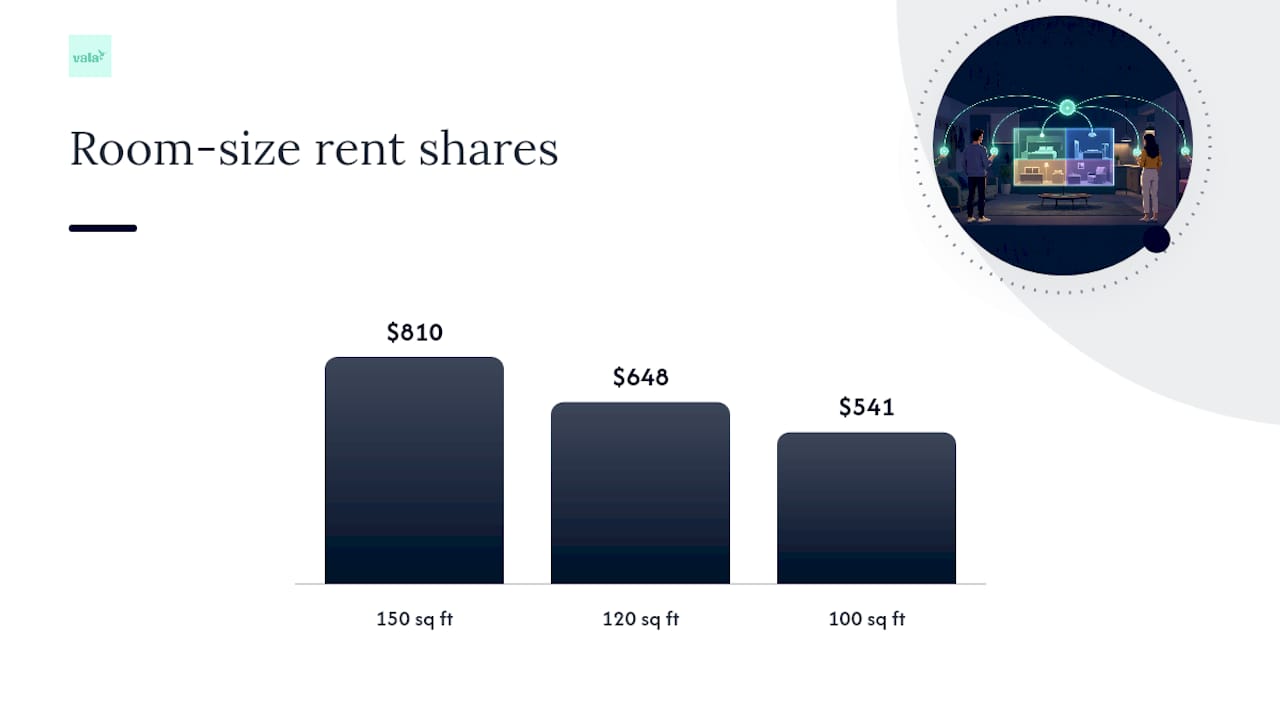
  2. Room-size weighting. Say the three bedrooms measure 150, 120, and 100 square feet, totaling 370 square feet. Each person’s share equals their room’s percentage of that total, multiplied by rent: 150/370 = 40.5%, or $810; 120/370 = 32.4%, or $648; 100/370 = 27%, or $541.
  3. Amenity premium. Add a flat premium to rooms with special features like private bathrooms, while subtracting that amount proportionally from the others, keeping total rent constant.
  4. Income-based split. If combined monthly income is $9,000 and one roommate earns $4,500, another $3,000, and the third $1,500, their shares of income are 50%, 33%, and 17%. Applied to $2,000 rent, that’s $1,000, $667, and $333.

The point-based formula behind most calculators is: individual rent equals (room point value ÷ total points) × total rent, where points reflect size and amenities together rather than square footage alone.

Pro Tip: Run the zero-sum amenity adjustment as its own line item. Add the premium to the room with the perk, then subtract the exact same dollar amount somewhere else, so the total rent never quietly creeps up.
Step-by-Step Math You Can Copy — overview diagram

How Do Envy-Free Rent Calculators Actually Work?

An envy-free rent split means no roommate would rather swap rooms and rent with anyone else in the house. Tools like the New York Times rent-division calculator get there by having each person bid on or rank rooms at different price points, then computing a division where every assignment beats every alternative for that person. Fair Divider works the same way, iterating through choices until the split stabilizes.

These calculators earn their keep in households with genuinely unequal rooms, because they turn “I feel like I got the worse deal” into a number everyone actually agreed to. That’s a real advantage over eyeballing square footage, since preferences (a quiet corner, morning light, a shorter walk to the kitchen) don’t always track with size.

Once rent is settled, a different category of tool takes over: ongoing expense trackers. Envy-free calculators solve the one-time question of who pays what. They don’t track whether Jordan’s Venmo actually landed on the first of the month, or whether the internet bill got folded in correctly. For that, you want:

  • One-off calculators for the initial split decision.
  • Shared-bill apps that split recurring charges like utilities and streaming.
  • Full expense trackers that log payments, flag missed ones, and keep a running history everyone can see.

Utilities and recurring fees should ride on whichever split percentages you already settled on, unless you agree to split those evenly regardless of room size.

How Vala Helps Roommates Keep Rent Splits Fair Over Time

A calculator gets you a fair number once. Keeping that number fair for the next twelve months is a different problem, and it’s the one most roommate households actually struggle with.

Vala handles the ongoing part. Once you’ve agreed on percentages, whether even, room-weighted, or income-based, you can set up:

  • Recurring entries so rent and utilities can be posted automatically each month.
  • Shared balances that show exactly who’s paid and who hasn’t, in real time.
  • Reminders before due dates to help prevent missed payments.
  • A shared record accessible to the household to reduce disputes.
  • Spending insights to help identify recurring charges or subscriptions affecting the shared budget.

A spreadsheet works fine for a one-time calculation. It falls apart once you’re tracking partial payments, a roommate who moved out mid-lease, or five separate utility bills a month. That’s when an app like Vala’s shared expense tools earns its place over a shared Google Sheet nobody updates consistently.

What to Do When a Roommate Stops Paying Rent

Start polite and documented, not confrontational. A simple written message asking for the payment, with a date attached, creates a record you might need later. Show them the shared ledger or app balance so the number isn’t in dispute, only the payment.

Before signing anyone on, put the agreement in writing: each roommate’s share, the due date, accepted payment methods, and what happens if someone pays late. Documenting the agreement upfront prevents most disputes that start from differing assumptions about who owes what.

If a roommate still won’t pay, check your lease first. Depending on how it’s structured, next steps can include mediation, small-claims court, or bringing the landlord in if one roommate is named on the lease and others aren’t.

  • Set a review date, like every six months, to renegotiate the split.
  • Base changes on real shifts: a raise, a room swap, or a new amenity like a finished basement.

Pro Tip: Renegotiate on a schedule, not just when someone complains. A standing six-month check-in turns “we need to talk about money” into a routine instead of a confrontation.

Fairness Versus Simplicity: What Actually Matters

Perfect fairness and easy fairness aren’t the same goal, and chasing the wrong one wastes energy. For short leases, near-identical rooms, or roommates who’ll move out in a year anyway, an even split beats an elaborate formula every time. Precision matters more in long-term households with real price gaps between rooms, where a lopsided split quietly breeds resentment for years.

What holds up in either case is the same: write the agreement down, and revisit it on a schedule rather than waiting for a fight to force the conversation.

— SaverStride

Try Vala to Keep Your Rent Split Fair, Automatically

Vala turns the math you just ran into something that actually sticks month after month. Once you’ve settled on even, room-weighted, or income-based percentages, Vala’s split bills app keeps applying them automatically instead of making you redo the calculation every time rent is due.

Valapoint

Here’s what that looks like in practice:

  • Automated split calculations based on the percentages your household already agreed on.
  • Recurring reminders before rent and utilities are due.
  • Shared transaction history so nobody has to ask “did you actually pay me back?”
  • Spending-insight tools that catch recurring subscriptions or fees eating into your shared budget.

If you want to see where your household’s money is actually going before you even finalize a split, run a Money Leak Check first. It’s a quick way to spot recurring charges you might be splitting unevenly without realizing it. From there, a paid subscription plan unlocks the full shared-expense toolkit for households that want to stop relitigating rent every few weeks.

Sources

FAQ

What Is a Fair Way to Split Rent With Roommates?

For similar rooms, split rent evenly. When rooms or amenities differ, use a room-size weighted formula or an envy-free calculator so nobody would rather trade rooms and price with someone else.

Do Roommates Split the Rent Equally?

Not always. Even splits, room-size weighting, and income-based splits are the three most common approaches, and the right one depends on how different the rooms and incomes are.

What Is the 50/30/20 Rule for Rent?

The 50/30/20 rule is a personal budgeting guideline that puts needs, including rent, at roughly 50% of after-tax income. It doesn’t tell roommates how to divide rent between themselves.

What Can I Do If My Roommate Doesn’t Pay Their Half of the Rent?

Send a documented written request first, then check your lease before escalating to mediation, small-claims court, or landlord involvement. A shared expense app can keep a transparent balance history that helps if disputes escalate.

Find Recurring Leaks in a Weekend: Privacy Friendly Spending Analysis

Spending analysis means collecting your recent transactions, grouping them into categories, and using those groups to spot leaks and set a realistic budget. Start today: export the recent months of transactions from your bank or credit card, or request a CSV file if your bank makes that easier. Several months gives you enough history to catch a pattern without dragging in a full year of noise.


TL;DR:

  • Spending analysis should cover three to six months of transactions to balance pattern recognition and avoid outdated habits skewing results.
  • Automated tools like Vala can greatly reduce manual effort by extracting, cleaning, and categorizing transaction data, especially across multiple accounts.
  • Prioritizing budget fixes involves targeting high-impact, low-effort actions like canceling unused subscriptions for quick savings.
  • Small recurring charges and shared expenses are common money leaks often missed without regular review and automation.
  • Combining analysis with forecasting helps create realistic budgets, identifying seasonal patterns and upcoming charges to prevent surprises.

Valapoint
See Where Your Spending Goes
Vala tracks expenses, manages budgets, and reveals spending patterns that can help you spot recurring leaks across everyday purchases.

Explore Vala

Table of Contents

What Spending Analysis Actually Does for You

Spending analysis exists to answer three questions: where does your money actually go, what’s quietly leaking out, and does your budget match reality. It’s different from budgeting, which sets targets going forward; analysis looks backward first, at what you’ve already spent, so your forward-looking budget isn’t a guess.

The Consumer Financial Protection Bureau recommends reviewing several months of checking account and credit card history to build an honest baseline. That word, honest, matters. Most people underestimate discretionary spending by a wide margin until they see it printed in black and white.

You don’t need to do this every week. A full review works well as:

  • A one-time deep dive when you’re building your first real budget
  • A quarterly checkup to catch new subscriptions or price creep
  • A monthly quick scan once your categories are set up

One to six months of history works, but three tends to be the sweet spot. It’s long enough to smooth out one weird month (a wedding, a car repair) but short enough that old habits you’ve already fixed don’t skew the picture.

The Five-Step Weekend Workflow

You can do this in an afternoon. It follows the same core sequence procurement analysts use for corporate spend: extract, cleanse, classify, analyze, act, adapted here for a checking account instead of a supply chain.

1. Extract your transactions. Log into every account you spend from, checking, credit cards, and any shared cards, and export three months of history. Most banks let you download a CSV or Excel file directly. If yours doesn’t, request one through customer service or use your statements as a backup source. Combine everything into a single spreadsheet or import it into an app that accepts bulk uploads.

2. Clean the data. Delete duplicate entries (a common issue if a card was charged and later refunded). Normalize merchant names so “AMZN Mktp US” and “Amazon.com” become one line item. Fix inconsistent date formats and confirm every amount is positive for spending and negative for refunds or income, or vice versa, whichever convention you’re using.

3. Categorize everything. Use a short taxonomy rather than a sprawling one. Four buckets work for most households: fixed (rent, insurance, loan payments), variable (groceries, gas, utilities), discretionary (dining out, entertainment, shopping), and subscriptions (streaming, apps, memberships). A tight taxonomy like this keeps your analysis actionable instead of turning into forty micro-categories nobody reviews twice.

4. Analyze the totals. Add up each category by dollar amount and as a percentage of your income. Flag anything recurring that you don’t immediately recognize, and look for spikes, one month where dining out doubled, a surprise annual renewal.

5. Act on three things. Cancel or renegotiate one recurring charge you don’t need. Set a hard cap on discretionary spending for next month. Automate a small transfer to savings the day after your paycheck lands, before you can spend it.

Pro Tip: Sort your subscriptions by billing date before you cancel anything. Canceling right after a renewal, rather than right before, means you don’t lose money you already paid for that cycle.

Choosing the Right Tool for the Job

Not every spending review needs software. A basic spreadsheet template works fine if you have one or two accounts and a couple of hours to spare. Where tools genuinely earn their keep is at the categorization and detection stage, the part most people find tedious enough to quit halfway through.

Four categories cover most of what’s available:

  • Spreadsheet templates — free, flexible, but every categorization is manual
  • Budgeting apps — set targets and track against them, lighter on historical analysis
  • Automated spending analyzers — import statements and auto-sort transactions using rules
  • Bank-integrated insights — built into your existing banking app, limited to that one account

Whatever you choose, look for CSV import, rule-based auto-categorization, recurring-charge detection, exportable reports, and categories you can rename or merge. Bank features like Starling Bank’s spending insights show what good category and merchant breakdowns look like, with date-range comparisons so you can see April against May at a glance.

A spreadsheet is enough if you’re doing a one-time review of a single account. Automation earns its place once you’re juggling multiple accounts, shared expenses, or a recurring monthly habit, since accurate automated classification cuts the manual prep time dramatically compared to hand-sorting hundreds of line items.

Turning Your Numbers Into a Plan

Raw totals don’t mean much on their own. Convert each category into a percentage of income first, that’s what tells you whether $400 on dining out is fine or alarming depending on whether you earn $3,000 or $8,000 a month.

Once you have percentages, prioritize using impact against effort. Fixing your biggest problem first sounds obvious, but it’s usually not the fastest win.

  • High impact, low effort: canceling one unused subscription, saves money immediately with zero ongoing work
  • High impact, higher effort: renegotiating your cell phone or insurance bill, worth a phone call
  • Lower impact, low effort: trimming one discretionary category by 10%
  • Lower impact, high effort: overhauling your grocery budget entirely, save this for later

Money Leak Snapshot: Subscription and recurring-charge reviews are consistently one of the fastest wins in a spending analysis, because canceling something takes minutes but the savings repeat every single month without further effort.

Expect visible results in stages: within 30 days you’ll likely cancel one or two subscriptions and notice a smaller discretionary total. By 90 days, your categories will feel routine and you’ll catch price increases before they slide through unnoticed. By 180 days, the habit itself becomes the real savings engine.

Real Money Leaks and Why Automation Matters Here

Manually tracking every transaction across multiple cards and a shared account eats hours. Automation doesn’t replace your judgment, it just removes the repetitive extract-clean-categorize grind so you can spend your fifteen minutes on decisions instead of data entry.

Vala’s spending analysis surfaces the same leaks over and over across real households:

  • Duplicate subscriptions billed on two cards after a card refresh or account merge
  • Group charges nobody actually uses anymore, split evenly by habit rather than by benefit
  • Free trials that quietly convert to paid plans weeks after anyone remembers signing up

These aren’t rare edge cases. They’re the everyday version of the financial leaks that show up in almost every account once someone actually looks. Automated pattern detection, the kind that flags a $14.99 charge appearing on the same date every month under three different merchant names, catches things a manual scan tends to miss simply because it happens every month and blends into the background. This piece was prepared under SaverStride editorial guidance, drawing on Vala’s work helping households detect spending patterns they’d otherwise never notice.

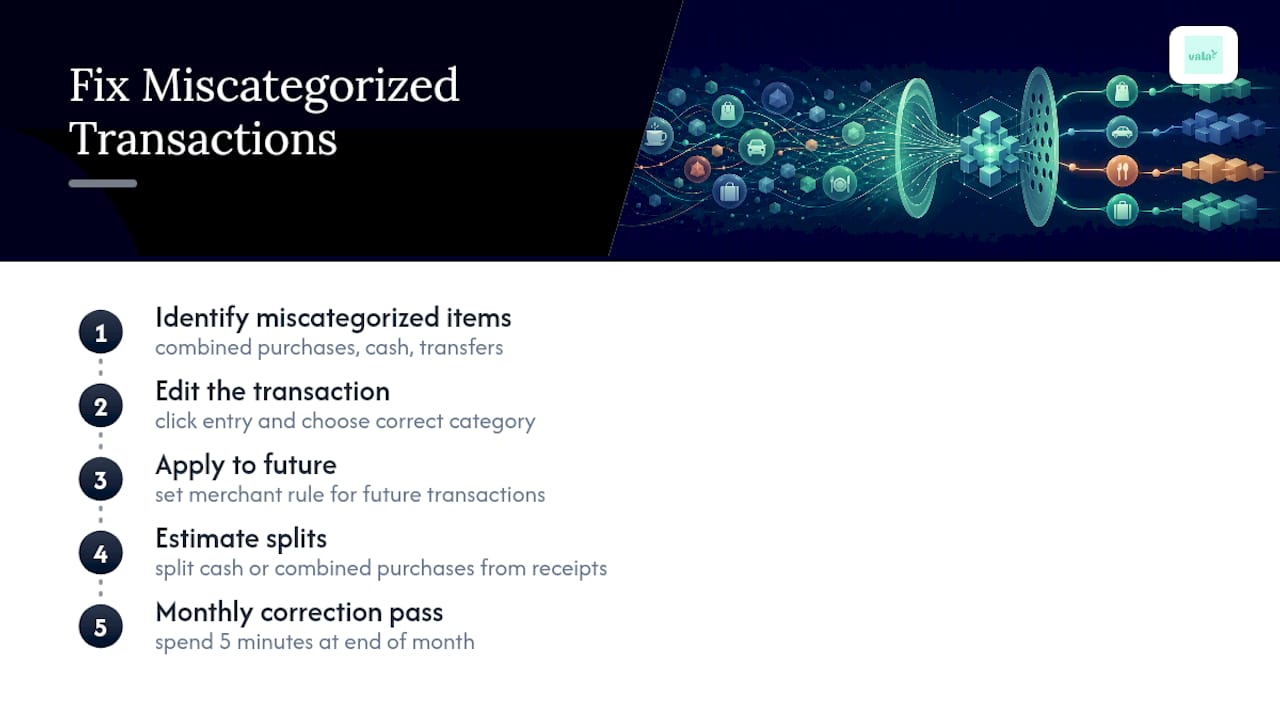
Fixing Miscategorized Transactions

Automatic categorization gets things wrong sometimes, and that’s normal, not a failure of the tool. A grocery store that also sells gas might land in “variable” one month and “fixed” the next. A big-box retailer selling everything from diapers to a television makes any rules engine guess.

When you spot a miscategorized transaction, fix it directly rather than letting it sit. Most tools let you click the entry, reassign the category, and apply that choice to future transactions from the same merchant automatically. That second step matters more than the fix itself: without it, you’re stuck correcting the same Target charge every single month.

Watch for a few recurring problem spots. Combined purchases (Target, Walmart, Costco) often mix categories in a single transaction. Cash withdrawals show up as one lump sum with no detail on what the cash actually paid for, so you may need to estimate a split based on memory or a receipt. Transfers between your own accounts sometimes get miscounted as spending, inflating your totals for no real reason.

Set aside five minutes at the end of your monthly review specifically for corrections. Skipping this step is the single biggest reason people abandon their analysis after two months, the categories stop matching reality and the whole exercise starts feeling pointless. A quick correction pass keeps the picture trustworthy.

Fixing Miscategorized Transactions — overview diagram

Protecting Your Data While You Analyze It

Handing over bank credentials or uploading transaction history means handing over a detailed record of where you live, shop, and spend your money. That’s worth treating carefully, regardless of which method you use.

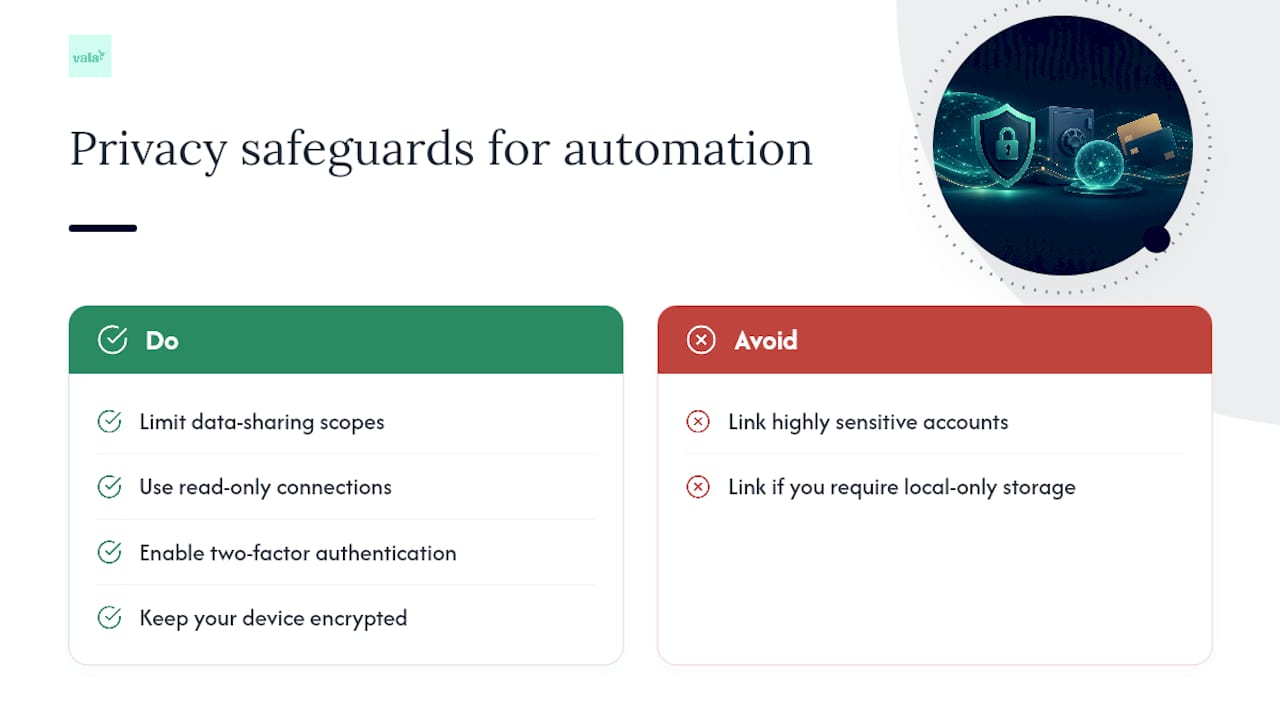
If you’re using a spreadsheet, keep it somewhere encrypted or password protected, not sitting unprotected in a shared cloud folder. If you’re using an app, check whether it connects to your bank through a read-only link (common with reputable aggregators) rather than storing your actual login credentials. Read-only access means the app can see transactions but can’t move money, which limits what a breach could actually do.

Read-only connection protecting financial data

Look for a few concrete signals before trusting any tool with financial data: bank-level encryption, a clear statement about whether your data gets sold to third parties, and the ability to delete your data entirely if you stop using the service. A vague privacy policy that never mentions encryption or data retention is a reason to keep looking.

Multi-factor authentication on the app itself is worth turning on even if it adds a few seconds to your login. Financial data doesn’t need to be exciting to be valuable to someone else. A list of your subscriptions and spending habits is enough to build a convincing scam, so treat access to it the same way you’d treat access to your bank account, because functionally, that’s what it is.

Building Categories That Actually Fit Your Life

Generic categories miss the details that matter to your specific spending. “Entertainment” that lumps together your kid’s soccer league fees and your Friday night takeout tells you nothing useful about either one.

Start with the four core buckets, fixed, variable, discretionary, subscriptions, then split further only where you genuinely spend enough to warrant it. If you spend $600 a month on pet care, that deserves its own line instead of hiding inside “variable.” If you spend $20 a month on parking, it can stay folded into “variable” without losing anything.

A good test: if a category’s total surprises you, split it. If it never surprises you, leave it alone. Categories exist to inform decisions, not to satisfy a sense of tidiness, so resist the urge to build fifteen categories when five will actually get reviewed.

Revisit your categories every few months as your life changes. A new baby, a new city, a new job with a longer commute, all of these shift what deserves its own line item. The goal isn’t a perfect taxonomy on day one. It’s a taxonomy that keeps earning your attention instead of one you build once and ignore.

Using Forecasts to Get Ahead of Future Spending

Past spending is useful mainly because it predicts future spending, not because the history itself matters. Once you have three months of clean, categorized data, you can start projecting forward instead of just looking back.

The simplest forecast is a rolling average. Take your last three months in a category, average them, and treat that number as next month’s expected spending. If your grocery average is $520, budgeting exactly $520 next month is a far better guess than picking a round number out of habit.

Watch for seasonal patterns too. Utility bills spike in summer or winter depending on climate. Gift spending clusters around the holidays. If your three-month window happens to land during a low-spending stretch, your forecast will underestimate what’s coming, so it’s worth glancing at the same months from last year if you have that data available.

Forecasting also flags problems before they hit your account. If a subscription renews annually and you know the date, you can set aside a little each month instead of absorbing the full charge in one shot. That’s the real value of combining analysis with forecasting: it turns spending review from a rearview mirror into something closer to a dashboard.

Spending Analysis vs. Budgeting: How They Work Together

Spending analysis and budgeting solve different problems, and confusing them is why a lot of budgets fail within a month or two. Analysis tells you what happened. Budgeting tells you what should happen next. Skip analysis and your budget is a guess dressed up as a plan.

Here’s how the two connect in practice:

Aspect Spending analysis Budgeting
Direction Looks backward at actual transactions Looks forward at planned spending
Question answered Where did the money go? Where should the money go?
Frequency One-time deep dive, then periodic checkups Ongoing, usually monthly
Output Categories, trends, leaks Targets and limits per category

A budget built without analysis first tends to set targets that don’t match reality, too optimistic on dining out, too generous on a subscription tier nobody uses anymore. Run the analysis first, let it inform realistic category limits, then use budgeting to hold yourself to those limits going forward. The two aren’t competing methods. Analysis is the diagnosis; budgeting is the treatment plan.

The Blind Spot Most People Miss

Most people focus their spending analysis on the big, obvious categories, rent, groceries, the car payment, and skip past the small stuff entirely. That’s backwards. Small recurring charges, especially the ones split across shared accounts with a partner or roommate, are where the real leaks hide, because nobody’s watching a $9.99 line item closely enough to question it.

The fix isn’t more discipline. It’s a system: set auto-categorization rules once, then schedule a fifteen-minute monthly review instead of a full re-analysis every time. Treat it like a recurring habit, not a one-time project, and the leaks stop reappearing.

— SaverStride

Let Vala Handle the Heavy Lifting

Doing this manually every month works, but it’s the part most people quietly stop doing after the second or third round. Vala automates the extract, clean, and categorize steps for you, then surfaces the specific money leaks, duplicate subscriptions, unused group charges, forgotten free trials, that a manual scroll through statements tends to miss.

Valapoint

Vala’s approach focuses on practical recovery rather than another dashboard to stare at: it reviews recurring charges automatically, splits shared and group expenses without the group-chat math, and gives you real-time insights tied to an actual action you can take, not just a chart. If you want to see where your own leaks are hiding, start with a free Money Leak Check or take the Financial DNA Test to understand your spending style before you dive in. Ready for the automated version, cleaning, categorizing, and recurring-charge review handled for you? Current pricing details are available on the provider’s website at Valapoint.

Where to Go Deeper

For methodology and further reading, the Consumer Financial Protection Bureau’s spending assessment guide walks through building a household baseline. Bill explains the extract, cleanse, and classify sequence in a procurement context that adapts well to personal use. For a look at what modern spend-insight tools can do, see Starling Bank’s spending insights feature, and for a structured challenge approach, the Zero Spend Guide offers a workbook for short-term aggressive saving.

Sources

FAQ

How do I do a spending analysis?

Export three months of transactions from your bank or credit card, clean and merge them into one file, sort them into a small set of categories (fixed, variable, discretionary, subscriptions), then total each category by dollar amount and percentage of income to spot leaks and set a realistic budget.

How can I save $5,000 in three months?

There’s no guaranteed formula, but pairing a spending analysis with aggressive cuts to discretionary categories and automated weekly transfers into savings gives you a realistic shot; canceling recurring charges and capping non-essential spending are usually the fastest levers.

What does “spend analysis” mean?

Spend analysis is the process of collecting, cleaning, and categorizing transaction data to understand where money goes and to identify savings opportunities, a method used across procurement and personal finance alike.

Does Vala do spending analysis automatically?

Yes. Vala automates the extract, clean, and categorize steps and surfaces recurring charges and money leaks in real time, so you get the insights of a manual spending analysis without the weekend spreadsheet work.

Automate Your Paycheck Budget With Vala: Biweekly and Weekly Examples

Budgeting by paycheck means assigning every dollar of every paycheck a job the moment it lands, matching bills to the pay date before they’re due. It works best if you’re paid more than once a month, have variable income, or feel stuck living paycheck to paycheck. Your first move: write down your next pay date and every bill due before the one after it.


TL;DR:

  • Automating savings transfers on the same day you receive each paycheck ensures consistent contribution and reduces reliance on willpower.
  • For irregular income, budgeting based on the lowest monthly average prevents shortfalls and maintains financial stability.
  • Dividing large, irregular expenses into equal parts stored in sinking funds avoids sudden financial stress or emergency bills.
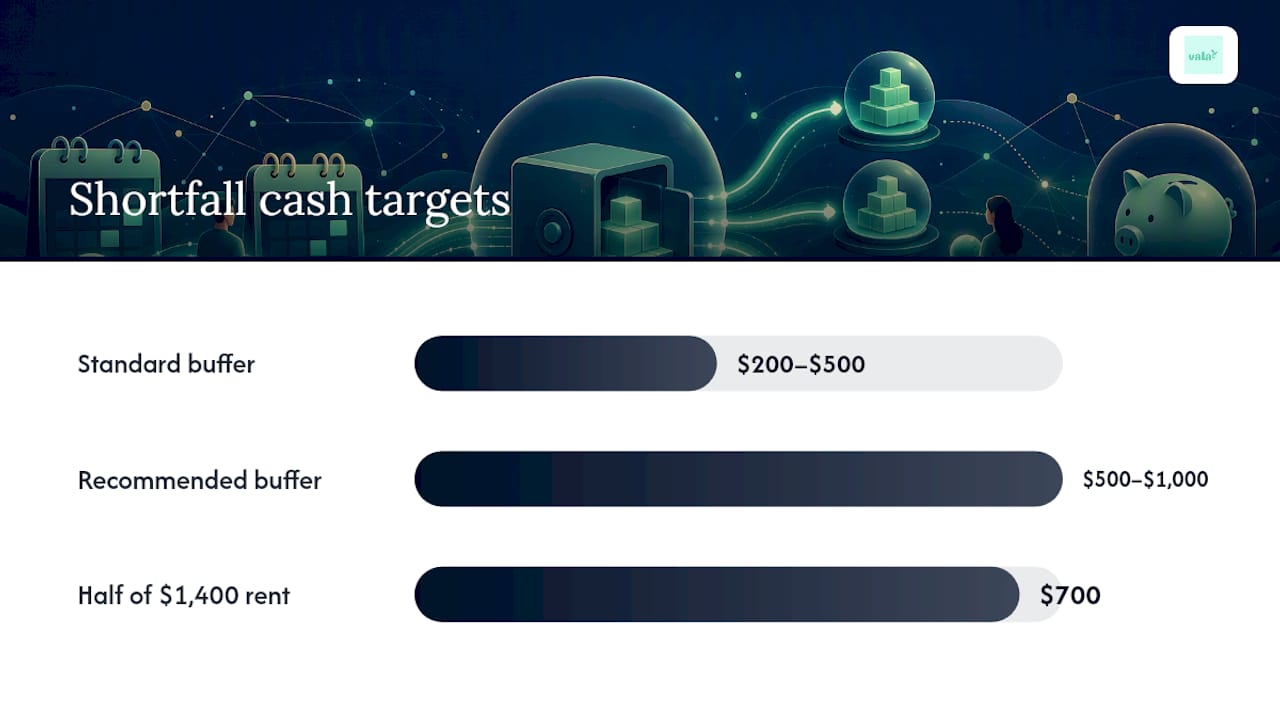
  • Keeping a checking account buffer of $200 to $500 helps absorb delays, processing errors, or slight miscalculations without missing payments.
  • Using apps that track pay dates, automate transfers, and send bill reminders makes the paycheck budgeting process more reliable and easier to maintain.

Valapoint
Make Paycheck Budgeting Easier
Vala helps you track expenses, manage budgets, and uncover spending patterns with automation, intelligent insights, and real-time tracking.

Try Vala

Table of Contents

How to Set Up a Budget by Paycheck Method

Building this system takes about 30 minutes the first time and five minutes every payday after that. The goal is simple: turn your pay schedule into a bill calendar so nothing sneaks up on you.

Here’s the setup sequence, start to finish:

  1. Pull your last two or three pay stubs. Write down your net pay (after taxes and deductions) and the exact dates you got paid. If your pay date shifts around weekends or holidays, note that too.
  2. List every bill with its due date and amount. Rent, utilities, car payment, subscriptions, minimum debt payments. Nothing gets skipped, even the $8 streaming charge.
  3. Build a bill calendar. Lay out a full month (or two, if you’re semi-monthly) and mark each bill against the calendar date it’s due.
  4. Assign each bill to the paycheck that arrives before its due date. If rent is due on the 1st and you get paid on the 28th, that paycheck owns rent. This is the core mechanic behind paycheck budgeting: list your pay dates, match bills to the paycheck before their due dates, transfer savings on payday, and whatever’s left becomes that period’s spending money.
  5. Automate your savings transfer first, not last. Set up an automatic transfer for the same day your paycheck hits, before you have a chance to spend it. This is the “pay yourself first” rule in action, and pairing it with automated savings removes the willpower problem entirely.
  6. Fund your sinking funds. For annual or irregular costs, like car registration, holiday spending, or an annual subscription, divide the yearly total by your number of paychecks and move that slice into a separate account every payday. A sinking fund method that divides a $600 yearly expense by 26 biweekly paychecks means moving about $23 aside each time, so the bill never feels like an emergency.
  7. Calculate your spending allowance. Once bills and savings are covered, whatever remains is yours to spend freely for that pay period.
  8. Set a checking account buffer. Keep an extra $200 to $500 sitting in checking at all times, untouched by your budget math, as a cushion against timing slips or bank processing delays.

A few habits make this stick:

  • Round bill estimates up slightly for variable costs like utilities, so you’re never short.
  • Recheck your bill calendar whenever a due date changes, subscriptions especially.
  • Review your buffer balance monthly, not just when something feels off.
  • Keep sinking funds in a separate account so you’re not tempted to “borrow” from them.

Pro Tip: Label your sinking fund transfers by name in your banking app, “Car Registration” or “Holiday Fund,” instead of one generic savings bucket. It’s much harder to raid a fund that has a specific purpose attached to it.

The U.S. federal consumer guidance on budgeting backs this same core loop: list income and expenses, plan your spending, and review monthly to make adjustments. Paycheck budgeting just adds the timing layer that tells you which paycheck covers which obligation.

What Does a Real Paycheck Budget Look Like?

Numbers make this method click faster than any explanation. Here are two full walk-throughs, one for biweekly pay and one for weekly pay, that you can copy directly into your own worksheet.

Biweekly example: $2,400 net per paycheck

Say you bring home $2,400 every other Friday. Your bill calendar might assign:

  • Rent ($1,400): due the 1st, assigned to the paycheck landing closest to month’s end.
  • Utilities and phone ($220): due mid-month, assigned to the second paycheck.
  • Savings transfer ($200): automated the day pay lands, before anything else moves.
  • Sinking fund ($75): covers car insurance, gifts, and annual renewals combined.
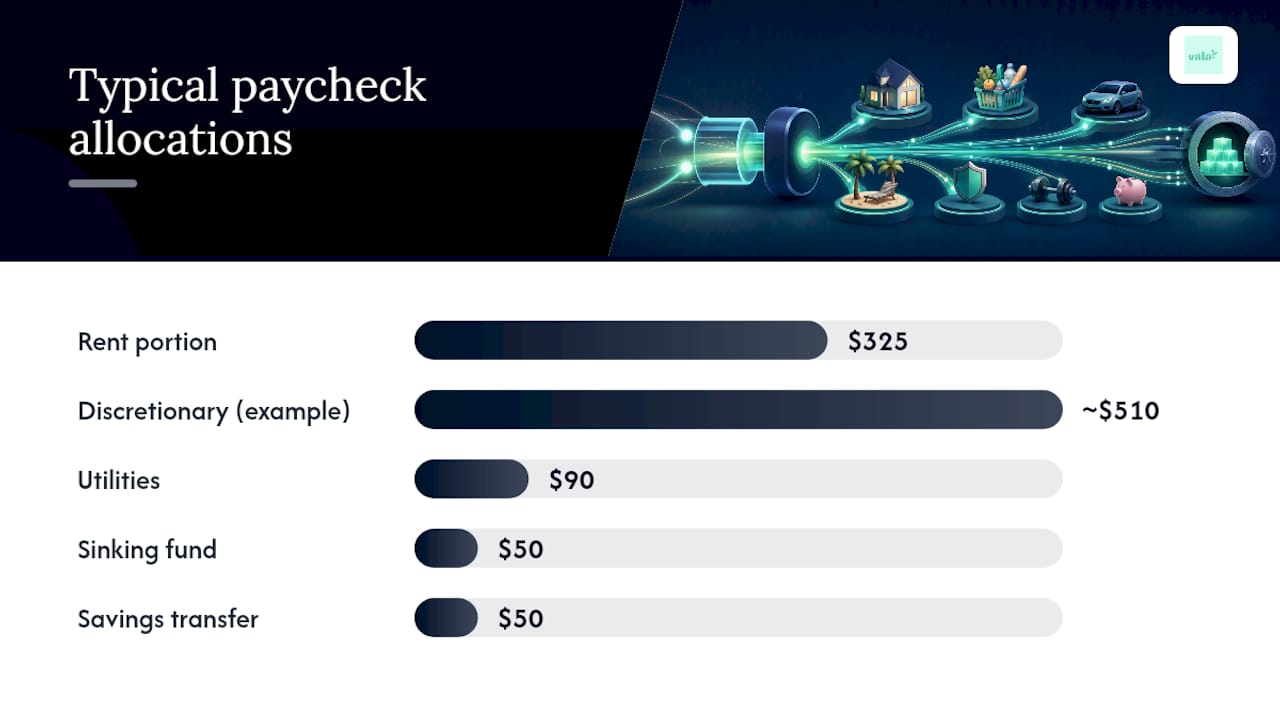
  • Remaining discretionary allowance (~$505): groceries, gas, entertainment, everything else for the two weeks.

That $505 becomes your real spending number for the period, not a guess.

Weekly example: $650 net per paycheck

If you’re paid weekly, bills get grouped differently because four paychecks a month means more frequent, smaller assignments. A typical breakdown:

  • Week 1: rent portion ($325) plus $50 into a sinking fund for annual expenses.
  • Week 2: utilities ($90), $50 savings transfer, remaining ~$510 for discretionary spending.
  • Week 3: rent portion ($325) again, plus $50 sinking fund.
  • Week 4: groceries, gas, subscriptions, and a top-off to the buffer account.

Divide the discretionary leftover by seven for a rough daily spending cap, a trick that keeps small purchases from quietly draining the whole week’s allowance.

Both schedules eventually produce an “extra” paycheck, a third biweekly check in months with 27 pay days, or a fifth weekly check in five-week months. Treat that paycheck as a windfall, not baseline income. The strongest uses: clearing debt faster, topping off your buffer, or fully funding a sinking fund in one shot instead of stretching it across months.

Quick copyable checklist for your own worksheet: pay date, net amount, bills assigned, savings transferred, sinking fund contribution, remaining allowance. Six columns, one row per paycheck. Research on paycheck-specific worked examples shows that seeing real numbers next to real dates is what actually gets people to adopt this system instead of abandoning it after week two.

Weekly example: $650 net per paycheck — overview diagram

How Do You Handle Variable Income or Shortfalls?

Not every pay schedule is clean, and not every month goes as planned. Here’s how to adapt the method when things get messy.

Variable or freelance income. Instead of budgeting your best month, use a rolling average of your last three to six months of income and budget against the lowest realistic estimate. Anything earned above that average becomes windfall money, following the same rule as an extra paycheck: debt, buffer, or sinking funds first.

Splitting large bills across paychecks. A $1,400 rent payment doesn’t have to come from a single check. Open a dedicated holding account and transfer half from each paycheck as it arrives, so the full amount is sitting there before the due date without straining any one pay period.

When a paycheck can’t cover everything assigned to it. Prioritize in this order:

  • Minimum payments on debt (avoid late fees and credit damage).
  • True essentials: housing, utilities, groceries, transportation.
  • Sinking fund contributions (pause, don’t cancel, if needed).
  • Discretionary spending and extra debt payments last.

Sizing your buffer for shortfall protection. If your income varies significantly month to month, aim for a checking buffer closer to $500 to $1,000 rather than the standard $200 to $500 range. That larger cushion absorbs a light paycheck without forcing you to skip a bill assignment entirely.

When a shortfall does happen, cut discretionary categories temporarily rather than skipping savings transfers. Pausing a sinking fund contribution for one cycle is a manageable setback. Skipping rent is not.

How Do You Handle Variable Income or Shortfalls? — overview diagram

Which Tools Actually Support This Method?

Your tool choice matters less than whether it captures pay dates as their own field, since that’s the entire mechanic this method depends on.

A solid paycheck worksheet, whether on paper or in a spreadsheet, needs these columns at minimum:

  • Pay date and net amount
  • Bills assigned to that paycheck, with due dates
  • Savings and sinking fund transfers
  • Remaining discretionary balance
  • Running buffer total

Printable workbooks work well for people who want a tactile, offline system. A printable paycheck workbook organizes bills and tracks paychecks with dedicated pages for savings targets, useful if you’re just starting out and want to see the whole system on paper before trusting an app with it.

Spreadsheets give more flexibility for people comfortable building their own formulas, letting you auto-calculate remaining allowances as you fill in bill assignments.

Apps save the most time long-term because they handle the math and the memory for you. Look for pay-date fields, scheduled transfer automation, sinking fund tracking, and bill due-date reminders, the same four functions the manual worksheet covers, just automated. A bill reminder app that flags due dates against your actual pay schedule removes the single biggest point of failure in this whole method: forgetting which paycheck owns which bill.

What Mistakes Break a Paycheck Budget?

Most paycheck budgets fail from small, avoidable habits rather than the system itself being flawed.

Buffer sizing. Keep $200 to $500 in checking at minimum (more if your income varies), untouched by your spending math. This absorbs bank processing delays and rounding errors without cascading into a missed bill.

Automate everything you can. Savings transfers, sinking fund contributions, and even bill payments where possible should happen without you touching a button. Willpower is a limited resource; automation isn’t.

Don’t treat windfalls as new baseline income. That third or fifth paycheck feels like free money, but building your regular spending around it sets you up for a rough month when it doesn’t show up.

Run a monthly review. Compare what you assigned against what actually happened. Two simple metrics: did every bill get paid on time, and did your buffer stay above its minimum? If yes to both, you’re on track.

  • Check your bill calendar for any due-date changes.
  • Confirm sinking funds are growing, not stagnant.
  • Adjust your discretionary allowance if a bill amount shifted.

Pro Tip: Set a recurring 15-minute calendar reminder for the day after each pay date. That’s your entire maintenance window, checked assignments, confirmed transfers, updated balance.

Can an App Run This Workflow for You?

Once your bill calendar and pay-date assignments are on paper, an app can take over the repetitive parts. The app lets you map your pay dates and set up scheduled transfers so savings and sinking fund contributions move automatically on payday, matching the exact workflow described above.

  • Use bill reminders to flag due dates against your real pay schedule.
  • Let the budget calculator estimate your remaining spending allowance after bills and savings are assigned.
  • Keep your manual worksheet as a backup, checking it against the app monthly.
  • Only link accounts you trust, and review connected accounts periodically for security.

Why the Timing Layer Changes Everything

Most budgeting advice tells you what percentage to spend on needs versus wants. That’s useful, but it doesn’t tell you when to move the money. Paycheck budgeting is the operational layer that turns a percentage rule into an actual transfer on an actual date. Try it for two full pay cycles before judging it. Adjust the categories, buffer size, and sinking fund amounts to fit how you actually live.

— SaverStride

Automate Your Paycheck Budget with Vala

A paper worksheet gets you organized, but it doesn’t move money for you. An app can automate the workflow this guide walks through: mapping pay dates, scheduling transfers for savings and sinking funds the moment a paycheck lands, and sending bill reminders tied to the real pay schedule instead of a generic calendar.

Valapoint

You still control the categories and the numbers. Such an app removes the manual re-entry every payday, tracks your buffer, flags bills before they’re due, and keeps sinking funds visibly separate so you’re never tempted to raid them. If you’ve been assigning bills to paychecks on paper and want that same system running itself, start with Vala’s personal finance app and connect your first pay cycle today.

Sources

This article is general information, not a substitute for advice from a qualified financial advisor. Consult a qualified financial professional about your own circumstances before acting on anything here.

FAQ

What Is the 70/20/10 Budget Rule?

The 70/20/10 rule allocates 70% of income to living expenses, 20% to savings, and 10% to debt payoff or giving, a variation on percentage-based frameworks like the more common 50/30/20 split that pairs well with paycheck timing.

What Percentage of People Earning $100,000 Live Paycheck to Paycheck?

Reporting on household cash flow shows that living paycheck to paycheck isn’t limited to lower earners, and higher-income households can face the same timing squeeze when spending scales with income; a structured paycheck budgeting system helps regardless of income level.

How Do I Start a Budget by Paycheck?

List your next pay date and net amount, write down every bill due before your following paycheck, and assign each bill to the check that arrives before its due date, then automate your savings transfer on payday.

What App Can I Use to Budget Based on My Paycheck?

Vala lets you map pay dates, automate scheduled transfers, and set bill reminders tied to your actual pay schedule, replicating a manual paycheck worksheet without the weekly re-entry.

30 Minute Budget Variance Review for Finance Teams: Find Root Causes

Budget variance analysis is the process of comparing your actual financial results against your budgeted figures to spot where reality diverged from the plan. It matters because it turns raw accounting data into a decision tool: you look at both the dollar gap and the percent gap, because materiality and scale tell you different things, and together they flag problems early enough to fix them.


TL;DR:

  • Materiality thresholds should combine percentage and dollar impact to avoid overlooking large dollar lines or being overwhelmed by tiny accounts.
  • Comparing static versus flexible budgets helps isolate whether cost overruns are due to price changes or volume increases, especially in multi-product businesses.
  • Running variance reviews monthly with a clear, concise template and assigned owners ensures timely action and prevents recurring issues from being ignored.
  • Small, uncontrollable, or one-time variances typically require monitoring, while controllable or structural ones demand immediate corrective measures or reforecasting.
  • Automating the mechanical calculation of variances frees analysts for interpretation, but final decisions on classification and action should remain manual.

Valapoint
Bring Everyday Spending Into Focus
Vala helps individuals, couples, and groups track expenses, manage budgets, and uncover spending patterns behind financial leaks.

Table of Contents

What Is Budget Variance Analysis and When Should You Use It?

At its core, budget variance analysis compares what you actually spent or earned against what you planned, then asks why the gap exists. That “why” is the whole point. A number without an explanation just sits on a report; a number with a root cause turns into a decision.

You’ll usually compare actuals against one of two baselines: a static budget (the original plan, untouched all year) or a flexible budget (the plan adjusted for actual activity levels, like volume or headcount). Static comparisons work fine when your revenue and costs are stable. Flexible comparisons matter more when volume swings, because they separate “we sold more than expected” from “we spent inefficiently.”

Finance teams lean on this analysis in a few recurring moments:

  • Monthly close review, where you check whether the month played out as planned before you finalize reporting.
  • Management reporting, where leadership needs a fast read on which categories need attention.
  • Reforecast triggers, where a variance is large enough that the original budget no longer reflects reality.

A healthy variance program does two things over time. It builds accountability, because owners know their numbers get reviewed on a schedule. And it sharpens your forecasting, since each cycle of comparing plan to actual teaches you where your assumptions were off.

What Are the Main Types of Budget Variances?

Not every variance means the same thing, and the label “favorable” can be misleading if you apply it carelessly. A favorable variance on a revenue line means you earned more than planned. A favorable variance on an expense line means you spent less than planned. Flip the direction on either side and you get “unfavorable.” The mistake most new analysts make is assuming favorable always means good. Underspending on marketing might be favorable on paper and still cost you a quarter of missed pipeline.

For revenue, the standard decomposition splits the variance into price, volume, and mix. Price variance captures the effect of selling at a different price than planned. Volume variance captures the effect of selling more or less. Mix variance, relevant for multi-product businesses, captures what happens when your product mix shifts even if total volume matches the plan.

For costs, you break variances down similarly: price (did you pay more per unit), efficiency (did you use more inputs than planned), and volume (did activity levels change), layered against fixed versus variable classification.

Beyond the number itself, classify every variance along four lines:

  • Timing: the money moved to a different period than planned.
  • Structural: a lasting shift, like a permanent rate increase.
  • One-time: a single event unlikely to repeat.
  • Controllable versus uncontrollable: whether the owner could have influenced the outcome.

How Do You Calculate a Budget Variance?

The formulas are simple enough to do in your head for small numbers, but running them consistently across every line item is where the discipline pays off.

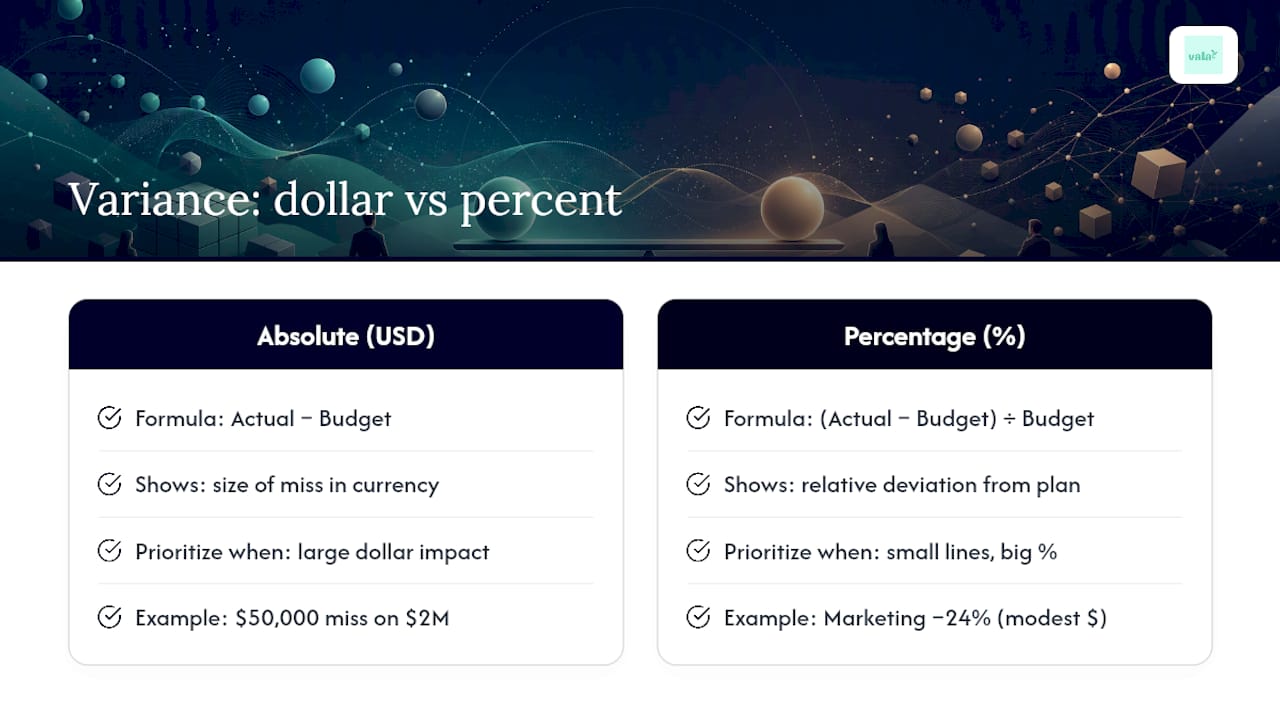
Absolute (dollar) variance = Actual − Budget

Percentage variance = (Actual − Budget) ÷ Budget

Dollar variance tells you the size of the miss in real currency. Percentage variance tells you how far off you were relative to what you planned. You need both, because a $2,000 miss on a $10,000 line is a big percentage swing but a small dollar one, while a $50,000 miss on a $2 million line is a tiny percentage but a number leadership will ask about immediately.

Here’s a simplified monthly example:

Pro Tip: Sort your variance report by dollar impact first, then scan percent variance for smaller line items you might otherwise skip. Ranking by dollar impact keeps you focused on what actually moves the bottom line, while the percent column catches a line like Marketing here: a 24% swing worth investigating even though the dollar amount is modest next to Revenue or COGS.

Marketing underspent by nearly a quarter, which could mean discipline or could mean a paused campaign that will hurt next quarter’s pipeline. Salaries barely moved. Each number needs its own follow-up question.

How Do You Calculate a Budget Variance? — overview diagram

How Do Flexible Budgets Isolate the Real Cause of a Variance?

A static budget can’t tell you whether a cost overrun came from paying more per unit or simply doing more volume. A flexible budget solves that by recalculating what you should have spent at the actual activity level, then comparing that adjusted figure to what you actually spent.

Building one takes a few steps:

  • Pick an activity driver: units sold, hours worked, transactions processed, whatever scales your costs.
  • Recalculate variable costs at the actual activity level, holding fixed costs constant.
  • Compare actual results to this flexed figure, not the original static number.

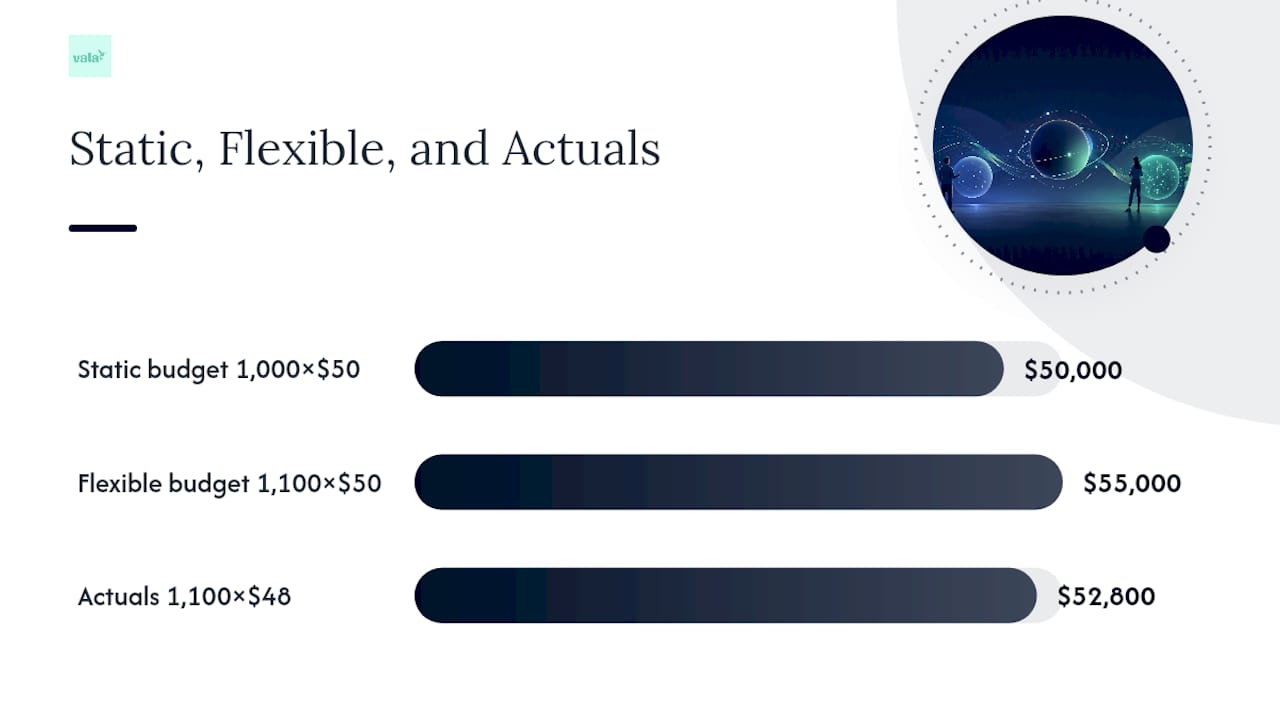
Presenting the static budget, the flexible budget, and actuals side by side is the clearest way to show a reviewer exactly where a variance came from.

For a single product, this mostly isolates volume from rate. For multi-product businesses, you add mix variance on top, since selling more of your lower-margin product while holding total units flat will show up as a favorable volume variance and an unfavorable mix variance at the same time. A quick illustration: if you budgeted 1,000 units at $50 revenue each ($50,000) but sold 1,100 units at $48, your volume variance is positive (+100 units × $50 = +$5,000) while your price variance is negative (100 units of underpricing at $2 × 1,100 = actually calculated as (Actual price − Budget price) × Actual volume = −$2,200).

How Do Flexible Budgets Isolate the Real Cause of a Variance? — overview diagram

How Often Should You Run a Variance Review?

Cadence matters as much as accuracy. Most finance teams run their primary review during the monthly close, then bring a summarized version to leadership a few days later once root causes are attached. Waiting longer than a month to catch a structural variance usually means you’ve already absorbed a quarter of unnecessary cost.

Set your materiality threshold using an AND rule rather than a single cutoff. Combining a percentage test with a dollar test stops you from either drowning in noise from tiny accounts or ignoring a large-dollar line that only moved by 2%.

A workable variance report template includes:

  1. Category and line item name.
  2. Month-to-date and year-to-date figures, in both dollars and percent.
  3. Prior-year comparison for context.
  4. Latest forecast, not just the original budget.
  5. Root cause, once identified.
  6. Assigned owner and due date for any follow-up action.

Pro Tip: Keep the review itself to about 30 minutes. A tight, repeatable review ritual that covers your top five or six variances and assigns next steps beats an exhaustive line-by-line audit that burns an afternoon and produces no decisions.

When a variance is structural rather than a one-time blip, that’s your trigger to reforecast rather than just noting it and moving on. A driver-based rolling forecast updates faster than an annual budget and keeps your comparisons relevant to current conditions instead of assumptions made a year ago. For teams weighing when a forecast update makes more sense than sticking with the original plan, comparing budget to forecast approaches is worth a closer look.

How Do You Decide What to Do With a Variance?

Finding a variance is only half the job. The other half is deciding whether it needs a shrug, a phone call, or a full reforecast.

Start with root-cause techniques that don’t require a data science degree:

  • 5-Why: ask “why” five times until you hit an actual cause instead of a symptom.
  • Price/volume split: isolate whether the miss came from rate or quantity before you assign blame.
  • Supplier or contract checks: many cost variances trace back to a renegotiated rate or a missed contract escalation clause.

From there, apply a simple decision rule. Small, one-time, uncontrollable variances usually just need monitoring. Controllable variances above your threshold need immediate corrective action from the line owner. Structural variances, the kind likely to repeat next month, need a reforecast so your plan reflects the new reality instead of chasing an outdated number.

Keep a disposition log of every material variance and what happened to it. Without one, you’ll investigate the same recurring overage three months in a row because nobody remembers it was already explained in February.

Where Does Automation Fit in Variance Analysis?

Automation handles the mechanical part well: pulling actuals, calculating dollar and percent variance, and flagging outliers against your thresholds. Technology can take on that repetitive calculation work, freeing analysts to spend their time on interpretation instead of spreadsheet formulas.

Vala’s AI-driven expense analysis applies that same logic to personal and household budgets, surfacing category drift and recurring subscription creep before they compound. Automation should surface likely causes and suggested decompositions, but finance still owns the final call on classification and what happens next.

What Actually Separates a Good Variance Program From a Weak One?

Chasing every line item to the penny burns time without improving decisions. The finance teams that get real value from this work pick their top variances by dollar impact, assign an owner, and move on. Concise, repeatable reviews beat exhaustive audits almost every time, because a decision made this month is worth more than a perfectly explained variance made three months late.

— SaverStride

Sources

FAQ

How Do You Calculate a Budget Variance?

Subtract the budgeted amount from the actual amount to get the dollar variance, then divide that dollar variance by the budget to get the percentage variance. Reviewing both together shows you the size of the miss and its relative significance.

What Is an Example of a Variance Analysis?

If you budgeted $50,000 for marketing and spent $38,000, your dollar variance is negative $12,000 and your percentage variance is negative 24%. From there you’d investigate whether the underspend was intentional discipline or a paused campaign that could hurt future pipeline.

Is It Good to Have a Budget Variance?

It depends on the direction and the line item: a favorable variance on revenue is good, but a favorable variance from underspending on a growth-driving category like marketing can signal a missed opportunity rather than success.

What Are the Three Types of Variances?

The most common framework splits variances into price, volume, and mix for revenue, or price, efficiency, and volume for costs, though teams also classify variances as timing, structural, one-time, or controllable versus uncontrollable depending on the analysis they need.

Use Your Last 6–12 Months to Budget Irregular Income for Freelancers

The fix for irregular income is a system, not a forecast: set a conservative baseline from your last 6 to 12 months of earnings, route every payment into labeled accounts, hold a buffer, and pay yourself a steady salary from it. This stabilizes your monthly cash flow and keeps tax money separate from spending money. Your first move is simple: pull up your last 6 to 12 months of net income before you touch a single budget category.


TL;DR:

  • Setting a conservative income baseline from your lowest month over six to twelve months ensures stable pay regardless of variable client payments.
  • Automating income split into tax, buffer, and spending accounts helps prevent misallocation and maintains system integrity during busy or slow periods.
  • Building a buffer of one to three months of salary and an emergency fund of six or more months provides day-to-day security and protection against larger shocks.
  • Prioritizing essential bills and savings in a tiered system allows for flexibility during slow months without risking crucial expenses.
  • Recalculating your baseline every six months and adjusting your buffer and emergency funds accordingly prevents recurring financial shortfalls.

Valapoint
Bring Your Spending Into Focus
Vala helps you track expenses, manage budgets, and uncover spending patterns with intelligent insights and real-time tracking.

Explore Vala

Table of Contents

Why Forecasting Fails (and Systems Win) for Variable Pay

Predicting next month’s income when you freelance, work commission, or drive for a gig platform is close to guessing. Clients pay late, projects fall through, and seasonal demand swings your paycheck by hundreds or thousands of dollars. A budget built on a forecast breaks the moment reality misses the number, and it usually misses.

Systems solve a different problem. Instead of asking “how much will I earn this month,” you ask “how much do I need to pay myself, regardless of when the money lands.” That shift is the whole trick.

A one-month buffer, sometimes called living on last month’s income, is the mechanism that makes it work. You spend this month using money you already earned last month, so a late invoice or a slow week never touches your rent payment. This is why the Consumer Financial Protection Bureau’s research matters: nearly a quarter of U.S. consumers report month-to-month income swings, and those households face a higher risk of falling behind on essential bills. A buffer directly targets that risk.

What a baseline-buffer system gives you:

  • A predictable “paycheck” even when client payments arrive on their own schedule
  • One month of breathing room between a missed payment and a missed bill
  • A separation between tax money, business costs, and what you actually spend

How Do You Calculate a Safe Income Baseline?

Your baseline is the number you can count on every month, not the number you hope for. It should represent the floor, not the average.

  1. Pull your last 6 to 12 months of net income. Nebraska’s Department of Banking and Finance recommends this window specifically because it captures a full seasonal cycle for most freelancers and gig workers.
  2. Identify your lowest consistent month. Exclude a true outlier (a month you were sick, a one-time bonus) but keep every normal slow month in the data.
  3. Choose your baseline method. Use the lowest month directly if your income is highly volatile, or use a floored average (take your 6 to 12 month average, then apply roughly 80% of it) if your income is moderately variable.
  4. Adjust for known non-monthly costs. Divide annual bills like car registration or software renewals into monthly amounts and fold them into the baseline.
  5. Set your personal salary at or below this number. This is the amount you pay yourself from the buffer every month, no matter what came in.

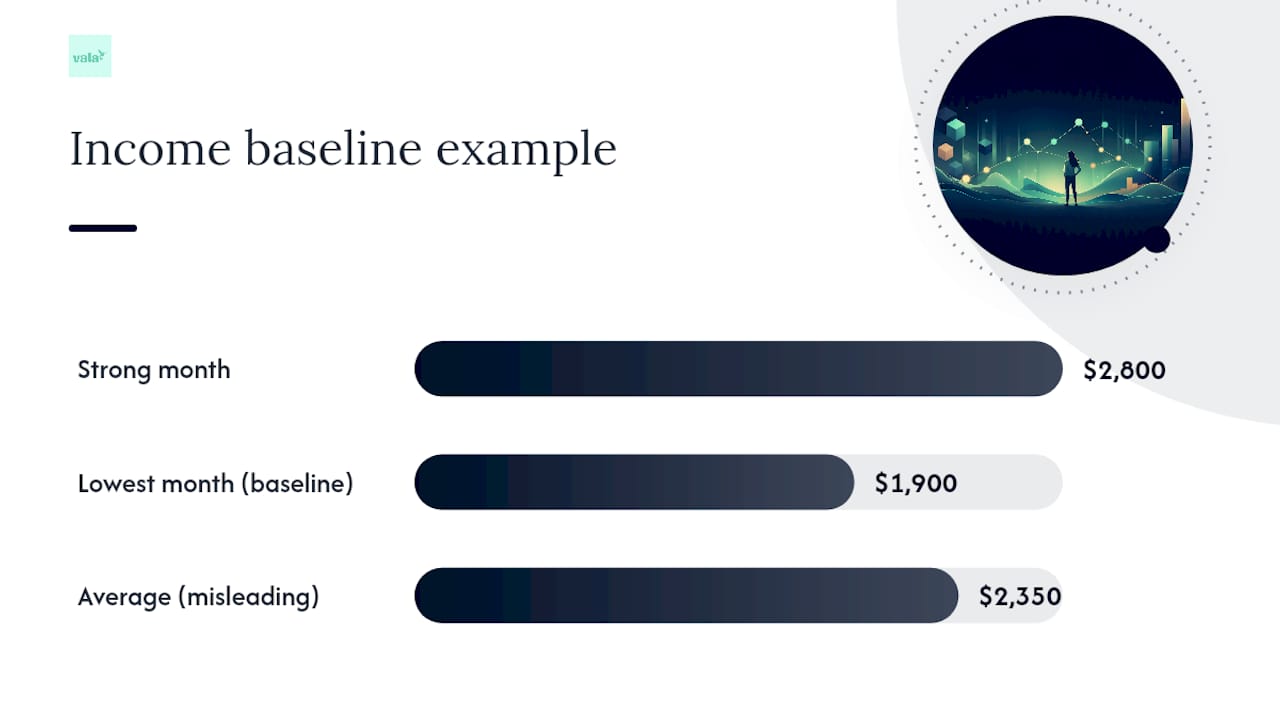
A driver earning $2,800 in a strong month and $1,900 in a slow one should not budget off $2,350. The lowest consistent month, $1,900, is closer to the real floor.

Pro Tip: Recalculate your baseline every 6 months. Rising income should eventually raise your salary, but only after two or three strong quarters confirm it is not a fluke.

How Do You Calculate a Safe Income Baseline? — overview diagram

Buffer vs. Emergency Fund: What’s the Difference?

A buffer and an emergency fund solve different problems, and confusing them is the most common mistake variable earners make.

The buffer smooths timing. It is the account that lets you pay yourself last month’s income this month, absorbing the normal lag between invoicing and getting paid. The emergency fund absorbs shocks: a lost client, a medical bill, a broken laptop that halts your work entirely.

  • Buffer target: 1 to 3 months of your salary amount, built first since it is what makes the whole system function day to day.
  • Emergency fund target: 6 or more months of living expenses. Guidance on cash buffers points variable earners toward the high end of standard advice, since a slow season and a personal emergency can hit at the same time.
  • Where to keep both: a high-yield savings account that’s separate from checking, easy to transfer from, but annoying enough to access that you won’t dip in on impulse.

Fund the buffer before the emergency fund. A one-month buffer eliminates most day-to-day stress; the emergency fund is your protection against the bigger, rarer hit. Once the buffer covers a full month of salary, split new savings between the two until the emergency fund reaches its target.

Roughly one in four Americans deals with income that moves month to month, according to the CFPB’s financial well-being data, and those households report more difficulty covering bills than steady-income households. A funded buffer is the single change that closes most of that gap.

How Should You Split Every Payment You Receive?

Every dollar that lands in your account needs a job before it ever reaches your spending money. Waiting until month’s end to figure out where money goes is how buffers stay empty and tax bills come as a surprise.

  1. Set aside 25 to 30% for taxes first. This range covers both self-employment tax and income tax for most freelancers, according to NerdWallet’s guide to irregular income.
  2. Cover business costs next, using whatever percentage matches your actual overhead (software, mileage, supplies).
  3. Route a fixed percentage to your buffer until it reaches your target.
  4. Pay yourself your set salary, the number from your baseline calculation.
  5. Send anything left to goals, savings, extra debt payments, or your emergency fund.

The account structure that makes this run on autopilot has four roles: a holding account where every payment lands first, a tax account, a buffer account, and your personal spending account. Penn State Extension’s guide to irregular income recommends exactly this setup, and it works because no single account ever mixes purposes.

Pro Tip: Set up automated transfers that trigger the moment a deposit hits your holding account. If you have to move the money manually, you will eventually skip it during a busy week, and that’s how tax money quietly becomes rent money.

Build a Priority-Based Budget That Funds Essentials First

A priority-based budget answers one question before any other: what gets paid no matter what? Building your spending in tiers, rather than category by category, means a slow month still covers rent even if it means discretionary spending hits zero.

A workable priority order looks like this:

  • Housing and utilities
  • Food (a real grocery number, not a guess)
  • Transportation and insurance
  • Minimum debt payments
  • Taxes (already set aside from each payment, not budgeted separately)
  • Buffer contribution
  • Emergency fund contribution
  • Retirement savings
  • Discretionary spending, last

Fund each tier from your baseline salary, top to bottom, before moving to the next one. In a low month, you might only clear housing, food, transportation, and minimum debt, leaving retirement and discretionary spending at zero. That’s the system working as designed, not a failure.

In an average month, everything through emergency fund contributions gets funded and a little discretionary spending survives. In a high month, the surplus above your fixed salary should go somewhere specific, extra debt payoff, a bigger retirement contribution, or a goal you’re funding, rather than sitting unassigned in your checking account where it quietly disappears.

What’s the Right Way to Set Aside Money for Taxes?

Underpaying taxes is the most expensive mistake irregular earners make, mostly because it’s invisible until it isn’t. A strong year of freelance income can turn into a shock at tax time if you spent what should have gone to the IRS.

  • Set aside 25 to 30% of every payment for taxes, covering both self-employment tax and regular income tax; your exact rate depends on total income and state.
  • Use the IRS Tax Withholding Estimator to check whether your set-aside percentage matches your real liability.
  • File estimated quarterly payments using Form 1040-ES if you receive 1099 income with no withholding.
  • Keep tax money in its own account, completely separate from your buffer and spending accounts.
  • Never borrow from your tax account to cover a slow month. That’s the fastest way to turn one problem into two.

Treating taxes as a first-priority category, something you set aside the moment money lands rather than something you calculate later, removes most of the anxiety around quarterly payments. The money is already gone from your spendable balance before you’re tempted to use it.

What Weekly and Monthly Habits Keep This System Accurate?

A system only works if you check it. Nebraska’s budgeting guide for irregular income recommends a short weekly review, and ten minutes is genuinely enough once your accounts are set up correctly.

Your weekly checklist:

  • Confirm every payment received got split into its labeled accounts
  • Check your buffer balance against your target
  • Review upcoming bills for the next two weeks
  • Flag any client payment that’s running late

Monthly, reconcile your actual salary payment against your baseline, and confirm your tax account balance is tracking with your income so far this year.

For the tools themselves, a cash-flow calendar helps you see slow weeks coming, and split-rule automation removes the manual work of dividing each deposit. Some personal finance apps automate this structure by splitting incoming payments by your set percentages, tracking your buffer against a target you set, and flagging recurring subscriptions or spending drift that quietly eats into your salary. The Monthly Expense Calculator helps you nail down your essential spending number before you set your baseline salary.

Pro Tip: Label every transfer the moment you set it up, not later. “Tax,” “Buffer,” and “Salary” as transfer names sound obvious, but six months in, unlabeled transfers become a guessing game.

What Should You Do the Moment a Month Falls Short?

A slow month is not a crisis if your system is already built for one. Here’s the order of operations the moment income drops below your baseline:

  1. Cut discretionary spending immediately. This tier goes to zero first because it’s designed to.
  2. Pause transfers to non-essential goals, retirement contributions and extra debt payments included, until income recovers.
  3. Draw from your buffer to keep your salary payment steady. This is exactly what the buffer exists for.
  4. Leave tax money untouched. No matter how tight the month, that account is off-limits.
  5. Contact creditors early if a bill genuinely won’t get covered. Most lenders offer more flexibility to someone who calls before a missed payment than after.

Once income recovers, rebuild in this order: refill the buffer back to its target first, since it’s what protects you from the next slow stretch. Then rebuild the emergency fund if you dipped into it. Only after both are back to target should extra income go toward goals or increased discretionary spending. Skipping straight to celebration spending after a good month is how the same shortfall repeats itself three months later.

What I’ve Learned Watching Irregular Earners Build Real Stability

The freelancers and gig workers who stop stressing about money aren’t the ones who land bigger clients or higher commission rates. They’re the ones who stop budgeting off hope and start budgeting off a number they already have in the bank. That shift, from forecasting to systems, is where the anxiety actually lifts.

Start with one piece this week: pull your last six months of net income and find your real floor. You don’t need the whole system running by Friday. You need one honest number to build on.

— SaverStride

Get Your System Running with Vala

Building a baseline-buffer system by hand works, but it takes real discipline to keep every payment split correctly week after week. Vala closes that gap by automating the parts that usually break down first, the splits, the buffer tracking, and the drift that quietly eats into your salary before you notice it.

Valapoint

Set up a holding account, tell Vala your split percentages for taxes, buffer, and salary, and every incoming payment routes itself the moment it lands. The app tracks your buffer against the target you set, flags subscriptions and spending patterns that pull money away from your goals, and gives you a real-time view of where you actually stand between paychecks. If you’re still working out your baseline number, the Monthly Expense Calculator helps you nail down your essential spending before you commit to a salary amount.

Start with the Vala personal finance app on its free plan, set up your accounts, and turn on split rules today. You’ll see your first automated payment split within minutes of connecting your bank.

This article is general information, not a substitute for advice from a qualified financial advisor. Consult a qualified financial professional about your own circumstances before acting on anything here.

Sources

FAQ

What Is the 70/10/10/10 Budget Rule?

For irregular earners, it works better applied to your baseline salary than to raw monthly income, since raw income swings too much to hold a fixed percentage steady.

What Percentage of People Earning $100,000 Live Paycheck to Paycheck?

Specific figures vary by survey and year, so no single number holds up as definitive across all sources. What is well documented is that income level alone doesn’t prevent cash-flow stress; irregular timing and inconsistent monthly amounts, tracked by the CFPB, drive bill-payment difficulty regardless of total income.

What Is the Best Budget App for People with Fluctuating Income?

The best fit is an app that automates payment splitting and buffer tracking rather than one built only for fixed monthly budgets. Vala automates the exact split-and-buffer structure this guide describes, routing each deposit to labeled accounts and tracking your buffer against a target automatically.

What Is the 3/6/9 Rule in Finance?

This isn’t a standardized financial planning framework, and definitions vary depending on the source. If you’ve seen it referenced for savings targets, treat any specific claim with caution and rely instead on the well-documented emergency fund guidance of 6 or more months of expenses for irregular earners.

How Much Should Freelancers Set Aside for Taxes?

A conservative rule of thumb is 25 to 30% of each payment, covering both self-employment tax and income tax, though your exact rate depends on total income and state. Confirm your number using the IRS Tax Withholding Estimator and file quarterly with Form 1040-ES if you receive unwithheld income.

Stop Post Trip Fights: 8 Travel Expense Categories for Couples & Groups

Build your trip budget around eight categories: transport, accommodation, food and drink, local transport, activities, travel essentials, shopping and extras, plus a buffer of about 10 to 15% of the total. Estimate each one before you leave, then log every purchase in an app or shared tracker as it happens. That single habit is what separates a trip that stays on budget from one that quietly bleeds cash.


TL;DR:

  • Accurate budget estimates should include separate categories for groceries and restaurant meals to track daily spending habits more transparently.
  • Use a buffer of 10 to 15 percent to cover unexpected costs like taxis or currency fluctuations, especially in unfamiliar destinations.
  • Decide group expense splits in advance with methods such as equal, itemized, or room-based to prevent disagreements and simplify settling up.
  • Logging expenses in real-time with an automated app helps avoid post-trip confusion and reduces the risk of overspending or forgotten costs.
  • Fixed costs like flights, accommodation, insurance, and visas should be locked in early, while flexible expenses like food and activities can be estimated more loosely.

Valapoint
Keep Every Trip Expense Clear
Vala helps couples and groups track spending, manage budgets, split costs, and spot patterns before small leaks become bigger problems.

Explore Vala

Table of Contents

What Are the Main Travel Expense Categories?

Every dollar you spend on a trip falls into one of a handful of buckets. Get the categories right and the math takes care of itself.

Transportation splits into two parts people often lump together. Your main transport is the flight, train, or long drive that gets you there. Separate from that is transport-to-departure: parking at the airport, the ride to the station, or a shuttle. Checked baggage fees belong here too, and on budget airlines that fee can rival the ticket price itself.

Accommodation is rarely just the nightly rate you see on the booking screen. Add platform service fees, then check for city or resort taxes, which many destinations charge per person, per night, on top of the listed price. A $100-a-night room can land closer to $115 once fees clear.

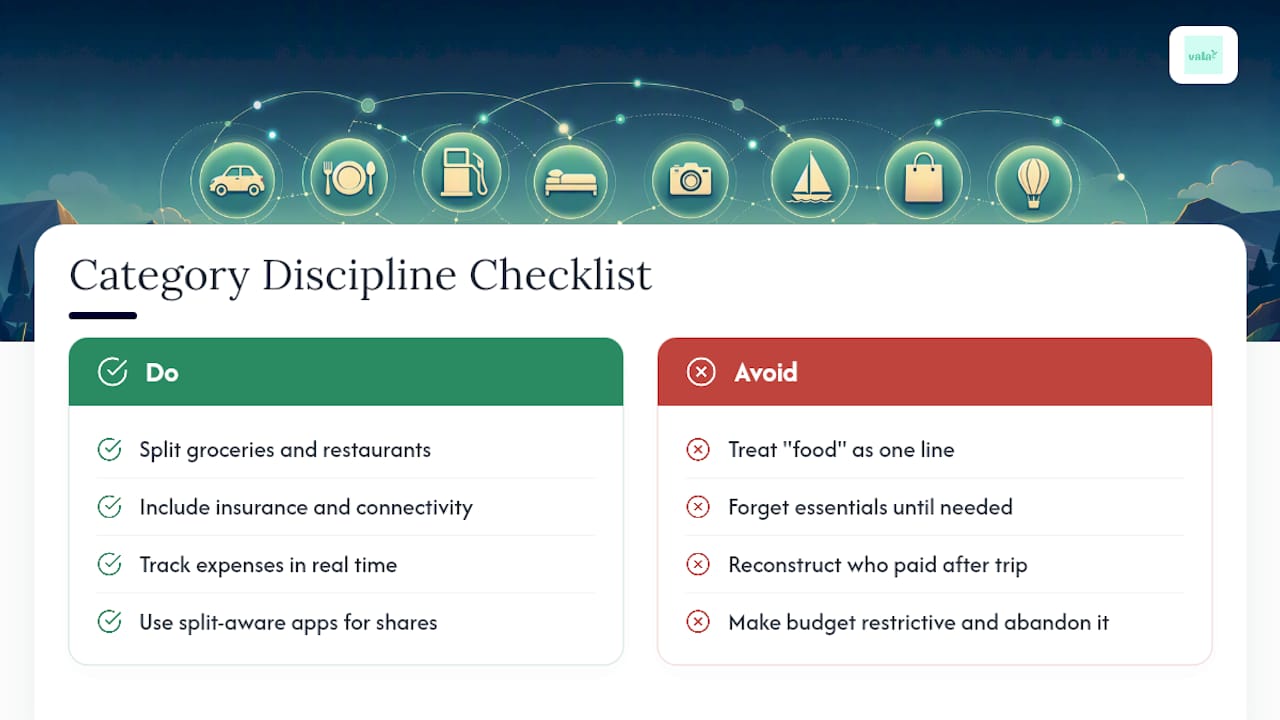
Food and drink works best split into two lines, not one. Groceries and quick lunches behave like a daily habit; sit-down restaurant meals behave like a splurge. Tracking them separately shows you exactly where a food budget actually goes.

Local transport covers everything that moves you around once you’ve arrived: metro or bus passes, rideshare fares, rental car fuel, and tolls. This category gets ignored in planning and then quietly becomes one of the bigger daily costs on the ground.

Activities and attractions is the fun bucket, but it needs its own line so it doesn’t disappear into “extras.”

Travel essentials cover the boring purchases that protect the trip: travel insurance, visa fees, and an eSIM or roaming plan for connectivity. Guides on smart travel budgeting flag insurance, connectivity, and visas as the lines travelers most often forget, right up until they need them.

Shopping, souvenirs, and tips round things out, and this is where a firm buffer matters most.

  • Transportation: flights/trains, airport transfer, parking, checked baggage
  • Accommodation: nightly rate, service fees, city/resort tax
  • Food and drink: groceries, restaurants, coffee and snacks
  • Local transport: transit passes, rideshare, fuel, tolls
  • Activities: tours, tickets, museum passes
  • Travel essentials: insurance, visas, eSIM/roaming
  • Shopping and extras: souvenirs, gifts, tips

Pro Tip: Set up your categories in your tracker before the trip, not during it. Naming them in advance takes thirty seconds and saves you from dumping everything into a vague “miscellaneous” pile once you’re actually traveling.

How Do You Estimate Each Travel Budget Category?

Two methods work well, and you can combine them. The first is a category-first template: you fill in every line above using real prices before you go. The second is anchor-and-float, where you separate fixed costs from daily flexible ones so the budget feels realistic instead of restrictive.

  1. List your fixed costs first. Flights, accommodation total, insurance, and visas rarely change once booked, so lock those numbers in early.
  2. Set a daily food anchor. Check average restaurant and grocery prices for your destination, then multiply by trip length.
  3. Estimate activities conservatively. Price two or three “must-do” experiences and assume the rest will cost less.
  4. Add local transport as a small daily line, not an afterthought.
  5. Apply your buffer last, once every other category is filled in.

Combining fixed and flexible costs into daily anchors is exactly how practical travel templates turn a vague trip idea into a number you can actually track against.

Buffer sizing isn’t arbitrary. A 10 to 15% contingency covers the taxi you didn’t plan for or the exchange rate that moved against you.

Once every category has a number, divide by trip length and travelers. Say a couple budgets $2,400 total for a 6-day trip. That’s $400 per day for two people, or $200 per person, per day. Compare that daily figure against destination examples like the lean, mid, and comfort tiers many guides publish, and you’ll know quickly whether your number is realistic or optimistic.

How Should Couples and Groups Split Travel Costs?

Decide what’s shared and what’s personal before anyone books anything. A five-minute conversation before the trip prevents a tense one during it.

Run through this checklist as a group:

  • Which costs are shared by default (lodging, group meals, transport)?
  • Which are personal (souvenirs, individual activities, drinks)?
  • Who’s fronting large upfront payments, like a nonrefundable rental deposit?
  • What split method will you use?

Three splitting methods cover almost every situation. Equal split works when everyone eats, sleeps, and does the same activities. Itemized split works when spending is uneven, so each person only pays for what they actually used. Room-based split works when one person books a suite and others share a standard room. Charging everyone the same rate in that case isn’t fair, so weight the accommodation line by actual room cost.

Log the first shared expense the moment it happens, not at the end of the trip. Waiting even a day makes it harder to remember who covered what, and starting to track immediately is consistently the advice that prevents post-trip arguments over money.

Friends logging a shared travel expense

Pro Tip: If one person pays for something big, like a group dinner or a shared Airbnb, don’t wait to “figure it out later.” Log it right away and let the group settle up once, at the end, with a single net transfer instead of five separate reimbursements. For more structure on setting this up before you fly, see how to organize group expense categories ahead of a trip.

What’s the Best Way to Track Travel Expenses on the Go?

Log every purchase the moment it happens, then do a two-minute nightly reconciliation to catch anything you missed. That combination beats trying to remember six days of spending on the flight home.

Look for these features in whatever app or spreadsheet you use:

  • Shared expense logging with automatic per-person splits
  • Category tagging that matches the framework above
  • Bank or card auto-imports so you’re not typing every receipt
  • Multi-currency support if you’re crossing borders
  • Receipt photo storage for anything you might need to dispute later

Keep your categories consistent across the whole trip. If you tag one taxi ride as “local transport” and another as “misc,” your totals stop meaning anything. Automation helps here: apps with built-in rules and AI-driven insights can auto-tag recurring charges and flag categories running hot before you’re three days into overspending on food.

Method Best for Main tradeoff
Spreadsheet Solo trips, simple math Manual entry, no auto-split
Shared-expense app Couples and groups Needs setup time upfront
Bank export + manual sort Post-trip review only No real-time visibility

A spreadsheet works fine for a solo trip with no splitting involved. The moment more than one wallet is paying for things, an app built for shared travel earns its keep by handling automatic splits and real-time balances instead of leaving that math for the flight home. For daily habits that make this stick, this guide to expense logging covers the nightly-reconciliation routine in more detail.

Why Category Discipline Changes How a Trip Actually Feels

The biggest mistake travelers make isn’t overspending. It’s spending without knowing where the money went, which turns a normal trip into a stressful guessing game at checkout.

Why Category Discipline Changes How a Trip Actually Feels — overview diagram

Most groups get the categories wrong from the start by treating “food” as one line instead of splitting groceries from restaurant tabs, and by forgetting travel essentials like insurance and connectivity until they’re already needed. Real-time tracking fixes half the problem. Split-aware apps fix the other half, because they remove the awkward post-trip math session where someone has to reconstruct who paid for what across six days and three cities.

Treating accommodation as your fixed anchor and letting food and activities float within a daily range keeps a budget realistic instead of restrictive. That’s the difference between a framework you actually follow and one you abandon by day three.

— SaverStride

Plan, Track, and Split Your Trip Budget With Vala

Vala turns everything above into something you don’t have to build from scratch. Instead of juggling a spreadsheet and three group chats about who owes what, you get category templates already set up for transport, accommodation, food, activities, and essentials, plus automatic splits that update in real time as your group spends.

Valapoint

Import your bank transactions and Vala sorts them into categories automatically, so you’re not typing every coffee and taxi ride by hand. Invite your travel companions, agree on your split method, and watch balances settle themselves as the trip goes instead of on the flight home. If you want to see how the categories and splitting actually work before you commit to a full trip, start with the personal finance app and set up your first trip budget today.

Sources

Cross-check your category estimates against real-world cost data before you finalize a number.

FAQ

What Are the Main Travel Expense Categories?

The core categories are transportation, accommodation, food and drink, local transport, activities, travel essentials, shopping and extras, and a contingency buffer.

How Big Should My Travel Budget Buffer Be?

Most guides recommend a 10 to 15% buffer on top of your total estimate, leaning toward 15% for first-time destinations or trips with many connections.

How Do I Split Travel Costs Fairly in a Group?

Decide shared versus personal costs before you leave, then use equal, itemized, or room-based splitting depending on how evenly spending is distributed across the group.

Should Groceries and Restaurants Be the Same Category?

No. Tracking groceries separately from restaurant spending under food and drink shows you far more clearly where your daily budget is actually going.

What’s the Easiest Way to Track Shared Travel Expenses?

Log every shared purchase immediately using an app with category tagging and automatic splitting, like Vala, rather than trying to reconstruct spending from memory at the end of the trip.

Stop Overpaying: 15 Minute Test to Handle Subscription Price Hikes

The moment you get a price increase notice, decide within that window using one question: “Would I sign up today at this new price?” If the answer is no, downgrade or cancel before the new charge hits. If you’re not sure, block off 15 to 30 minutes right now to audit every recurring charge on your accounts, because that’s the fastest way to make the decision obvious.


TL;DR:

  • Reviewing three months of statements from various sources helps identify all active subscriptions and their actual monthly costs.
  • Asking whether you would resubscribe at the new price guides whether to downgrade, negotiate, cancel, or accept the increase effectively.
  • Downgrading to a cheaper tier should be tried first, as it often provides savings with minimal disruption before considering cancellation.
  • Cancel subscriptions through the original platform, using clear scripts and proof of cancellation to handle disputes if charges continue.
  • Conducting quarterly 15-minute audits with automated tools like Vala can maintain visibility and prevent future subscription creep.

Valapoint
See Where Your Money Goes
Vala tracks expenses, manages budgets, and reveals spending patterns that can help you spot recurring costs and financial leaks.

Explore Vala

Table of Contents

How to Handle Subscription Price Hikes: The Quick Audit

You can’t manage what you can’t see, and most people can’t see all of it. Nearly 40% of consumers admit they’re currently paying for at least one subscription they no longer use, and 74% say forgetting a recurring charge is easy to do. That’s not a willpower problem. It’s a visibility problem, and it’s solvable in one sitting.

Pull up three months of statements and go hunting. Check these places, in order:

  1. Bank and credit card statements (search “subscription,” “recurring,” or the merchant name directly)
  2. Apple/Google subscription management pages
  3. PayPal’s automatic payments list
  4. Email receipts (search “renewal,” “receipt,” or “your subscription”)
  5. Vendor billing portals for anything paid outside app stores

As you find each charge, build a simple five-column list:

  • Service name
  • Cost (convert any annual plan to its monthly equivalent by dividing by 12)
  • Billing cadence (monthly, annual, quarterly)
  • Last used date
  • Decision (keep, downgrade, cancel, or ask)

That monthly conversion matters more than it looks. A $120 annual renewal reads as painless once a year, but at $10 a month it sits right next to your other subscriptions where you can actually compare it. Note the price you were originally paying next to the new one. Without that reference point, an increase from $9.99 to $12.99 just feels like “the new normal” instead of a 30% jump worth questioning.

Should You Accept, Downgrade, or Cancel the New Price?

Run every price increase through one test: would you sign up today, at this new price, if you’d never subscribed before? That single question cuts through loyalty, habit, and sunk cost faster than any spreadsheet. Guides on handling these notices consistently point to the notification window as the moment to decide, because once you’ve paid the higher price once, it starts to feel normal. That’s anchoring, and it’s why acting fast actually gets easier the sooner you do it.

Work through your options in this order:

  • Downgrade first. Many services roll out a cheaper tier alongside a price increase specifically to soften the blow. Check if a cheaper plan fits your needs on the Planes de Suscripción — BitPulse page. It often captures most of the savings with zero disruption to your account or history.
  • Ask for a retention offer. Cancellation flows frequently surface discounts of 30% to 50% for a trial period once you start the process.
  • Cancel outright if you wouldn’t resubscribe today.
  • Accept the increase only when the service still clears your “would I sign up today” bar and you’ve confirmed there’s no cheaper tier.

A streaming service you watch weekly at $17.99 probably clears the bar. A meal kit you haven’t used in two months, now $79.99, does not.

Pro Tip: Do the downgrade check before you touch the cancel button. Losing a lower tier by mistake is a common regret, and canceling makes you start from zero.

Canceling and Negotiating: Scripts and Where to Go

Start where you signed up, not where you think you should go. If you subscribed through the Apple App Store or Google Play, cancel there. If you signed up on the vendor’s own site, cancel there instead, because app store cancellations don’t touch website subscriptions and vice versa. Companies build friction into cancellation on purpose, and pausing is not canceling. Paused plans usually resume billing automatically.

Once you find the right channel, keep it simple:

  1. Locate the exact cancellation path (app settings, account dashboard, or a dedicated “manage subscription” page).
  2. Use a direct chat or phone script: “I’d like to cancel my subscription effective immediately, please confirm in writing.”
  3. If you’d stay at a discount, ask first: “Before I cancel, is there a retention discount or loyalty rate available?”
  4. Save proof: screenshot the confirmation screen, note the confirmation number, and timestamp your attempt.
  5. Escalate to your card issuer if the charge continues after cancellation, using your saved documentation to support a dispute.

That documentation habit isn’t optional. If a company keeps charging after you’ve canceled, your bank or credit card dispute process needs proof you tried, and a screenshot with a timestamp settles that argument fast.

Preventing Subscription Creep Before It Starts Again

The best defense against future price hikes is a system that doesn’t rely on memory. Set a reminder 14 to 30 days before every annual renewal so you’re deciding on your schedule, not the vendor’s. Pair that with a recurring 15-minute audit every quarter, treating it like maintenance rather than a one-time cleanup.

A few habits make the biggest dent:

  • Rotate streaming services instead of holding all of them simultaneously. Watch, cancel, move to the next.
  • Only switch to annual billing when you’re certain you’ll use the service for the full year.
  • Consolidate duplicate tools and switch to family or group plans where it makes sense.
  • Give the savings a job. Move whatever you free up into a named savings goal immediately, or it quietly gets absorbed back into everyday spending.

Pro Tip: Name the goal something specific, like “Vacation 2027,” not “Savings.” Vague labels get raided first.

Which Tools Actually Speed Up a Subscription Audit?

A subscription cost calculator does one job well: it takes every plan you enter, converts annual costs to their monthly equivalent, and totals your real monthly spend in one number. That number is usually higher than people expect, and seeing it is often what finally triggers action.

Annual subscription costs converted to monthly total

Manual searching through statements works, but it’s slow and easy to abandon halfway through. Automated tracking tools can surface forgotten charges faster, though it’s worth checking any tool’s fees and privacy practices before connecting your accounts.

Vala’s subscription cost calculator handles the annual-to-monthly math automatically, and its tracker keeps every recurring charge visible in one place instead of scattered across statements. Pair that with a clear cancel-unused-subscriptions action plan and the workflow becomes simple:

  • Run the calculator to see your real monthly total
  • Mark each subscription keep, cancel, or downgrade
  • Set your reminder for the next quarterly check

Why We Recommend the 15-Minute Quarterly Habit

Short, frequent audits beat long, rare ones. A quarterly 15-minute session keeps renewal dates fresh in your mind and removes the dread that builds up around a once-a-year deep clean. That reduction in friction is what actually makes the habit stick.

Picture the session broken into minutes: two minutes pulling up statements, five minutes updating your five-column list, five minutes running the “would I sign up today” test on anything flagged, three minutes canceling or downgrading what fails. Nothing about it demands a spreadsheet background or financial expertise, just a recurring 15 minutes on the calendar.

— SaverStride

Run the Numbers With Vala Before the Next Renewal Hits

Vala turns the audit you just read about into something you can finish in one sitting instead of an afternoon of statement-scrolling. The subscription cost calculator converts every annual plan to its monthly equivalent automatically, so you see your real total spend without doing the math by hand.

Valapoint

Beyond the calculator, Vala’s subscription tracker keeps every recurring charge visible in one dashboard, flags the ones you haven’t touched in months, and works alongside the cancel-unused-subscriptions action plan so you’re not guessing at next steps. If you split any subscriptions with a partner or roommates, shared group tracking keeps everyone looking at the same numbers instead of chasing separate receipts. Try the personal finance app and run your own audit today. Seeing your actual monthly total is usually the push that gets stalled cancellations finally done.

Sources

FAQ

What Should I Do First When a Subscription Price Rises?

Decide before the new charge hits by asking, “Would I sign up today at this price?” Then downgrade, request a retention discount, or cancel based on the answer.

How Long Should a Subscription Audit Take?

A full audit of recent statements and app store subscriptions takes about 15 to 30 minutes, and a maintenance version afterward only takes 15 minutes each quarter.

Are Retention Discounts Real, or Just a Sales Tactic?

They’re real and common. Many services offer discounts of 30% to 50% for a few months once you start the cancellation process, so it’s worth asking before you confirm.

What’s the Difference Between Pausing and Canceling a Subscription?

Pausing typically resumes automatic billing after a set period, while canceling stops charges entirely, so always confirm which one you’re actually choosing.

Can an App Like Vala Help Me Track Price Increases?

Yes. Vala’s subscription tracker and cost calculator flag recurring charges and convert annual plans to monthly costs, making price increases easier to spot and act on quickly.

90 Day Personal Finance Recovery Plan: Phase First 12 Week Checklist

A personal finance recovery plan is a phased, actionable sequence that stops further damage now and puts you on a 6 to 60 month path back to stability. Full recovery typically takes 2 to 5 years, with real progress showing up in the first 6 to 12 months. Your immediate next step: spend 10 to 30 minutes listing your cash, income, and every bill due this month.


TL;DR:

  • Creating a detailed list of all income and bills helps identify the financial gaps and prioritizes payments on housing, utilities, and food.
  • Building a small emergency fund and automating essential payments provide stability and reduce decision fatigue during recovery.
  • Focusing on debt repayment only after establishing a financial cushion ensures sustained progress and prevents setbacks.
  • Negotiating with creditors early, seeking hardship programs, and avoiding new credit can minimize interest and prevent further debt accrual.
  • Regular review, tracking progress, and using automation tools support long-term resilience and prevent relapse into financial instability.

Valapoint
Bring Your Spending Into Focus
Vala tracks expenses, manages budgets, and reveals spending patterns to help you take control of your financial recovery.

Explore Vala

Table of Contents

What Is the First Step in a Personal Finance Recovery Plan?

Phase 1 is triage, not strategy. You’re not optimizing anything yet. You’re stopping the bleeding and buying yourself room to think.

Start with a fast inventory. Pull up your bank balance, list every source of income coming in over the next month, and write down every bill with its due date and minimum amount. Don’t estimate. Log the real numbers, even the embarrassing ones. This single exercise often takes less than an hour and tells you more than a month of worrying.

Once you can see the full picture, rank your payments in this order:

  1. Housing — rent or mortgage, because losing shelter compounds every other problem.
  2. Utilities — especially anything that triggers a shutoff notice fast, like electricity or water.
  3. Food — groceries before restaurants, always.
  4. Transportation — your car payment or transit pass if you need it to earn income.
  5. Insurance — health and auto coverage, since a lapse here creates a much bigger bill later.
  6. Child support or court-ordered obligations — these carry legal consequences that other debts don’t.

Everything else, including credit cards, medical bills, and personal loans, waits.

Next, call your creditors before they call you. The FTC recommends reaching out early and asking specifically about hardship programs, reduced payment plans, or temporary forbearance. When you call, ask for the representative’s name, request any agreement in writing, and note the date and terms. Companies rarely offer their best hardship option unless you ask directly.

Build a bare bones crisis budget for the next 30 days. List only true essentials from your priority list above, and pause everything else, including subscriptions, extra debt payments beyond the minimum, and discretionary spending. This isn’t your permanent budget. It’s a tourniquet.

If your income doesn’t cover essentials even after cutting everything nonessential, look into local emergency assistance programs through your county or state human services department. Many offer one-time help with rent or utilities specifically to prevent a crisis from worsening.

How Do You Build a Financial Foundation After a Setback?

Once the bleeding stops, months one through six are about building something that holds. This phase is where a lot of recovery plans quietly fail, usually because people try to attack debt before they have any cushion at all.

Start with a modest starter emergency fund. It won’t cover a job loss, but it can absorb small unexpected expenses without sending you back into crisis mode. Keep it in a separate savings account, not mixed with your checking, so you’re not tempted to spend it.

Automate what you can. Set up autopay for your essential bills so a missed due date doesn’t undo your progress. A phased recovery plan with automated basics is one of the most consistently recommended steps across reputable financial guides, and for good reason: willpower is unreliable, but a scheduled transfer isn’t. Separating your accounts into essentials, savings, and discretionary spending removes the daily decision fatigue that wears people down.

This is also the point to start rebuilding credit. Secured credit cards and credit builder loans report to the bureaus the same way unsecured products do, but they require a deposit that limits your risk. Use a secured card for one recurring bill, like a streaming subscription, and pay it off in full every month. Small, consistent activity like this can show up as measurable score improvement within 6 to 12 months as utilization drops and positive history accumulates.

Hunt down financial leaks while you’re at it. Recurring subscriptions, forgotten trial periods, and duplicate services quietly drain more money than most people realize. Reviewing your recurring charges and hidden financial leaks often frees up $50 to $150 a month without touching your lifestyle.

If income is unstable, treat every irregular paycheck conservatively. Budget against your lowest expected month, not your best one, and pick up temporary work or benefits if there’s a genuine gap.

How Do You Build a Financial Foundation After a Setback? — overview diagram

Should You Use the Debt Avalanche or Snowball Method?

Months six through eighteen are when you actually attack the debt. This is the phase most people picture when they hear “recovery plan,” but it only works if the first two phases already happened.

The decision between avalanche and snowball comes down to what keeps you paying. The avalanche method targets your highest interest rate debt first, which saves you the most money mathematically. The snowball method targets your smallest balance first, which gives you a faster emotional win. Here’s the decision rule: if you’ve stuck with financial commitments before, choose avalanche and save the interest. If you’ve abandoned budgets or payoff plans in the past, choose snowball. The motivation boost from clearing an account outright is worth more than the interest savings if it keeps you in the game.

Debt avalanche and snowball method comparison

Structure your monthly cash so every dollar has a job. Once a debt is paid off, roll that exact payment amount into the next target instead of absorbing it into your spending. This “payment snowball” effect is what turns eighteen months of grinding into something that accelerates as it goes.

When negotiating with creditors for settlements or extended hardship terms, come prepared. Draft a one page hardship summary with your income, essential expenses, and a specific proposed payment. Include dates and amounts. Propose a single new monthly figure rather than waiting for them to offer one. Get every agreement confirmed in writing, and record the representative’s name and the approval date.

Consolidation or a nonprofit Debt Management Plan makes sense when you’re juggling multiple high interest unsecured debts and can’t negotiate rates on your own. A nonprofit DMP consolidates your payments into one, often at a reduced interest rate, and typically aims for full repayment within a timeframe commonly up to several years. Expect modest setup and monthly fees, not the aggressive upfront charges some for profit debt settlement companies charge.

Pro Tip: Protect your progress by freezing new credit applications during this phase, keeping every account on autopay, and marking small milestones, like your first debt paid to zero, on a calendar where you’ll actually see them. Momentum is fragile in month nine. Give yourself a reason to keep going.

When Should You Move From Recovery to Growth?

Somewhere around month twelve, the goal shifts from stopping damage to building resilience. This is the quiet, unglamorous phase where recovery becomes permanent instead of temporary.

Your starter emergency fund graduates into a full 3 to 6 month buffer. Set a specific dollar target based on your essential monthly expenses, and automate a fixed transfer into savings every payday, even if it’s just $25 to start. Small, consistent transfers beat sporadic large ones because they don’t depend on your discipline in the moment.

Once your secured card has reported for 6 to 12 months of on time payments, most issuers will offer an unsecured upgrade automatically, or you can apply directly with another lender. Graduating off secured credit isn’t just symbolic. It frees up the deposit you had tied up as collateral.

Retirement contributions typically restart here too. If your employer offers a match, direct enough to capture the full match before anything else.

Build a monitoring rhythm instead of relying on memory. Check your budget weekly, review your credit report and full account balances quarterly, and reassess your annual goals, insurance coverage, and retirement contribution rate once a year. Revise your milestones as your situation improves, and actually acknowledge the wins. A debt free anniversary or your first fully funded emergency buffer deserves more than a passing thought.

Where Can You Get Professional Help With Debt?

Not every recovery plan can be handled solo, and knowing when to bring in help saves both time and money.

  • Nonprofit, HUD-approved credit counselors review your full situation for free or low cost and can enroll you in a legitimate DMP. Paid credit repair and debt settlement companies often promise faster results for high upfront fees, and the FTC warns these come with real scam risk.
  • DMP fees are typically modest setup plus a small monthly charge, and MMI reports many participants complete repayment in five years or less with measurable credit improvement along the way.
  • Bankruptcy consultation is worth exploring when debt exceeds what any payment plan could realistically resolve. Chapter 7 typically discharges unsecured debt faster but has stricter eligibility; Chapter 13 restructures debt into a 3 to 5 year repayment plan and fits situations with regular income.
  • Verify before you enroll. Use AnnualCreditReport.com, the CFPB, HUD’s counselor locator, and USA.gov to confirm any organization is legitimate before sharing financial details.

What Does a 90-Day Financial Recovery Checklist Look Like?

A week by week structure keeps recovery from feeling abstract. Here’s how the first twelve weeks break down.

  1. Weeks 1 to 2: Complete your full inventory of cash, income, and debts. Build your crisis budget. Contact every creditor about hardship options. Set autopay for essentials only.
  2. Weeks 3 to 4: Open a dedicated savings account and start building your $500 to $1,000 starter emergency fund.
  3. Weeks 5 to 6: Automate your remaining bills and enroll in one credit building action, like a secured card or credit builder loan.
  4. Weeks 7 to 8: Choose avalanche or snowball and make your first payment under the new structure.
  5. Weeks 9 to 10: Make your second and third rolling payments, and negotiate at least one creditor settlement or reduced rate.
  6. Weeks 11 to 12: Document what’s improved, cash position, debt balance, credit score, and decide whether you need professional help going forward.

Measure outcomes weekly, not just at the end. Track your total debt balance, your checking account cushion, and whether you’ve missed any payments. If by week six you still can’t cover essentials, or a creditor won’t negotiate at all, that’s your signal to call a nonprofit credit counselor rather than keep pushing alone.

How Can Automation Make Financial Recovery Easier?

Recovery holds up better as an operational system than as a test of willpower. Automating the repetitive parts frees up mental energy for the decisions that actually need your judgment.

  • Bill reminders and autopay scheduling reduce the chance a due date slips through during a stressful month.
  • Automatic subscription review flags recurring charges you forgot you were paying for.
  • Category tracking shows exactly where your crisis budget is leaking without manual spreadsheet work.
  • Goal tracking keeps your emergency fund and debt payoff targets visible instead of abstract.

An app like Vala handles this housekeeping automatically, which shortens the time between “I have a plan” and “I can see it working.”

What’s a Realistic Mindset for Financial Recovery?

Recovery isn’t linear, and it isn’t fast. It’s built from small, boring wins that compound quietly over months, not one dramatic turnaround. If you slip a month, that’s not a failure. It’s the normal shape of the process.

Share your plan with anyone else in your household. Accountability works better with two sets of eyes on the same budget than one person carrying it alone.

Start your inventory in the next 24 to 48 hours. The plan only works once you’ve written down where you actually stand.

— SaverStride

Sources

Save Time: Track Cash and Cards in 15 Minutes a Week

The easiest reliable way to track cash and card together is to pick one primary ledger, whether that’s an app or a single spreadsheet, and log cash with a fast-entry habit while your card transactions import automatically. That combination covers both weaknesses at once: cards get tracked without effort, and cash gets tracked because you’ve made it a two-second habit instead of a chore you save for Sunday. The rest of this guide walks through the methods, the setup, and the tools that make this stick.


TL;DR:

  • Using an app with quick manual cash entry and automatic card import is the most effective system for frequent cash handlers, provided it encourages consistent use.
  • Setting up requires about 30 minutes for initial inventory, linking accounts, creating a cash wallet, and weekly reconciliation, which can be done in just 15 minutes afterward.
  • Features like one-tap entry, receipt capture, and a dedicated cash wallet significantly reduce friction, but offline modes and data export are essential for practical use and control.
  • Linking bank accounts to an app involves privacy trade-offs, so limit permissions, use read-only access, and secure your device to mitigate data sharing risks.
  • A simple daily habit of recording cash purchases immediately and reconciling weekly ensures the system remains reliable and sustainable over time.

Valapoint
valapoint.com
Track Every Expense More Easily
Vala combines real-time expense tracking, budget management, and intelligent insights to help you understand where your money goes.

Explore Vala

Table of Contents

Which Method Actually Works for Combining Cash and Card Tracking?

You have four realistic options, and the right one depends less on which app has the best reviews and more on how much cash you actually handle each week.

  • App with manual cash entry. Your card and bank transactions sync automatically, and you add cash purchases yourself in seconds. This is the fastest setup for most people, though it does mean linking accounts to a third party, which comes with a privacy trade-off worth weighing.
  • Hybrid app plus envelopes. You keep physical cash sorted into labeled envelopes for categories like groceries or gas, then log the envelope totals into your app weekly. This method leans on behavior, not memory. It’s harder to forget $40 is missing when the envelope is visibly lighter.
  • Spreadsheet. Full control, zero data sharing, and no monthly fee. The cost is time. You’re the one entering every card transaction by hand, which works if you’re disciplined but falls apart fast if you’re not.
  • Notebook or pocket ledger. The lowest-tech option and, for some people, the stickiest one. Writing “$6.50, coffee” the moment you pay creates a friction point that forces awareness. It only works if you genuinely keep it current.

If you carry cash often, prioritize the method with the lowest friction at the moment of the purchase. If you rarely touch cash, an app with occasional manual entries is probably overkill in the other direction. According to guidance from Broadview Federal Credit Union, the most effective tracking method is simply the one you’ll actually use consistently. That’s not a cop-out answer. It’s the entire game.

How Do You Set Up Combined Cash and Card Tracking?

Setting this up takes about 30 minutes once, and about 15 minutes a week after that.

  1. Take inventory. List every checking account, credit card, and the amount of cash you typically carry or keep on hand.
  2. Pick your ledger and set a cadence. Decide whether you’ll log entries immediately, daily, or weekly. Immediate is the gold standard for cash, since memory fades fast.
  3. Link or import your card accounts. Most budgeting apps let you connect checking and credit accounts so transactions categorize automatically, which removes the manual work for anything paid by card.
  4. Create a cash wallet. Set up a dedicated account inside your app or spreadsheet just for cash, and build a quick-entry shortcut, like a saved template for “coffee” or “parking,” so logging takes one tap instead of five.
  5. Reconcile weekly. Spend 10 to 15 minutes every week checking that your cash wallet balance matches what’s actually in your pocket, and that categories look right.
  6. Verify at month’s end. A five-minute check against bank statements catches anything that slipped through both systems.

Pro Tip: Build one consistent category set from day one, and create shortcuts for your five most common cash purchases. The fewer decisions you make per entry, the more likely you’ll actually make the entry.

What App Features Actually Reduce Friction?

Not every feature matters equally. Some sound useful and end up ignored within a week.

  • One-tap quick entry or saved templates. Fast-entry shortcuts are consistently the feature that determines whether cash purchases get logged at all, since anything that takes more than a few seconds tends to get skipped.
  • Receipt capture or OCR. Snapping a photo of a receipt and entering it later is a solid bridge when you can’t log in the moment.
  • A dedicated cash wallet account. You want a clear separation between what’s in your bank and what’s in your pocket, with an easy way to move money between them.
  • Tagging and split transactions. Useful when a single purchase covers two categories, like a Target run that’s half groceries and half household supplies.
  • Offline mode and secure backups. A tool that only works with signal is a tool you won’t use in a parking garage.
  • Export options. You should always be able to pull your data out in a usable format, not locked into one app forever.

What Do You Give Up on Privacy When You Automate?

Linking your bank and card accounts to a budgeting app means sharing transaction data with a third party, and that’s a real trade-off, not a minor detail. Automation saves time. It also means an outside company can see where you shop, how much you earn, and what you spend it on.

A spreadsheet or a local, unlinked app keeps everything on your device and skips that exposure entirely, at the cost of manual entry for every card transaction.

If you do link accounts, take a few concrete steps to reduce risk: limit data-sharing scopes where the app allows it, choose read-only connections instead of ones that can move money, enable two-factor authentication, and keep your device encrypted. One simple rule covers most of the risk: never link an account you use for highly sensitive or one-off large transactions.

Five safeguards for safer account linking

How Does an App Like Vala Handle Cash and Card Together?

Here’s what that workflow looks like in practice, using Vala’s own tools as an example rather than a pitch. The typical setup runs like this:

  • Link your checking and credit accounts so transactions categorize on their own.
  • Create a cash wallet and set up quick-entry shortcuts for recurring cash purchases.
  • Turn on smart categorization so the app learns your spending patterns over time.
  • Run a short weekly reconcile to catch anything miscategorized or missing.

AI-driven suggestions speed this up by flagging likely categories and surfacing money-leak alerts, small recurring charges or creeping subscription costs, before they become invisible. If you’d rather test the waters first, you can start without linking any accounts, or use read-only mode, and add automation once you’re comfortable.

A Two-Minute Ritual That Keeps This from Falling Apart

Most tracking systems die from lack of habit, not lack of features. Try this: quick-add every cash purchase the moment you make it, and run your reconcile every Sunday at the same time, maybe right after coffee. Keep the app or notebook somewhere you’ll actually see it, like your phone’s home screen, not buried three folders deep. Pre-build templates for your regular purchases so Monday’s coffee takes one tap, not ten.

— SaverStride

Try the Financial DNA Test Before You Build Anything Manually

If you’d rather skip the spreadsheet setup and get a system that already handles the cash-and-card split, Vala does the linking, categorization, and cash-wallet quick entry for you from day one.

Valapoint

Some apps speed up exactly the steps this guide walks through by hand: connecting your accounts, sorting transactions into categories automatically, providing a dedicated cash wallet with fast-entry shortcuts, and splitting shared costs when tracking expenses with a partner or group. You can start with the free tier, or take the Financial DNA Test to see your spending style mapped out before you commit to anything. Privacy options are available from the start too. You can explore the app without linking a single account and add that automation later, on your own timeline.

Sources

For more on the habit side of this, Broadview Federal Credit Union and Finance for Beginner both cover manual logging and envelope tactics in depth. Vala’s own guide on tracking expenses and the No Spend Reset Challenge Workbook on zero-based budgeting are useful next stops.

Save $25 a Week: Build an Emergency Fund for Beginners

Start with a small, doable target like a few hundred dollars, then build toward covering several months of essential expenses. Automate a recurring transfer into a separate, liquid savings account so the saving happens without you thinking about it. Your very next move: calculate your essential monthly expenses so you know exactly what number you’re working toward.


TL;DR:

  • Building an emergency fund should start with a goal of at least $250 to $1,000 before aiming for three to six months of essential expenses.
  • Automating regular transfers into a separate high-yield savings account ensures consistent savings without relying on willpower.
  • The ideal emergency fund is kept in liquid accounts like FDIC-insured HYSAs, avoiding locked-up or market-risk assets, for quick access during emergencies.
  • Replenishing the fund after use and regularly reassessing the needed amount are key to maintaining its effectiveness against changing circumstances.
  • Habitual, automated savings methods outperform reliance on willpower and help reach larger financial goals over time.

Valapoint
See Where Your Money Goes
Vala tracks expenses, manages budgets, and reveals spending patterns that can help you find room for consistent emergency fund contributions.

Explore Vala

Table of Contents

What Is an Emergency Fund, and Why Does It Matter?

An emergency fund is cash set aside strictly for unexpected, essential costs, not for planned purchases or things you simply want. A vacation is discretionary. A car repair that gets you to work is not.

Legitimate emergencies typically include:

  • Job loss or a sudden drop in income
  • Urgent medical or dental bills
  • Essential car or home repairs
  • Unplanned travel for a family emergency

Without a dedicated cushion, these costs usually land on a credit card. Consumer finance guidance from the CFPB points to emergency savings as the primary defense against high-interest borrowing when life throws a curveball. Keep the definition tight. If you start letting “emergency” stretch to cover a sale or a spontaneous weekend trip, the fund stops doing its actual job.

How Much Should You Save: Starter Goals and the 3-6 Month Rule

Skip the temptation to calculate a scary six-month number on day one and give up before you start. Build in stages instead.

  • Milestone 1: $250 to $1,000, your first real cushion against a flat tire or an overdraft fee.
  • Milestone 2: One full month of essential expenses.
  • Milestone 3: Three to six months of essential expenses, the standard target most advisors recommend.

Financial experts commonly point to that three-to-six-month range as the core benchmark, with $1,000 or one month of expenses treated as the sensible first step rather than the finish line.

Where you land inside that range depends on your situation. Stable salaried income with no dependents leans toward three months. Freelance or commission income, a mortgage, kids, or a chronic health condition pushes you toward six, sometimes nine to twelve months. If cash is tight right now, don’t try to solve for the full range at all. Hit $1,000 first. Everything else can wait until that buffer exists.

Pro Tip: If the “right” number feels paralyzing, ignore it for now. Save toward one month of expenses first, then reassess. Momentum beats precision every time.

How Do You Build an Emergency Fund Step by Step?

This is the operational part. Four moves, done in order, turn a vague goal into an actual balance.

Four-step emergency fund building process

1. Calculate your essential monthly expenses

Pull up twelve months of bank and card statements. Add up housing, utilities, groceries, insurance, minimum debt payments, transportation, and childcare. Leave out restaurants, subscriptions, and entertainment; those are not essentials. Divide the twelve-month total by twelve to get your true monthly baseline. A monthly budget planner makes this faster if you’d rather not build a spreadsheet from scratch.

2. Set a target and break it into micro-goals

Multiply your monthly essentials by your chosen timeline (three, six, or more months) to get the full target. Then chop it into pieces you can actually hit: a weekly transfer, a biweekly transfer timed to payday, or a monthly milestone. A $3,000 goal becomes $58 a week for a year, which feels far more achievable than “$3,000” ever will.

3. Automate the transfers

Split your direct deposit so a fixed slice routes straight into savings before it ever touches your checking account. This single habit does more for consistency than any amount of willpower, according to the CFPB’s guidance on emergency savings. If your paycheck arrives biweekly or your hours vary week to week, time the transfer to land the same day your deposit clears. Round-up tools that sweep spare change from purchases into savings work well as a background booster, layered on top of your main transfer, not instead of it.

4. Free up cash and use windfalls

Cancel subscriptions you forgot you had. Audit recurring charges for “phantom” services you no longer use. Sell equipment, clothes, or electronics sitting in a closet. Consumer finance advisors at AARP point to these small cuts as reliable, repeatable ways to redirect cash without touching your actual budget. Then treat windfalls as accelerators: put half of a tax refund or work bonus straight into the fund and keep the other half guilt-free.

Sorting unused belongings to sell

If you’re living paycheck to paycheck, start absurdly small. Even $5 to $25 per pay period builds the habit of saving before the amount matters, and you can raise the contribution once it feels automatic rather than forced. A pay-yourself-first approach works especially well here because it removes the decision from every single payday.

Where Should You Keep Your Emergency Fund?

Liquidity matters more than yield. Your emergency fund needs to be reachable within a day or two, without penalties, without market risk, and without a phone call to unlock it. That rules out the stock market and rules out long-term CDs for the bulk of the money.

  • Use a high-yield savings account (HYSA) at an FDIC or NCUA-insured institution.
  • Online banks typically post better rates than brick-and-mortar counterparts, according to American Express’s guidance on emergency fund accounts.
  • Keep the account separate from checking so the balance doesn’t get spent by accident.
  • Factor in ACH transfer delays; some people keep a small cash buffer locally for same-day needs while the bulk sits in the HYSA.
  • A limited CD ladder can work for a small slice of a larger fund, but never lock up money you might need next week.

Comparing rates before you pick a bank is worth the ten minutes it takes; tracking bank spreads across providers shows how much the gap between banks can actually cost you over a year.

How Do You Maintain and Reassess Your Emergency Fund?

Using the fund isn’t a failure. It did its job. The mistake is leaving it depleted and hoping nothing else happens.

  • Replenish on a schedule. Add $25 to $100 extra per week, on top of your normal contribution, until the balance is back to full.
  • Re-evaluate your target after major changes: a new baby, a job switch, a move, a new health diagnosis, or a new dependent all shift your real number.
  • Separate true emergencies from irregular but predictable costs. Annual insurance premiums, car registration, or holiday spending belong in a sinking fund, not the emergency fund. Mixing the two erodes the cushion you built for actual emergencies.

How Automation and Tools Help You Save Faster

Automation removes the daily decision of “should I transfer money today?” and replaces it with a rule that runs itself. Split direct deposits, recurring transfers on payday, and round-up tools all work by taking your willpower out of the equation entirely.

The app supports this habit-first approach with capabilities such as automated recurring transfers into a savings goal, money-leak detection to flag forgotten subscriptions and phantom charges, and goal tracking to show progress toward your target in real time.

For a deeper walkthrough, Vala’s guide on automating personal savings goals and its breakdown of annual savings milestones both offer concrete starting points.

Why Habit Beats Willpower When Building Savings

Most advice on emergency funds focuses on the number: three months, six months, whatever multiple fits your risk profile. That number matters far less than whether the transfer actually happens every single payday without you deciding to make it happen. Willpower runs out. A standing transfer doesn’t.

If you take nothing else from this guide, take two things. Calculate your true monthly essentials this week, not “someday.” Then set up a $25 automatic weekly transfer into a separate account, even if $25 feels almost pointless. It isn’t. It’s the habit that eventually carries a $1,000 goal, then a full month’s expenses, then the real target.

— SaverStride

Let Vala Handle the Transfers While You Watch the Balance Grow

Vala turns the steps in this guide into something that runs in the background instead of something you have to remember. It automates split deposits and recurring transfers into your savings goal, tracks your progress toward whatever target you set, whether that’s $1,000 or six months of expenses, and flags money leaks like forgotten subscriptions so you have more to redirect into savings each month.

Valapoint

None of this requires you to overhaul your budget or change how you live day to day. You set the goal, Vala automates the transfer and tracks the number, and you check in when you want an update instead of doing the math yourself. Start with the Vala personal finance app to set up your first automated transfer today.

Trusted Resources and Calculators

Sources