How I Manage My Money: A Simple, Practical Plan

The best thing you can do right now is set a simple budget and automate one transfer to savings. That single action, done today, starts the cycle that every other money habit builds on. Here is the short checklist to follow:

  • Daily (2 minutes): Open your banking app and confirm no unexpected charges.
  • Weekly (10 minutes): Review spending by category and flag anything over budget.
  • Monthly (30 minutes): Reset your budget, check your savings balance, and pay down any extra debt.

Expect a small cash buffer within 30 days, noticeably faster debt payments by 90 days, and visible net worth progress by 365 days. FINRA’s five-step financial roadmap confirms this sequence works: take inventory, understand interest, pay off debt, build retirement, then optimize taxes. Tracking net worth alongside monthly spending also keeps motivation steady through uneven months.

Key Takeaways

Automating one savings transfer and reviewing spending weekly are the two habits that move every other money goal forward faster.

Point Details
Start with three core numbers Know your take-home income, essential expenses, and net worth before building any budget.
Use a percentage framework The 50/30/20 rule or Fidelity’s 60/30/10+15 guideline gives you a tested starting split.
Build an emergency fund first Aim for $500–$1,000 to start, then grow to 3–6 months of essential expenses over time.
Pick a debt strategy and automate it Snowball builds momentum; avalanche saves interest. Set minimums on autopay and direct extra dollars to your target debt.
Valapoint automates the follow-through Vala connects accounts, tracks categories, and alerts you before you overspend, so the plan stays active without manual effort.

Table of Contents

How do you calculate the numbers that drive your money?

Three figures run everything: your monthly take-home income, your essential expenses, and your net worth snapshot.

Monthly take-home income is what actually hits your account after taxes and deductions. If your income varies, use a 12-month rolling average from your bank statements. That average becomes your planning baseline. Consumer recommends this approach specifically for irregular earners.

Essential expenses split into fixed (rent, car payment, insurance) and variable (groceries, utilities, gas). Pull three months of statements and average the variable ones. The total tells you your floor: the minimum you need each month no matter what.

Net worth is simply assets minus liabilities. Add up savings, retirement accounts, and any property value, then subtract every debt balance. You do not need precision here. A rough number updated monthly shows whether you are moving forward.

Pro Tip: Write all three numbers on one page before you build any budget. Seeing income, expenses, and net worth together in one place makes priorities obvious and removes the guesswork from every decision that follows.

What budget framework actually works for beginners?

Two frameworks cover most situations. Pick the one that fits your income structure.

Framework Essentials Wants / Nonessentials Short-Term Savings Retirement
50/30/20 50% 30% 20% Included in 20%
Fidelity 60/30/10+15 60% 30% 10% +15% pre-tax

Budget frameworks comparison diagram

Fidelity’s money management guide outlines both models. The 50/30/20 rule works well when your income is moderate and retirement is already handled through a workplace plan. Fidelity’s 60/30/10+15 guideline suits higher earners who want to separate retirement from short-term goals.

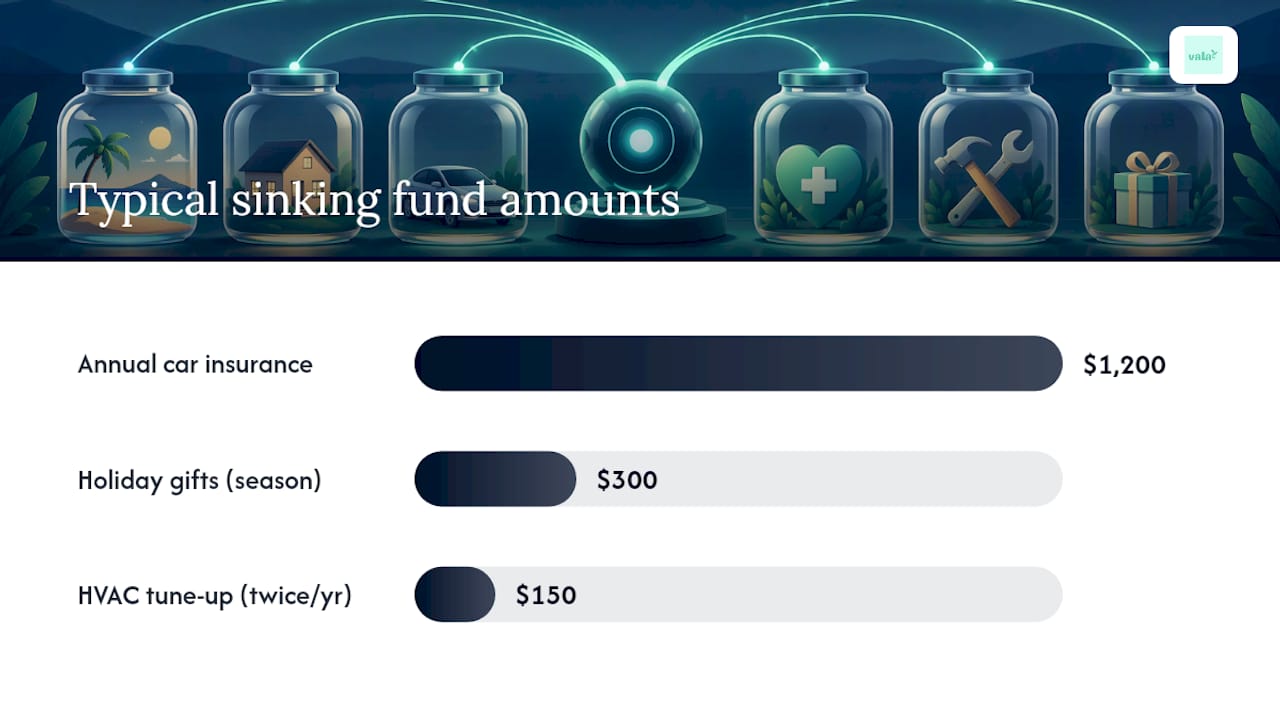
Sinking funds solve the problem of predictable irregular expenses. Instead of scrambling when your car registration or annual insurance bill arrives, divide the total by 12 and move that amount to a labeled savings bucket each month. Common sinking funds: car maintenance, home repairs, holiday gifts, and annual subscriptions.

To set up your first budget:

  1. List every expense category from last month’s statements.
  2. Assign each category to essentials, wants, or savings.
  3. Apply your chosen percentage split to your take-home income.
  4. Compare the target to your actual spending. Adjust one or two categories, not everything at once.
  5. Run it for 30 days before making further changes.

Pro Tip: Fidelity’s financial planning steps recommend starting with the basics first: budget, insurance, and emergency fund. Get those three solid before you optimize anything else.

How do you track spending without it becoming a chore?

Manual tracking with a spreadsheet gives you full control and zero subscription cost. An AI-assisted Excel budget template can speed up the setup if you prefer that route. The trade-off is time: you enter every transaction yourself, which works well if you have fewer than 20 transactions a week.

Automated apps like Mint connect directly to your accounts, pull transactions, and categorize them without manual entry. That automation is what makes tracking stick long-term. U.S. Bank’s money management guide advises defining your financial priorities before choosing any tool, so the app serves your goals rather than the other way around.

When evaluating any tracking tool, check for:

  • Auto-import: Does it connect to your bank and credit cards securely?
  • Categorization accuracy: Does it correctly sort groceries, subscriptions, and dining?
  • Goal and sinking-fund support: Can you set savings targets by category?
  • Privacy and security: Does it use read-only bank connections and encrypt your data?

A simple adoption plan: connect your accounts on day one, set your categories on day two, automate any recurring rules on day three, then check in weekly. That four-step setup takes under an hour. For a deeper look at budgeting app options, Valapoint’s blog covers practical adoption tips and feature comparisons.

How much emergency fund do you actually need?

Start with $500–$1,000. That starter target, recommended by Experian’s beginner money guide, gives you enough to cover a car repair or a medical copay without touching a credit card. Once you hit that milestone, build toward one full month of essential expenses, then extend to 3–6 months over time.

Three reliable ways to fund it faster:

  • Round-ups: Some apps round each purchase to the nearest dollar and transfer the difference automatically.
  • Percentage of each paycheck: Even 3–5% of each direct deposit adds up quickly.
  • Small side income: A single freelance project or a sold item can jump-start the fund without touching your regular budget.

Keep the emergency fund in a high-yield savings account or money market account, separate from your checking. The separation removes the temptation to spend it, and the higher rate means your buffer earns something while it sits.

Pro Tip: Automate the transfer the day after your paycheck lands. When the money moves before you see it, you stop thinking of it as available to spend.

Debt snowball vs. avalanche: which one should you use?

Both strategies work. The difference is psychology versus math.

The debt snowball pays the smallest balance first, regardless of interest rate. You clear accounts faster, which builds momentum. The debt avalanche targets the highest interest rate first, saving more money over the full payoff period. Fidelity’s money management resource covers both trade-offs clearly.

When to use each:

  • Choose avalanche if you carry high-rate credit card debt and can stay motivated without quick wins.
  • Choose snowball if you have several small balances and need visible progress to keep going.
  • Consider consolidation or a low-rate balance transfer when your credit score qualifies and the transfer fee is less than the interest you would otherwise pay.

For student loan borrowers, repayment strategy examples from Titan Prep walk through income-driven and standard options that interact with these payoff methods.

Implementation checklist:

  1. List every debt with its balance, minimum payment, and interest rate.
  2. Set all minimums on autopay.
  3. Direct every extra dollar to your target debt (smallest or highest rate).
  4. Track your projected payoff date and update it monthly.

Pro Tip: Even $25 extra per month on a credit card balance cuts months off the payoff timeline. Start small and increase the extra payment as your budget frees up.

Where should you put extra savings after debt?

Follow this priority order, drawn from Fidelity’s financial planning steps:

  • Step 1: Fully fund your emergency cushion (3–6 months of essentials).
  • Step 2: Contribute enough to your 401(k) to capture the full employer match. That match is an immediate 50–100% return on those dollars.
  • Step 3: Max your HSA if you have a high-deductible health plan. HSA contributions are triple tax-advantaged: deductible going in, tax-free for medical use, and taxable-but-penalty-free after 65.
  • Step 4: Scale retirement contributions toward 10–15% of gross income across 401(k) and IRA.
  • Step 5: Use a taxable brokerage account for goals beyond retirement (a home down payment, a sabbatical, a business start).

The Investor makes the case for starting early better than any paragraph can. Run your own numbers: even modest monthly contributions grow substantially over 20–30 years.

Pro Tip: Automate every contribution the day you set it up. A contribution you schedule manually each month will eventually get skipped. One that moves automatically never does.

How do you protect what you have built?

Insurance and credit hygiene prevent a single event from erasing months of progress.

Essential coverage to have in place:

  • Health insurance (prevents catastrophic medical debt)
  • Auto insurance at or above your state’s minimum liability requirement
  • Renters or homeowners insurance (often under $20–$30/month for renters)
  • Disability insurance if your employer offers it, especially if you are the primary earner
  • Term life insurance if others depend on your income

Credit hygiene basics:

  • Pay every bill on time. Payment history is the single largest factor in your credit score.
  • Keep credit utilization below 30%, and aim for under 10% if you are actively building your score.
  • Check your credit reports at AnnualCreditReport.com once a year. All three bureaus are free.

Fraud prevention:

  • Enable transaction alerts on every account.
  • Freeze your credit at all three bureaus if you are not actively applying for credit. It is free and takes minutes.
  • Use tracking apps that connect via read-only, encrypted bank links rather than stored passwords.

How do you make budgeting a habit that actually sticks?

Budgeting works best as a repeating cycle, not a one-time setup.

  1. Daily: Spend two minutes scanning for unexpected charges or overdraft risk.
  2. Weekly: Review each spending category against your budget. Reallocate if one category is running over.
  3. Monthly: Reset allocations, confirm savings transfers went through, and update your debt balances.
  4. Quarterly: Review your financial goals. Did your income change? Did a major expense appear? Adjust the budget to match your current life, not the one you planned for three months ago.

When you spot a category consistently over budget, you have two choices: cut spending in that category or move money from a lower-priority one. Neither is wrong. The goal is alignment between your spending and your actual priorities.

Track three numbers over time: your cash buffer (emergency fund balance), your savings rate (savings divided by take-home income), and your total debt balance. Those three metrics tell you whether the plan is working faster than any single monthly budget review can.

Pro Tip: Net worth is a better long-term motivator than monthly spending totals. A month where you overspent on groceries but paid down $300 in debt still moved your net worth forward. Zoom out.

How does an AI app like Vala support every step of this plan?

Each step in this plan maps directly to a feature in an app like Vala.

  • Account aggregation: Connects all your bank and credit card accounts in one place, so your full financial picture is always current.
  • Category automation: Sorts transactions automatically and flags patterns you would miss reviewing statements manually. Automated expense tracking reduces both workload and categorization errors.
  • Sinking-fund buckets: Lets you label savings by purpose (car fund, holiday, insurance) so every dollar has a clear role.
  • Debt payoff tracking: Monitors balances and projects payoff dates as you make extra payments.
  • Spending alerts: Notifies you when a category approaches its limit, before you overspend.

Three quick use cases: a single earner with irregular freelance income uses the 12-month average baseline and Vala’s alerts to avoid overspending in high-income months. A couple sharing household costs uses the shared expense splitting feature to keep contributions fair without manual calculations. A saver paying down credit cards uses the debt tracker to watch balances drop in real time, which sustains motivation through the avalanche method.

AI-driven budget personalization takes this further by adapting category suggestions to your actual spending patterns rather than a generic template.

Pro Tip: Start with one connected account and one budget category. Get comfortable with the weekly check-in before adding more. U.S. Bank’s guidance and Fidelity’s advice both point to the same truth: one manageable habit beats ten abandoned ones.

The one habit that changed how I manage money

The habit that made the biggest difference was the weekly 10-minute review. Not a full budget overhaul, not a spreadsheet rebuild. Just opening the app every Sunday, scanning the week’s categories, and moving any leftover money to savings or debt before the next week started.

Hands setting weekly reminder on smartphone

The challenge was consistency. The first few weeks felt pointless because the numbers barely moved. But by week six, the pattern was clear: dining out was consistently over budget, and subscriptions I had forgotten about were quietly draining $40 a month. Fixing those two things freed up real money without changing anything else.

The practical mechanics: set a recurring calendar reminder for Sunday evening, keep the session under 15 minutes, and automate any transfer you decide on immediately rather than planning to do it later. The review reveals the problem; the automation fixes it before the next week starts.

Pick one habit from this article and start it today. Not next month.

Vala makes it easier to follow through on your plan

Most people know what they should do with their money. The gap is follow-through, and that is exactly where Vala closes it. Vala’s personal finance app connects your accounts, categorizes spending automatically, and surfaces the patterns that drain your budget quietly, like forgotten subscriptions and creeping variable costs.

Valapoint

The freemium version covers basic tracking and budgeting. The paid plan adds AI-driven spending insights, sinking-fund buckets, shared expense splitting, and bill reminders that keep every deadline visible. Setup takes under 10 minutes: connect your accounts, confirm your categories, set one savings goal, and let the automation handle the weekly tracking you would otherwise skip.

Visit Valapoint’s personal finance tools to run your numbers and see where your money is actually going.

Useful resources for going deeper

  • Money management tips | Fidelity — covers the 50/30/20 rule, Fidelity’s 60/30/10+15 guideline, and debt payoff strategy trade-offs.
  • Financial planning steps | Fidelity — a sequenced guide from budget basics through retirement and tax optimization.
  • 11 money management tips for beginners | Experian — practical starter goals including emergency fund targets and automation tactics.
  • 5 Steps to Take Control of Your Finances | FINRA — a concise five-step roadmap from inventory to tax-smart investing.
  • Investor — free tool to project how regular contributions grow over time.
  • Mymoney — free government worksheets and calculators for self-led financial planning.
  • Consumer — straightforward budgeting guidance including tips for handling irregular income.

This article is general information, not a substitute for advice from a qualified financial advisor. Consult a qualified financial professional about your own circumstances before acting on anything here.

Sources

Stop Impulse Buying: Psychology-Backed Tactics That Work

You can stop impulse buying right now with four moves: pause before purchasing, add friction to the checkout process, redesign your environment to reduce temptation, and budget intentionally for treats you actually want. That’s the whole system. Everything else is detail.

Here’s what you can do in the next 10 minutes:

  • Delete your saved card details from your top two shopping sites or apps.
  • Screenshot the item you want, then close the app or browser tab entirely.
  • Move your phone away from your desk or put it in another room for 15 minutes.
  • Unsubscribe from one marketing email sitting in your inbox right now.
  • Add the item to a wishlist instead of your cart, and set a calendar reminder to revisit it in 48 hours.

Pro Tip: When the urge to buy hits, name it out loud or in a note: “I feel the urge to buy this.” Rating its intensity from 1 to 10 and watching it for 10–15 minutes is a CBT-derived technique called urge surfing that lets the craving peak and fall without you acting on it.

Key Takeaways

Stopping impulse buying comes down to five consistent moves: pause before you purchase, add friction to the checkout process, redesign your environment, budget intentionally for joy, and track your spending with tools that surface leaks automatically.

Point Details
Pause before every purchase Use the 48-hour rule and wishlist method to let urges peak and fall before spending.
Add friction to checkout Remove saved card details and uninstall retail apps to slow the buying sequence.
Redesign your environment Unsubscribe from marketing emails, mute notifications, and curate social feeds to cut trigger exposure.
Budget for intentional joy Allocate a monthly “joy” amount per value category so planned treats replace impulsive ones.
Track with Valapoint Use Valapoint’s AI-driven insights and budget categories to detect leaks and reinforce non-spending wins.

Table of Contents

Why do you keep impulse buying? Emotional and situational triggers explained

Impulse purchases rarely happen because you need something. They happen because you feel something. Stress, boredom, anxiety, and even celebration all activate the brain’s reward system, and shopping delivers a fast dopamine hit that temporarily soothes the discomfort. The problem is that the relief fades quickly, and the purchase stays on your credit card statement.

Research and practitioner commentary consistently show that impulse buying spikes during periods of social stress or economic uncertainty, precisely when budgets are already under pressure. Recognizing your personal triggers is the first line of defense.

The most common triggers include:

  • Stress or anxiety: Shopping feels like control when everything else feels chaotic.
  • Boredom: Scrolling a retail app fills idle time and produces small excitement hits.
  • Celebration: “I deserve this” spending after a win or a hard week.
  • Hunger: Shopping while hungry, especially for food-adjacent or comfort items, amplifies impulse decisions.
  • Notifications and urgency cues: Flash sales, countdown timers, and “only 2 left” alerts are engineered to bypass deliberate thinking.
  • FOMO: Seeing others buy or post about products on social media creates social pressure that feels like need.

To find your top two or three personal triggers, ask yourself: What was I feeling in the hour before my last three impulse buys? Where was I? What had just happened? A pattern usually appears within minutes of honest reflection. You can also take Valapoint’s Financial DNA Test to get a clearer picture of your spending style and the behavioral tendencies driving it.

How to stop impulse buying with pause-and-wait tactics

The single most reliable tactic is creating a gap between the urge and the purchase. That gap is where the impulse dies. U.S. Bank’s financial education guidance specifically recommends the 24–48 hour rule and removing saved payment data as friction tools that reduce emotionally driven purchases.

Here’s how to build that gap deliberately:

  1. Add the item to a wishlist, not your cart. A wishlist has no checkout button. The act of saving it satisfies the urge to “do something” without spending.
  2. Set a 48-hour reminder. Put it in your phone calendar. If you still want the item in two days and it fits your budget, buy it guilt-free.
  3. Remove stored payment details. Typing in your card number manually adds 60–90 seconds of friction. That pause is often enough to break the emotional momentum.
  4. Take a 10–15 minute urge-surfing pause. Step away from the screen. Rate the urge’s intensity. Watch it drop. CBT guides from the Beck Institute confirm that urges peak and recede naturally within this window when you don’t feed them.
  5. Use the screenshot method. Consumer finance guides widely recommend taking a screenshot of the item and closing the app. The image stays; the checkout pressure disappears.

Why does each of these work? Impulse buying relies on a tight loop: trigger, craving, action, reward. Breaking the loop at the action stage weakens the habit over time. Every time you delay and don’t buy, the neural pathway linking that trigger to that purchase gets a little thinner.

Pro Tip: Use if-then planning to make delay automatic: “If I feel the urge to buy something unplanned, then I will add it to my wishlist and close the app.” Writing this down once makes it far easier to execute under emotional pressure.

How to stop impulse buying with pause-and-wait tactics — overview diagram

How to redesign your shopping environment to reduce temptation

You can’t rely on willpower alone when your environment is designed to sell to you. The fix is to reduce exposure before the urge even starts.

Start with this checklist:

  • Uninstall retail apps from your phone. Browsing friction on a mobile browser is significantly higher than tapping an app icon.
  • Mute or turn off push notifications from every shopping platform, including food delivery apps.
  • Unsubscribe from marketing emails. Use a tool like Unroll.Me or simply hit unsubscribe on the next five promotional emails you receive.
  • Remove saved card details from browsers and retail accounts (this doubles as a pause tactic).
  • Install an ad blocker such as uBlock Origin on your desktop browser to cut retargeting ads that follow you after browsing.
  • Curate your social media feeds. Unfollow or mute accounts that consistently trigger purchase urges, whether that’s influencer hauls, flash-deal accounts, or brand pages.

Social spending deserves its own rule. If group outings or shared purchases tend to push you into unplanned spending, set a personal cap before you go. Decide the number in advance, not in the moment when social pressure is highest.

Build a value-based budget so spending feels intentional, not guilty

A budget that bans all fun spending doesn’t work. Financial therapists are clear on this: removing all discretionary spending creates deprivation, and deprivation leads to rebound binges that cost more than the original treats would have. The goal is to make your spending intentional, not to eliminate enjoyment.

Here’s how to build a values-based budget in three steps:

  • Identify your top two or three genuine value categories. These are the areas where spending actually makes you happy: experiences with friends, fitness, cooking, books. Not the categories where you spend by default.
  • Allocate a monthly “joy” amount to each. Even $30–$50 per category is enough to satisfy the urge to treat yourself without blowing your budget.
  • Rename the categories with goal language. Instead of “fun money,” label it “Weekend Hikes Fund” or “Cookbook Collection.” Specific labels reduce the chance of raiding the category for unrelated impulse buys.

Use this mini-worksheet as a starting point:

Automation makes this stick. U.S. Bank recommends scheduling automatic transfers to savings on payday, before discretionary money is available to spend. When the “hot” money moves to a separate account immediately, the temptation to spend it drops sharply. Categorizing past spending by copying bank statements into labeled buckets, as The Guardian’s personal finance reporting describes, also reveals exactly where small leaks are hiding. You can use Valapoint’s personal finance tools and calculators to set up these allocations and run the numbers quickly.

For readers who prefer a spreadsheet approach, an AI-powered Excel budget template can help you build and automate these category allocations without starting from scratch.

Build a value-based budget so spending feels intentional, not guilty — overview diagram

What tools and systems actually help you curb impulse spending?

Tech should do one thing for impulse control: make not buying feel easier than buying. The best tools automate friction, surface spending leaks you can’t see manually, and reward restraint by showing your savings grow.

Here’s how to set up a practical system:

  • Budgeting app (Valapoint): Connect your accounts and let Vala’s AI-driven insights flag small recurring leaks, categorize discretionary spending automatically, and alert you when a category is running hot. The spending insights feature is particularly useful for spotting patterns you’d never notice from a bank statement alone.
  • Card controls: Most U.S. banks and credit unions let you set spending limits by category or merchant type directly in their app. Use this to cap retail or food delivery spending at your budgeted amount.
  • Subscription managers: Review recurring charges monthly. Valapoint’s subscription review feature surfaces charges you may have forgotten, which are often the result of past impulse sign-ups.
  • Notification managers: iOS Screen Time and Android Digital Wellbeing both let you set app limits and schedule downtime for shopping apps during high-risk hours (late evenings, lunch breaks).
  • Browser extensions: uBlock Origin blocks retargeting ads. The Honey extension, used carefully, can also delay purchases by surfacing coupon codes, which adds a small pause to the checkout flow.

Pro Tip: Set up Valapoint’s budget goal tracker with a “Joy Fund” category and a monthly cap. Every time you check the app and see the balance unspent, that visual feedback reinforces the habit of not buying. Saving money automatically through AI insights works the same way: watching a savings balance grow is a reward that competes with the dopamine hit of buying.

Privacy matters when connecting financial accounts. Valapoint uses secure bank integration with read-only access, so your credentials stay protected while the app reads your transaction data.

When impulse buying is more than a habit and where to get help

Most people can curb impulse spending with the tactics above. But for some, the behavior is driven by deeper emotional patterns that habit changes alone won’t fix. Peer-reviewed research links trait impulsivity and specific decision-making patterns to compulsive purchasing behaviors, and clinical interventions address those underlying traits directly.

Seek professional support when you notice:

  • Chronic overdrafts or carrying debt specifically from discretionary purchases
  • Hiding purchases from a partner, family member, or roommate
  • Buying items and returning them repeatedly without using them
  • Sleep disruption or persistent anxiety tied to spending guilt
  • Relationship conflicts caused by financial secrecy or overspending
  • Feeling unable to stop even when you genuinely want to

Where to find help:

  • CBT therapist: Search the Beck Institute’s therapist directory or Psychology Today’s filter for financial or behavioral issues.
  • Financial therapist: The Financial Therapy Association (financialtherapyassociation.org) lists credentialed practitioners who combine money coaching with emotional support.
  • Debtors Anonymous: Free peer-support meetings available online and in person across the U.S. at debtorsanonymous.org.

What to do right after an impulse purchase

Acting quickly after an unplanned purchase limits the financial damage and, more usefully, turns the event into data you can use.

  1. Check the return window immediately. Most U.S. retailers offer 14–30 days. Open the confirmation email now and note the deadline in your calendar.
  2. Consider resale if returning isn’t possible. Platforms like Facebook Marketplace, eBay, and Poshmark let you recover most of the cost on clothing, electronics, and home goods.
  3. Log the trigger. Write one sentence in a notes app: what you were feeling, where you were, and what prompted the purchase. This is your urge journal entry. Behavioral money coaches recommend urge logs as one of the most effective tools for breaking the cycle.
  4. Adjust next month’s budget. Move the amount spent from your “joy” category or flag it as an overage. Don’t punish yourself; just rebalance.
  5. Reward the next non-purchase. The next time you face the same trigger and don’t buy, transfer $5 or $10 to savings. Small positive reinforcement builds the new habit faster than guilt ever does.

One-week rapid reset: On day one, return or list the item. Days two through four, log every urge without acting on it. Day five, review your trigger journal and identify the pattern. Days six and seven, set one new environment change (delete an app, unsubscribe from one email list) based on what you found.

How long does it take to see real results?

Small wins appear fast. Measurable budget changes follow within weeks. Habit stabilization takes longer, but the financial impact compounds steadily. USA Today’s consumer reporting notes that impulse buying rises during tight-budget periods, which means the payoff from building these defenses is highest exactly when you need it most.

Tactic Short-Term Result (Days 1–14) Medium-Term Result (Weeks 3–4)
Urge surfing (10–15 min pause) Fewer same-session purchases Reduced frequency of strong urges
24–48 hour rule Immediate drop in spur-of-moment buys Wishlist items often go unbought
Environment redesign Less exposure, fewer trigger moments Lower baseline temptation
Value-based budgeting Clearer category limits Visible rebalancing of discretionary spend
App-based tracking (Valapoint) Leaks identified within first review Consistent category awareness month over month

To track your own progress, measure these each week:

  • Number of impulse purchases made (aim to reduce week over week)
  • Total discretionary spending versus your budgeted amount
  • Number of urges logged versus urges acted on
  • Wishlist items added but not purchased (this is a win worth counting)

Progress is rarely a straight line. A stressful week will produce more urges. That’s normal. What changes over time is how often those urges turn into purchases.

What these tactics feel like when you actually use them

The first week is the most friction-heavy. You’ll feel the pull to check a retail app and realize you deleted it. You’ll start to type your card number and stop halfway through. Those moments of mild annoyance are the system working. By week two, the wishlist fills up with things you no longer want. By week three, checking your Valapoint budget and seeing a category with money still in it starts to feel genuinely satisfying. One planned treat per month, something you actually chose rather than grabbed impulsively, feels better than five unplanned purchases combined.

Progress isn’t linear. Some weeks you’ll slip. The recovery checklist above handles that. What compounds over months is the growing gap between what you earn and what you spend without thinking, and that gap is where financial confidence lives.

Valapoint makes it easier to stay on track

Knowing the tactics is one thing. Having a system that enforces them automatically is what makes the difference between a good week and a lasting habit.

Valapoint

Valapoint’s AI-powered finance app detects the small recurring leaks that manual budgeting misses, flags when discretionary categories are running over, and surfaces spending patterns before they become problems. Set up a “Joy Fund” budget bucket with a monthly cap, connect your accounts securely, and let the app’s real-time alerts create the friction that keeps impulse spending in check. The subscription review feature catches forgotten sign-ups, and the budget goal tracker turns every unspent dollar into visible progress toward something you actually care about.

Start with the free plan and see your spending patterns clearly within the first week. Download the Valapoint personal finance app and run your first spending analysis today.

Sources

These are the primary sources used in this article, each worth bookmarking for deeper reading:

This article is general information, not a substitute for advice from a qualified financial advisor. Consult a qualified financial professional about your own circumstances before acting on anything here.

Understand Personal Cash Flow: Your Quick Plan to Track & Improve

Personal cash flow is the difference between the money coming in and the money going out each month. Positive cash flow means you keep more than you spend. Negative cash flow means the opposite, and that gap tends to grow quietly until it becomes a real problem. By the end of this guide, you’ll be able to calculate your net cash flow, set up a simple tracking routine, and take concrete steps to improve it starting today.

Three actions you can take right now:

  • Calculate this month’s net cash flow. Add up your take-home income, then subtract every expense you can find. The number you get is your starting point.
  • Find one avoidable outflow to cut. Check your bank statement for subscriptions, auto-renewals, or recurring charges you forgot about.
  • Automate one small saving. Automating a small saving each paycheck builds the habit before the amount matters.

Pro Tip: Experian recommends listing every inflow and outflow for a full calendar month before drawing conclusions. One month of data is a snapshot; two or three months reveal a pattern.


Key Takeaways

Understanding and managing your personal cash flow comes down to one repeatable habit: calculate your net cash flow monthly, find one leak, and automate one saving, then build from there.

Point Details
Core formula Net cash flow = total inflows minus total outflows; a positive result means you have a surplus to direct intentionally.
Sinking funds prevent surprises Divide annual and quarterly bills by 12 and treat each as a monthly outflow to avoid false surpluses.
Variable income needs a conservative baseline Build your budget on your lowest reasonable monthly income from the past 6–12 months, not your average.
Weekly reps build the habit A 15-minute weekly review and a 30-minute monthly statement are enough to stay accurate and catch problems early.
Valapoint’s Vala automates the routine Vala handles categorization, leak detection, sinking funds, and bill reminders so your cash flow statement stays current without manual effort.

Table of Contents

What does personal cash flow actually measure?

Personal cash flow measures money movement over a specific period, usually a month. It answers one question: did more money arrive than leave? That makes it your short-term financial vital sign, distinct from two other tools you may already use.

Here’s how the three concepts differ:

  • Cash flow statement: Records what actually happened. Inflows minus outflows equals your net position. It looks backward.
  • Budget: A forward-looking plan for how you intend to spend and save. It looks ahead.
  • Net worth: A snapshot of assets minus liabilities at a single point in time. It doesn’t tell you whether you can pay next month’s bills.

Bank of America’s Better Money Habits makes the distinction clear: a budget is your intent, and a cash flow statement is your record. Using both together gives you the full picture. The budget tells you where you planned to go; the cash flow statement tells you where you actually went.

Cash flow also affects your credit and borrowing capacity. Lenders and financial advisors look at whether your income reliably covers your obligations. A consistently positive net cash flow signals financial stability, while repeated shortfalls can push you toward credit reliance and higher utilization. Before seeking personalized borrowing advice, you can verify any financial professional’s credentials through FINRA BrokerCheck.


How to calculate your personal cash flow step by step

The formula is straightforward:

Net cash flow = Total cash inflows − Total cash outflows

Diagram of step-by-step cash flow calculation

K38 Consulting’s cash flow guide confirms this core formula and notes that a surplus can immediately fund emergency savings or debt repayment.

What counts as an inflow

Include money you actually receive and can spend:

  • Net (take-home) pay from your job
  • Freelance or side income received this month
  • Rental income
  • Interest or dividends paid out in cash
  • Government benefits or alimony received

Exclude reinvested dividends or unrealized investment gains. Those don’t hit your checking account, so they can’t pay your bills.

What counts as an outflow

Outflows fall into four categories:

  • Fixed: Rent or mortgage, car payment, insurance premiums, loan minimums
  • Variable: Groceries, utilities, gas
  • Discretionary: Dining out, streaming services, clothing
  • Lumpy/annual: Car registration, holiday gifts, annual subscriptions

That last category trips most people up. LegalClarity’s cash flow analysis guide recommends converting every nonmonthly bill into a monthly sinking-fund line. Divide the annual amount by 12 and treat that figure as a monthly expense. A $600 car insurance payment due in October becomes $50 per month in your cash flow statement, every month.

Pro Tip: Taxes deserve the same treatment. If you pay quarterly estimated taxes, divide your annual tax bill by 12 and include that as a monthly outflow. Ignoring it creates a false surplus that disappears four times a year.

Worked monthly example

This reader has a positive net cash flow of $1,490. That surplus is available for an emergency fund, debt paydown, or savings goals.


Which tracking method will you actually stick with?

The best tracking method is the one you use consistently. Here are the three main options and their real trade-offs:

Manual ledger (pen and paper or a notes app)

  • Setup time: 10 minutes
  • Automation: None
  • Best for: People who want full control and spend mostly cash
  • Downside: Easy to miss transactions; requires daily discipline

Spreadsheet template

  • Setup time: 20–30 minutes
  • Automation: Partial (formulas auto-calculate totals)
  • Best for: People comfortable with Google Sheets or Excel who want flexibility
  • Downside: You still enter transactions manually; no bank sync

Dedicated finance app

  • Setup time: 15–30 minutes including bank connection
  • Automation: High (auto-categorization, alerts, recurring tracking)
  • Best for: Anyone who wants real-time visibility without manual entry
  • Downside: Requires sharing bank credentials; subscription cost for premium features

Investopedia’s monthly budget guide suggests starting with broad spending buckets rather than tracking every penny. That approach reduces friction and builds the habit before you refine the categories.

Valapoint’s Vala app covers the app-based route with automatic categorization, spending leak detection, sinking fund tracking, and bill reminders. It maps directly to the steps in this guide. You can explore Vala’s finance app features to see how it handles each piece.

For readers who prefer a cash-first system, tracking cash spending without stress offers practical low-friction workflows that don’t require an app at all.

To start today: Open your bank’s transaction history for the past 30 days. Copy the totals into the template in Section 9 or a blank spreadsheet. That single step gives you your first real cash flow number.


How to improve weak or negative cash flow

If your net cash flow is negative or barely positive, these actions tend to move the needle fastest. Work through them in order.

  1. Cancel or pause unused subscriptions. Pull your last two bank statements and highlight every recurring charge. Cancel anything you haven’t used in 30 days. This is the fastest win because the savings repeat every month automatically.
  2. Refinance or consolidate high-interest debt. A lower interest rate on a credit card or personal loan reduces your fixed monthly outflow immediately. Even a 3–4 percentage point reduction on a $5,000 balance saves meaningful money each month.
  3. Adjust your tax withholding. If you consistently get a large refund, you’re giving the IRS an interest-free loan. Adjusting your W-4 through your employer adds money to each paycheck now. Northwestern Mutual’s budgeting guide includes this as a practical step in any cash flow review.
  4. Add an income stream. Freelance work, selling unused items, or a part-time shift adds to inflows without touching your current lifestyle.
  5. Automate savings before you spend. Set up a direct deposit split so a fixed amount moves to savings the moment your paycheck arrives. Automating personal savings goals removes the decision entirely.

Pro Tip: Round-up features in finance apps move spare change from every purchase into savings automatically. It’s not a wealth-building strategy on its own, but it builds the savings habit and adds up faster than most people expect.

Once you have a surplus, allocate it in this order:

  • First: Build a one-month cash reserve (your immediate liquidity buffer)
  • Second: Pay down high-interest debt (credit cards, payday loans)
  • Third: Fund short-term goals (vacation, car repair fund)
  • Fourth: Invest for long-term goals

How to handle variable or irregular income

Freelancers, gig workers, and anyone with seasonal income face a specific challenge: their cash flow varies month to month, so a single month’s calculation can mislead them.

Hands organizing cash envelopes for budgeting

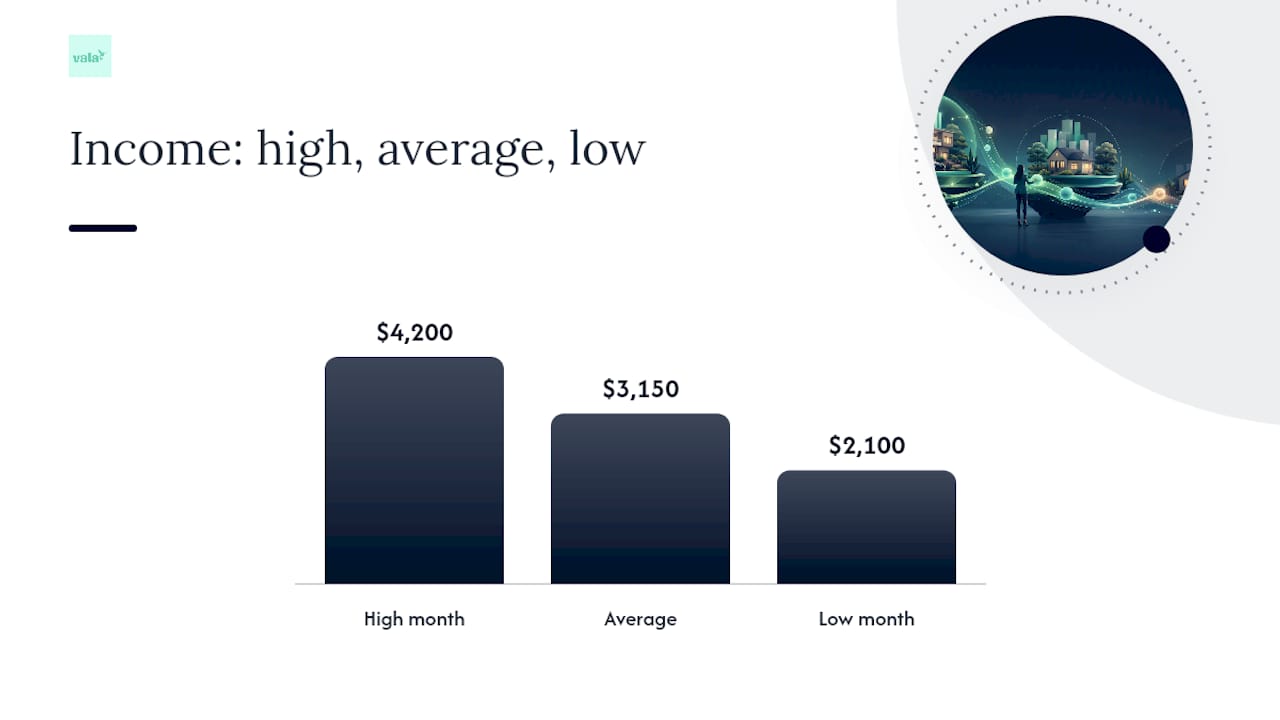
The fix is a conservative baseline. Fidelity’s budgeting guide recommends building your budget on the lower end of your recent monthly income. Look at 6–12 months of income history and use a figure close to your lowest reasonable month, not your average. If your income ranged from $2,800 to $5,400 over the past year, plan around $3,000. Any month you earn more is a surplus you can direct intentionally.

A practical smoothing checklist for variable earners:

  • Separate bill account: Move your fixed monthly obligations (rent, utilities, insurance) into a dedicated account. Fund it first from every payment you receive.
  • Sinking funds for irregular bills: Annual and quarterly expenses get their own monthly line, as described in the calculation section.
  • Quarterly tax sinking fund: If you’re self-employed, divide your estimated annual tax by 12 and set that aside monthly. Quarterly deadlines stop being a crisis when you’ve been saving for them all along.
  • Larger emergency buffer: Fidelity’s guidance points toward a 6-month liquidity buffer for variable-income earners, compared to the 3-month baseline often cited for salaried workers.
  • Conservative discretionary spending: In a high-income month, resist the urge to expand lifestyle spending. Treat the surplus as next month’s safety net first.

A quick numeric example: you earn $48,000 in a good year but your income swings by $1,500 month to month. Your annual car insurance is $720, your quarterly estimated tax is $1,800, and you have a $240 annual software subscription.

  • Car insurance: $720 ÷ 12 = $60/month
  • Estimated tax: ($1,800 × 4) ÷ 12 = $600/month
  • Software subscription: $240 ÷ 12 = $20/month

Those three lines alone add $680 to your monthly outflows. Miss them and your cash flow statement shows a surplus that evaporates four times a year.


A simple weekly and monthly routine that keeps you on track

Consistency beats perfection. A short, repeatable routine is more useful than a detailed review you do once and abandon.

  1. Weekly (15 minutes): Open your bank or app and categorize any uncategorized transactions from the past seven days. Flag anything that looks wrong or unexpected. That’s it. Investopedia’s budget guide calls these short sessions “reps” and notes that they build a durable habit without creating burnout. A weekly spending plan can make this even faster.
  2. Monthly (30 minutes): Complete your cash flow statement for the month just ended. Compare your actual net cash flow to your planned budget. Note any category that ran over. Adjust next month’s plan accordingly.
  3. Quarterly (60 minutes): Review your sinking funds. Are they on track? Revisit your savings goals. Check whether any fixed costs have crept up (insurance renewals, subscription price increases). If a major life event happened (new job, new baby, large purchase), treat this as a full reset.

When to do an immediate review: A job change, a new lease, a major medical expense, or a new loan all shift your cash flow significantly. Don’t wait for the quarterly slot. Run a fresh calculation within the first week of any major financial change.


Common cash flow mistakes and red flags to watch for

Most cash flow errors fall into a few predictable categories. Catching them early saves real money.

Measurement mistakes:

  • Using gross pay instead of net (take-home) pay inflates your inflows
  • Forgetting lumpy annual bills creates a false monthly surplus
  • Ignoring subscriptions and auto-renewals, which LegalClarity notes are among the most common sources of undetected outflows
  • Counting reinvested dividends or unrealized gains as spendable income

Behavioral traps:

  • Reviewing cash flow only when something goes wrong (reactive instead of proactive)
  • Treating a one-month surplus as permanent and expanding spending before the pattern holds
  • Skipping the sinking fund step and then scrambling when annual bills arrive

Red flags that signal a structural problem:

  • Repeated overdrafts or overdraft fees
  • Rising credit card utilization month over month
  • Two or more consecutive months of negative net cash flow

A persistently negative net cash flow signals that either fixed costs are too high or income is insufficient. The first move is to cut fixed costs, not discretionary ones, because fixed cuts repeat every month. The second move is to build a short-term cash reserve, even a small one, to absorb the next unexpected expense without going further into debt.

First-fixes checklist:

  • Tighten discretionary spending by 10–15% for 60 days
  • Create a temporary $500–$1,000 cash reserve before paying extra on debt
  • Call service providers (insurance, internet, phone) and ask for a lower rate

Your copyable monthly cash flow template

Use this template as your starting point. Copy the structure into a Google Sheet, Excel file, or your finance app’s custom categories.

Worked example (using the numbers from Section 3):

How to use this in a spreadsheet:

  • Enter your planned amounts at the start of each month
  • Update actuals weekly during your 15-minute review
  • Add a formula in the Net Cash Flow row: =Total Inflows − Total Outflows
  • Color-code the net row: green for positive, red for negative

For readers who want a deeper look at cash flow optimization beyond the basics, Wealth Assimilation’s cash flow guide covers advanced strategies worth reading once you have the fundamentals in place.


What a short weekly cash flow check actually looks like

The routine described in this guide isn’t theoretical. A 15-minute weekly review, done consistently, surfaces problems before they compound. The monthly net cash flow check takes about 30 minutes and answers one question: did the plan match reality?

What tends to happen in practice is that small automations do the most work. Moving a fixed amount to a sinking fund the day after payday removes the temptation to spend it. Setting a bill reminder two days before a due date eliminates late fees. These aren’t dramatic changes. They’re small, repeatable behaviors that add up over months.

The specific behavior worth copying: when you cancel a subscription, immediately redirect that exact dollar amount to a sinking fund or savings goal. The money was already leaving your account. Redirecting it rather than absorbing it back into discretionary spending is what turns a one-time cut into a permanent improvement.


Valapoint’s Vala app puts this guide on autopilot

Tracking cash flow manually works. But the step most people skip is the weekly review, and that’s exactly where Vala removes the friction.

Valapoint

Vala connects securely to your bank accounts and automatically categorizes every transaction, so your cash flow statement builds itself in real time. Spending leak detection flags recurring charges you may have forgotten. Sinking fund tracking lets you set monthly targets for annual bills and watch them fill. Bill reminders keep due dates visible before they become overdrafts. The personal finance tools inside Vala also include calculators you can use to run your first net cash flow number in minutes.

When choosing a cash flow app, look for: bank-level encryption and read-only account access, automatic categorization with manual override, sinking fund or savings bucket features, and spending alerts you can customize.

Vala’s freemium plan lets you start tracking at no cost. The premium tier unlocks AI-driven insights, shared expense splitting for couples and groups, and advanced goal tracking. You can get set up in about 15 minutes. Try the Vala personal money app and run your first cash flow calculation today.


Sources

These sources back the key claims in this guide and are worth bookmarking for further reference.

This article is general information, not a substitute for advice from a qualified financial advisor. Consult a qualified financial professional about your own circumstances before acting on anything here.

Free AI Budgeting App for Individuals, Couples, and Groups

The best way to get free, hands-on budget management right now is to start with an AI-powered freemium app that connects to all your active accounts for a complete picture. Skip the spreadsheets. Try Vala’s free tier today and get accurate, automated insights within minutes of linking your checking, savings, and primary credit card accounts.

Here is why this fits your situation:

  • Automation does the work. Vala connects to your bank accounts, categorizes every transaction, and flags spending patterns without any manual entry.
  • Shared budgeting is built in. Whether you are splitting costs with a partner or a small group, the free tier handles shared expense tracking out of the box.
  • No cost to start. The freemium model means you get real, useful features before you ever consider paying.

Key Takeaways

A free AI-powered budgeting app covers the core needs of most individuals, couples, and small groups in the U.S., with no cost required to start tracking, splitting, and saving.

Point Details
Start free, start fast Vala’s free tier includes auto-categorization, shared splitting, and alerts with no subscription needed.
Link all active accounts Connecting checking, savings, and your main credit card gives the AI a complete picture for accurate insights. Partial data produces partial insights.
Set one goal first Pick one specific budget target in the first week; one focused goal builds the habit faster than five vague ones.
Check security before linking Confirm read-only connections, data deletion controls, and encryption before connecting any bank account.
Upgrade only when you need it Paid features are worth it when you need predictive forecasting, automation, or unlimited shared groups.

Table of Contents

What do free AI budgeting apps actually give you?

A free tier on an AI-powered app is not a stripped-down demo. Most free tiers include automatic account linking, transaction categorization, basic budget creation, shared expense splitting, and spending alerts. According to SuperMoney’s breakdown of how AI budgeting apps work, these apps use machine learning to connect to your accounts and generate personalized recommendations without any manual data entry.

What typically sits behind a paywall: advanced forecasting, automated recurring transfers, unlimited shared groups, and premium goal optimization tools.

Feature Free Tier Paid Tier
Automatic account linking
Transaction categorization
Basic budget tracking
Shared expense splitting ✓ (limited groups) ✓ (unlimited)
Spending alerts
Predictive forecasting Limited
Automated recurring transfers
Advanced goal optimization

Comparison of free and paid AI budgeting app features

GreenPath Financial Wellness notes that AI budgeting apps are most effective when paired with consistent habits or support from certified counseling, such as NFCC- or HUD-aligned services.


How does AI actually improve your daily budgeting?

AI does four things well in a budgeting app: it categorizes transactions automatically, detects spending patterns over time, sends anomaly alerts when something looks off, and calculates a safe-to-spend figure based on your upcoming bills. Research from Jumpp Finance confirms that AI budgeting tools analyze past transactions and recurring expenses to predict upcoming costs and suggest real-time budget adjustments.

Where AI stops short: it cannot set your personal priorities, weigh a career change against a savings goal, or make judgment calls about trade-offs that only you understand. USA Today’s personal finance coverage makes this clear: AI automates tracking and pattern detection, but it cannot replace human decision-making.

Pro Tip: Treat AI recommendations as suggestions, not directives. When the app flags that you spent more on dining this month, use that as a prompt to decide whether to set a weekly limit, not as an automatic rule to follow.

AI can often suggest specific, small actions—like canceling a forgotten $14/month subscription or capping weekly takeout at $60—that may produce real, immediate results. The insight is only useful when you act on it.

Vala’s approach to AI-personalized budgets goes further by surfacing spending patterns and savings opportunities specific to shared and personal budgets, not just generic category averages.


How does AI actually improve your daily budgeting? — overview diagram

How do you set up a free AI budgeting app in the first week?

Getting started is typically quick. Here is the sequence that gets you useful results fast.

  1. Pick your app and confirm bank support. Check that your primary bank is supported before you sign up. Most apps list compatible institutions on their website or during onboarding.
  2. Link your primary accounts. Connect your checking account, savings account, and main credit card. Partial data produces partial insights, so connecting every active account gives the AI a complete picture. “Read-only” means the app can see your transactions but cannot move money.
  3. Set one concrete goal and one budget category. Pick something specific: save $200 this month, or keep dining under $150. One focused target beats five vague ones.
  4. Enable alerts and invite others. Turn on weekly summary emails and spending alerts. If you are budgeting with a partner or group, send the invite now so shared expenses sync from day one.

Do in the first week:

  • Review your categorized transactions once and correct any miscategorized items.
  • Check the spending pattern summary after 5–7 days.
  • Act on one AI suggestion, even a small one.

Avoid in the first week:

  • Linking accounts and then ignoring the app for two weeks.
  • Setting more than two budget categories before you see how the first one tracks.

What should you check before linking your bank accounts?

Security is the right thing to check before you connect any financial account. Here is what matters for U.S. users:

  • Bank-level encryption. Look for strong encryption standards such as 256-bit AES or equivalent language in the app’s security documentation.
  • Read-only connections. Apps that use Plaid-type integrations connect to your institution without the ability to initiate transfers. Confirm this before linking.
  • Independent security audit compliance (e.g., SOC 2). Apps that undergo recognized security audits demonstrate higher standards of data protection.
  • Data deletion controls. A trustworthy app lets you delete your data and revoke account access at any time. Check the privacy policy for a clear deletion process.
  • Purpose limitation. The privacy policy should state that your transaction data is used for your budgeting, not sold to third parties.

Before you link any account, open the app’s privacy policy and search for “data deletion” and “third-party sharing.” If either section is vague or missing, that is a signal to look elsewhere.

For guidance beyond the app itself, NFCC-certified and HUD-approved counselors offer free or low-cost financial counseling across the U.S. and can help you turn app insights into a real financial plan.


When is the free tier enough, and when should you upgrade?

For most individuals and couples just starting out, the free tier covers everything you need for the first three to six months. Three clear signs it is time to consider paid:

  • You are splitting costs across more than one group regularly. Free tiers typically cap shared groups. If you manage household expenses with a partner and also split costs with roommates or friends, you will hit that limit quickly.
  • You want predictive forecasting. If you need the app to project next month’s cash flow based on recurring bills and income patterns, that feature is almost always paid.
  • You want automated recurring transfers. Manually moving money to savings every payday works, but automation removes the friction entirely, and that feature lives in paid tiers.

Pro Tip: Before upgrading, list the two or three paid features you would actually use. If you cannot name them specifically, the free tier is still the right choice.

For individuals on a tight budget, the free tier plus a free AI-enabled spreadsheet template covers most planning needs without any subscription cost.


Why starting with a freemium AI budgeting app makes sense

The biggest barrier to consistent budgeting is not knowledge. It is friction. A freemium AI app removes that friction by doing the categorization, pattern detection, and alerting automatically. You get to focus on the decisions, not the data entry.

Small wins matter more than perfect systems. Catching one unnecessary subscription, staying under your dining budget for two weeks, or simply knowing your actual monthly spending for the first time, these are the habits that compound. The app makes them visible. You make them stick.


Vala is a strong free starting point for individuals, couples, and groups

Vala gives you real budgeting power without a subscription. The free tier includes automatic transaction categorization, shared expense splitting, safe-to-spend alerts, and goal tracking, all backed by bank-level encryption and read-only account connections.

Valapoint

For individuals who want to track spending and catch money leaks, the Vala personal finance app is the place to start. For couples and small groups, shared expense splitting is available on the free tier from day one. Vala also supports users who want to connect their budgeting to NFCC- or HUD-aligned counseling resources for deeper financial guidance.

Want to explore the full toolkit? Vala’s personal finance tools include budget calculators, savings trackers, and debt tools that complement the app’s automated insights.


Useful resources and trusted partners

  • How AI Personalizes Budgets for Smarter Money Management — Vala Blog: deeper reading on AI categorization and personalized spending insights.
  • Vala Blog: Budgeting Tips and Money Management Guides — full library of budgeting and expense tracking articles.
  • GreenPath Financial Wellness: AI Budgeting & Credit Apps — consumer guidance on using AI apps alongside certified financial counseling.
  • SuperMoney: How AI Budgeting Apps Work — plain-language explanation of how these apps connect to accounts and generate insights.
  • USA Today: Can AI Replace Budgeting? — balanced look at what AI can and cannot do in personal finance.
  • AI Excel Budget Template — partner resource for users who want a spreadsheet export or offline planning option alongside their app.

This article is general information, not a substitute for advice from a qualified financial advisor. Consult a qualified financial professional about your own circumstances before acting on anything here.

Sources

How to Save for an Apartment: A Plan for First-Time Renters

Before you start browsing listings, know your number. A solid target for saving for an apartment is your total move-in costs plus two months of true monthly expenses. In practice, that works out to roughly 2–4 months’ rent as a combined move-in and runway cushion, according to rent.com. The one-line plan: calculate your full move-in cost, set a timeline, open a dedicated savings account, and automate transfers from every paycheck.

If you’re in a high-cost city like New York or San Francisco, stretch that target to several months, especially in higher-cost cities. If you’re splitting costs with a roommate, 3 months may be enough. The math changes, but the structure stays the same.


Table of Contents

What does it actually cost to move into an apartment?

Most first-time renters underestimate the upfront bill by a wide margin. The listed rent is just one line item. Here’s what you’re actually paying before you sleep in the new place:

  • Security deposit: — Usually one month’s rent, sometimes two in competitive markets

On the recurring side, rent.com notes that combined utilities (electricity, water, internet, trash) run a moderate amount per month for a typical one-bedroom.

Worked example: Say your target apartment rents for $1,500/month.

Cost Category Low Estimate Typical High Estimate
Security deposit $1,500 $1,500 $3,000
First + last month $1,500 $3,000 $3,000
Application + admin fees $50 $100 $200
Moving costs $200 $600 $2,000
Basic furnishing $500 $1,500 $3,000
Supplies + groceries $100 $200 $300
Total move-in $3,800 $6,900 $12,100

That typical column of $6,900 is about 4.5 months of rent. Add two months of living expenses as a runway buffer, and your full savings target sits closer to $10,000 before you hand over the keys.


How do you turn that total into a monthly savings goal?

The formula is simple: savings target ÷ months available = monthly savings requirement. The Apartment Notes first-apartment calculator formalizes this as: Savings Goal = Move-In Cost + (Monthly Budget × 2), which captures both the upfront cash and the runway.

Here’s how that plays out across three realistic timelines, using the $6,900 typical move-in figure plus a $2,600/month total living cost (rent + utilities + basics):

3-month plan: Target = $6,900 + ($2,600 × 2) = $12,100 → save $4,033/month. This is aggressive. It works if you’re living rent-free with family and have minimal expenses right now.

6-month plan: Same $12,100 target → save $2,017/month. More realistic for someone earning $45,000–$55,000/year with moderate current expenses.

12-month plan: Same target → save $1,008/month. Achievable for most full-time earners. This timeline also gives you time to build credit and gather documents.

Choosing your timeline comes down to three factors: how stable your income is, whether you already have an emergency fund (don’t drain it for the apartment), and what other financial goals are competing for the same dollars. If you’re carrying high-interest debt, the 12-month plan gives you room to pay minimums and still save consistently.


How do you build a monthly budget that landlords will approve?

Landlords use two standard benchmarks to screen tenants. The 30% rule says your rent should not exceed 30% of your gross monthly income. The 3x rent qualifier means landlords typically want your monthly income to be at least three times the rent. On a $1,500 apartment, that means showing $4,500/month in verifiable income.

Some financial advisers suggest keeping rent closer to 25% of your take-home pay for better cash flow, especially if you’re also paying off student loans. With a roommate, both thresholds become much easier to hit.

Once you know your rent, your true monthly cost is higher than the lease says. Savvy Nickel’s first-apartment checklist notes that rent plus utilities and recurring expenses typically runs 20–40% higher than the listed rent alone.

Sample monthly budget for $4,500/month take-home pay:

Category Monthly Amount
Rent ($1,500 apartment) $1,500
Internet $60
Transportation (gas or transit) $200
Phone $60
Subscriptions $40
Personal/miscellaneous $100
Emergency/runway savings $300

That leaves $1,690/month for debt payments, retirement contributions, and discretionary spending. If your numbers look tighter, the roommate option or a lower-rent unit changes the math significantly.

Documents landlords typically require at application:

  • Government-issued photo ID
  • Two to three recent pay stubs
  • W-2 (or 1099 for freelancers/self-employed)
  • Two to three months of bank statements
  • Personal or professional references
  • Proof of renter’s insurance (sometimes required before move-in)

HUD’s fair housing resources outline what landlords can and cannot ask for during screening, which is worth reviewing so you know your rights alongside your responsibilities.


How do you build a monthly budget that landlords will approve? — overview diagram

What does moving and furnishing actually cost?

Moving costs vary widely based on how much help you hire. Here’s a realistic range:

Moving Method Typical Cost Best For
Friends + borrowed truck $50–$200 (gas, food, supplies) Minimal furniture, local move
DIY truck rental (U-Haul, Penske) $150–$500 Studio or one-bedroom, local
Hybrid (rent truck + hire loaders) $400–$800 One-bedroom, moderate distance
Full-service movers $800–$2,500+ Larger moves or long distance

Hands loading box into moving truck

For furnishing, a minimal setup (bed frame, mattress, basic kitchen items, a few storage pieces) runs $500–$1,500 if you shop smart. A fuller setup with a couch, dining table, and desk can reach $2,500–$4,000 buying new.

Ways to cut furnishing costs significantly:

  • Facebook Marketplace and Craigslist for gently used furniture
  • Thrift stores (Goodwill, Salvation Army, local shops) for kitchen items and décor
  • Curb alerts and “free” sections on local community boards
  • Hand-me-downs from family or friends who are also moving or downsizing
  • IKEA or Amazon Basics for affordable new essentials when used isn’t available

One-time setup costs that often get overlooked:

  • Internet installation or activation fee ($50–$100)
  • Utility deposits for electricity or gas ($50–$150 per utility)
  • Small appliance purchases (toaster, microwave, vacuum): $100–$300
  • Cleaning supplies and basic tools: $50–$100
  • Curtains, shower curtain, bath mat, and hangers: $75–$150

Budget $300–$600 for these incidentals even if your furnishing plan is minimal.


What documents and credit steps should you prepare before applying?

Preparing your paperwork before you start touring apartments saves real money. Rushed applications lead to missed deadlines, backup choices, and higher rents. Apartment List recommends starting at least 60 days before your intended move-in date to give yourself time to fix problems before they cost you.

Document checklist:

  • Valid government-issued photo ID (driver’s license or passport)
  • Two to three recent pay stubs (or offer letter for new jobs)
  • Most recent W-2 or 1099 tax form
  • Two to three months of bank statements showing consistent deposits
  • Contact information for two references (employer or previous landlord preferred)
  • Proof of renter’s insurance if the landlord requires it at signing

Credit steps to take 60–90 days out:

  • Pull your free credit report at AnnualCreditReport.com and check for errors
  • Dispute any inaccurate negative items in writing; corrections can take 30–45 days
  • Pay down credit card balances to reduce your utilization ratio, which directly affects your score
  • Avoid opening new credit accounts in the 60 days before applying
  • If your score is below 620, ask a trusted family member about co-signing; many landlords accept this

A stronger credit profile doesn’t just improve approval odds. It can also reduce or eliminate the need for a double security deposit, which some landlords require from applicants with thin or damaged credit.


Three copyable savings plan templates you can use right now

These templates use a $1,500/month rent and a $12,100 savings target (move-in + 2-month runway) as the base. Adjust the numbers to your actual rent.

  1. 3-month sprint plan

    • Monthly savings needed: $4,033
    • How to reach it: eliminate dining out entirely, pause all non-essential subscriptions, add side income of $500–$1,000/month, and redirect any bonus or tax refund directly to the fund
    • Best for: someone living rent-free with family and earning $60,000+/year
    • When to extend: if you can’t hit $4,000/month without depleting your emergency fund, move to the 6-month plan
  2. 6-month steady plan

    • Monthly savings needed: $2,017
    • How to reach it: cut dining and subscriptions by $300/month, add one side income stream ($300–$500/month), and automate the rest from your paycheck split
    • Best for: most full-time earners in the $40,000–$55,000 range
    • Irregular income tip: if you’re paid irregularly, save 45% of every deposit instead of a fixed dollar amount
  3. 12-month build plan

    • Monthly savings needed: $1,008
    • How to reach it: automate $1,000/month to a HYSA, keep current spending mostly intact, and apply any windfalls (tax refund, bonus, overtime) as lump-sum boosts
    • Best for: someone balancing student loan payments, building an emergency fund, or earning under $40,000/year
    • Debt and retirement note: continue paying minimums on all debt, and keep contributing to a 401(k) up to any employer match before redirecting extra dollars to the apartment fund. Free employer match is a guaranteed return you shouldn’t skip.

For all three plans, use percentage-based contributions if your income varies. Saving 30–45% of each paycheck toward the apartment goal works better than a fixed dollar target when paychecks fluctuate.


Key Takeaways

Saving for an apartment requires a concrete cash target (move-in costs plus two months of living expenses), a realistic timeline, and automated contributions that remove the need for daily willpower.

Point Details
Set your cash target first Aim for move-in costs plus two months of living expenses, roughly 2–4 months’ rent total.
Match timeline to income A 3-month plan needs $4,000+/month in savings; a 12-month plan needs around $1,000/month.
Automate from day one Schedule transfers on payday to a separate HYSA so the money moves before you can spend it.
Start 60 days early Use the lead time to gather documents, check your credit report, and correct any errors before applying.
Use Valapoint to stay on track Vala’s goal tracker, subscription scanner, and automated transfers keep your apartment fund moving without manual effort.

Why the boring approach actually works

The plans that succeed aren’t the ones that demand the most sacrifice. They’re the ones that require the fewest decisions. When your savings transfer is automatic, you don’t have to choose between saving and spending every pay period. That single structural change, moving money before you see it, does more for your progress than any amount of motivation.

What most first-time renters underestimate isn’t the cost of moving. It’s the cost of not being ready. A weak credit file, missing documents, or a savings account that’s $2,000 short means settling for a worse apartment, paying a higher deposit, or delaying the move entirely. The 60-day planning window and the 3–4 month savings target aren’t arbitrary rules. They’re the margin between a smooth move and a stressful one.

Modest, consistent actions compound. A $1,000/month automated transfer over 12 months gets you to the same place as a $4,000/month sprint over 3 months, with far less strain. The goal isn’t to suffer for your apartment. It’s to build a system that works quietly in the background while you live your life.


Vala makes apartment saving straightforward

Tracking your apartment fund manually across spreadsheets and bank accounts is tedious, and it’s easy to lose momentum when progress isn’t visible. Vala gives you a clear, real-time view of your savings goal, flags the subscriptions draining your fund, and automates the transfers so your plan runs on schedule.

Valapoint

Set your apartment savings goal in Vala, connect your bank account, and let the app surface exactly where your money is going. The subscription scanner alone typically uncovers $50–$150/month in charges worth cutting. Vala is free to start, with premium features available for users who want full AI insights, shared expense splitting, and advanced goal tracking.

Open your apartment savings goal in Vala today, or explore the full feature set at valapoint.com/personal-money-app.


Useful sources and further reading

  • portal.hud.gov
  • First-Time Apartment Renter’s Guide: 20 Step Checklist
  • How much money should you save for an apartment?
  • Renting Your First Apartment: The Complete Financial Checklist | Savvy Nickel
  • First Apartment Costs Calculator — Apartment Notes
  • How Much You Should Save Before You Move Out | Capital One

Incremental Budgeting: A Practical Guide for 2026

Incremental budgeting builds each new budget by taking the prior period’s figures as a baseline and applying planned adjustments for inflation, headcount changes, or new contracts. According to the Association of Chartered Certified Accountants (ACCA), those increments should explicitly account for inflation and any known cost changes, not just carry numbers forward unchanged. The Corporate Finance Institute positions it as a conservative method best suited to stable environments, and AccountingTools notes that its long-term risks, particularly budgetary slack and perpetuated inefficiency, deserve serious attention before you commit to it as your default approach.

Table of Contents

How incremental budgeting works, with a worked example

The core mechanic is straightforward: you start with last year’s approved budget (or actuals, if they differ significantly), then apply a documented adjustment to each line. Bill.com’s practical walkthrough shows how to express those adjustments either as a percentage increase or as an absolute dollar amount, depending on what drives the cost.

Common adjustment types include:

Here is a spreadsheet-ready example for a single department:

Budget Line Prior Budget Increment New Budget
Salaries +3% (CPI-linked)
Office supplies +2% (inflation)
Software licenses +$1,500 (new seat)
Travel 0% (no change)

To roll this up to a consolidated budget, sum each department’s new total, then reconcile against the organization’s revenue forecast. A quick sanity check: total incremental spend growth should not outpace projected revenue growth without a documented reason.

The disadvantages you need to plan around

The risks here are behavioral as much as technical. AccountingTools flags budgetary slack as one of the most persistent problems: managers learn that requesting more than they need protects their future allocation, so padding becomes a rational strategy rather than an honest estimate.

Key risks:

  • Use-it-or-lose-it spending: Tutor2u describes how teams rush to spend remaining budget before the period closes, purely to avoid a cut next year.

“Incremental budgeting creates inertia. Without a governance trigger that forces periodic re-evaluation, the budget becomes a record of past decisions rather than a plan for future priorities.” — synthesized from tutor2u

The GAO has noted in public-sector audits that unchecked incremental approaches in government budgeting can perpetuate outdated allocations for years, recommending periodic comprehensive reviews as a corrective.

When should you actually use incremental budgeting?

The honest answer is: when your cost structure is genuinely stable and your priorities are not changing fast.

Good fits:

  • Government departments and public agencies with legislated spending mandates
  • Established businesses with predictable revenue and fixed overhead
  • Households with stable income and fixed monthly obligations
  • Long-term infrastructure or multi-year project budgets where scope is locked

Poor fits:

  • Startups or businesses in rapid growth phases (the Federal Reserve’s small business survey data documents how frequently small employers face shifting cost structures)
  • Organizations undergoing restructuring or entering new markets
  • Teams where discretionary spending is a significant share of the budget
  • Any environment where last year’s cost drivers no longer reflect current operations

Quick decision checklist — ask yourself these four questions:

  1. Has your cost structure stayed broadly stable for the past two years?
  2. Can you document a clear driver (inflation, headcount, contract) for each planned change?
  3. Is your organization’s strategic direction unchanged from last year?
  4. Do you have the governance in place to challenge lines that grow without justification?

If you answered yes to all four, incremental budgeting is a reasonable default. Two or more “no” answers suggest a more thorough review method is worth the extra effort.

How to build an incremental budget, step by step

A typical departmental or household cycle takes one to two weeks from data pull to approval. Here is the process:

  1. Set monitoring checkpoints (Ongoing): Schedule monthly variance reviews. Track expense categories against budget in real time so you catch drift early.

Sample column structure for your spreadsheet:

Column Content
Line item Name of cost category
Prior actuals Last year’s actual spend
Increment driver CPI / headcount / contract / none
Increment % or $ Documented adjustment
New budget Prior actuals × (1 + %) or + $
Owner Named responsible person
Notes Any one-off context

Pro Tip: Schedule a forced zero-based review for any line that has grown more than 15% over three consecutive years, or whenever your organization launches a new strategic initiative. That trigger prevents incremental drift from compounding silently.

How incremental budgeting compares to other methods

No single method wins in every situation. The table below compares four common approaches on the dimensions that matter most for your decision.

Method Best for Time & effort Accuracy for current needs Risk of outdated costs Resource cost
Incremental Stable orgs, predictable costs Low Moderate High without reviews Low
Zero-based (ZBB) Restructuring, discretionary spend High High Low High
Rolling budget Fast-changing environments Medium High Low to medium Medium
Activity-based Complex cost structures, overhead allocation High High Low High

The most practical approach for most organizations is a hybrid: use incremental budgeting for the majority of years to save time, then run a zero-based budget review every three to five years, or apply ZBB specifically to discretionary categories like marketing and travel every year. AccountingTools recommends exactly this kind of periodic comprehensive review to clear out accumulated inefficiencies without abandoning the speed advantage of the incremental method.

For early-stage companies weighing these options, startup budgeting essentials offer a useful framework for deciding when a more rigorous baseline-building exercise is worth the investment.

How incremental budgeting compares to other methods — overview diagram

Common mistakes and how to fix them

Most incremental budgeting failures trace back to a small set of avoidable errors.

  • Ignoring inflation: Applying a flat 0% increment to salary lines while the CPI is rising means you are effectively cutting real compensation. Fix: pull the current BLS CPI figure and apply it as a floor for cost-sensitive lines.
  • Skipping periodic comprehensive reviews: The GAO’s findings on public budgets show that without a scheduled reset, outdated allocations survive indefinitely. Fix: put a ZBB review on the calendar now, even if it is three years out.

A simple corrective policy: any line item requesting an increment above your threshold requires a one-paragraph written justification tied to a measurable business driver. That single rule eliminates most padding.

Key Takeaways

Incremental budgeting works best when your cost structure is stable, your adjustments are documented, and you schedule periodic zero-based reviews to clear out accumulated inefficiencies.

Point Details
Definition Incremental budgeting starts from prior actuals and applies documented adjustments for inflation, headcount, or contracts.
Core strength Low time and effort make it practical for stable organizations and households with predictable monthly costs.
Main risk Budgetary slack and use-it-or-lose-it spending accumulate unless governance forces periodic justification.
Hybrid approach Use incremental most years; schedule a zero-based review every three to five years or for discretionary categories annually.
Valapoint Valapoint’s budget tracking and goal tools let you set a baseline, apply increments by category, and monitor variance in real time.

The part most guides skip about incremental budgeting

The standard advice on incremental budgeting focuses on its simplicity, and that is fair. But the real risk is not the method itself — it is the false confidence it creates. When a budget looks reasonable because it is only slightly different from last year, it tends to pass review without scrutiny. That is exactly when outdated assumptions survive longest.

The fix is not to abandon incremental budgeting. It is to treat the increment decision as the moment of accountability, not just a mechanical calculation. Tie every increment to a named driver. If you cannot name the driver, the increment does not belong in the budget. That one discipline turns a passive carry-forward into an active, defensible plan.

For personal finance users, the same principle applies. Adjusting last month’s budget by a few percent is fine. But once a year, sit down and ask whether each category still reflects how you actually want to spend. That annual reset, even a quick one, prevents lifestyle inflation from quietly compounding year after year.

Vala makes incremental budget tracking straightforward

Knowing the method is one thing. Keeping it current throughout the year is where most people lose momentum. Valapoint’s budget tracking app lets you import your baseline categories, set increment targets by line, and watch actual spending update in real time against each target. No spreadsheet maintenance, no end-of-month scramble to reconcile figures.

Valapoint

The budget goal tracker adds a savings layer on top: once your incremental budget is set, you can attach a savings goal to any surplus line and track progress automatically. AI-driven spending insights flag when a category is trending over budget before the period closes, so you can adjust early rather than explain the variance after the fact.

Try Valapoint free and set up your first incremental budget in under ten minutes. Your spending categories, your baseline, your targets — all in one place.

Vala makes incremental budget tracking straightforward — overview diagram

This article is general information, not financial or professional advice. Confirm current figures and regulations with a qualified professional or the relevant primary source.

Useful sources for further reading

Examples of Hidden Recurring Charges: Find and Stop Them

Hidden recurring charges are small, repeated fees billed automatically through platforms like the Apple App Store, payment services like PayPal, or directly by vendors — and most people never notice them until they run a full audit. Reviewing statements over a period longer than a year helps catch both monthly and annual billing cycles that a shorter review might miss.

Your fastest first move: open your Apple App Store or Google Play subscription settings right now and count every active subscription. Then set a calendar reminder to export 14 months of bank statements this weekend. Those two steps alone will surface most of the charges covered below.

  • Apple App Store subscriptions continue billing even after you delete the app
  • PayPal maintains separate billing agreements that never appear on your card statement
  • Valapoint can scan your connected accounts and flag recurring charges automatically
  • Comparedge’s SaaS Hidden Costs Report found that most tracked products carried at least one cost that was not listed on the pricing page.

Table of Contents

What are the most common examples of hidden recurring charges?

Hidden recurring charges fall into predictable categories. Knowing each one makes them easy to spot on a statement or app-store screen.

Category What it looks like on a statement Where to check
App-store billing “APPLE.COM/BILL” or “Google Play” with no app name App Store / Google Play subscription settings
Trial-to-paid conversion Same vendor, charge starts 7–30 days after signup Bank statement + vendor account settings
Annual renewal One large charge, same vendor, once per year 14-month statement export
Metered usage overage Variable monthly amount from a SaaS vendor Vendor billing dashboard
Seat minimums / block pricing Fixed charge regardless of actual users Vendor account or invoice
PayPal billing agreement “PAYPAL *VENDORNAME” or just “PAYPAL” PayPal → Manage Automatic Payments
In-app add-on or upgrade Small recurring line from a known app App-store subscriptions + app account

Usage meters and auto-upgrades are among the most common sources of unexpected cost spikes: a cloud storage plan that auto-upgrades when you hit 15 GB, or an API tool that silently bills per call above a free tier.

Hands checking cloud storage billing on smartphone

Platform-level billing is the trickiest category. Your bank statement shows “APPLE.COM/BILL $12.99” — but which app? You have to open the App Store, tap your profile, and select Subscriptions to see the actual service name. The same masking happens with Google Play: the card charge reads “Google Play” and the real app is buried in device settings.

Trial-to-paid conversions are almost always opt-out by design. You enter a card for a “free” trial, forget to cancel, and the charge appears soon after. Canceling an unused subscription can save a significant amount annually, especially if you have multiple subscriptions running.

Annual renewals are the sneakiest of all. A $99 charge from a vendor you signed up with 13 months ago looks like a new charge, not a renewal. That’s exactly why a 3-month statement review misses them entirely.


Why do these charges keep showing up on your bill?

The short answer: you consented at signup, and the billing platform is designed to keep charging until you actively stop it.

The core problem isn’t fraud — it’s inattention. Financial experts consistently note that most recurring charges persist because consumers never audit them against actual usage. The fix is treating every recurring payment the way you’d treat a quarterly bill: review it, confirm you still want it, and cancel if you don’t.

Recurring billing is legally defined as a merchant-initiated charge on a stored payment method, triggered by a schedule the customer agreed to at signup. That agreement is buried in terms of service, and the default is always “keep billing.”

Platform-level billing compounds the problem. When Apple or Google processes the charge, the merchant name on your bank statement is Apple or Google — not the app. You have to go three layers deep (bank → app store → subscription list) to find the real vendor.

Statistic to know: Comparedge documented 1,355 hidden-cost items across 482 SaaS products, with 88% of those products carrying at least one cost that never appeared on the pricing page. Metered usage and renewal price jumps were the two dominant patterns.

Pro Tip: Set a recurring calendar event titled “Subscription Audit” every 90 days. Treat it like a quarterly bill review — not optional, not skippable.


How do you find every hidden recurring charge in under an hour?

This checklist takes 30–60 minutes and covers every place recurring charges hide. Work through it in order.

  1. Export 14 months of bank and credit card statements as a CSV. Sort by vendor name, then by amount. Look for any charge that repeats monthly or annually — even small ones like $4.99.
  2. Search your email for the words “receipt,” “subscription,” “renewal,” and “billing.” Filter by sender. Every confirmation email is a live subscription until proven otherwise.
  3. Check Apple App Store subscriptions: open the App Store app → tap your profile photo → Subscriptions. Every active subscription is listed with its next billing date.
  4. Check Google Play subscriptions: open the Play Store → tap your profile → Payments & subscriptionsSubscriptions.
  5. Check PayPal automatic payments: log in to PayPal → SettingsPaymentsManage automatic payments. PayPal billing agreements are separate from card charges and won’t appear on your bank statement.
  6. Check connected OAuth apps: in Google Workspace, go to myaccount.google.com/permissions. In Microsoft, go to account.microsoft.com/privacy/app-access. Third-party SaaS tools often bill through these connections.
  7. Review your card issuer’s recurring payments page: most major U.S. banks (Chase, Bank of America, Capital One) now flag recurring charges in their app under “Subscriptions” or “Recurring transactions.”

For a faster 30-minute recurring-expense audit, Valapoint’s automated detection can pull these patterns from connected accounts in one step.

  • Watch for vague merchant names: “DSCRD *NITRO” is Discord Nitro; “AMZN MKTP” is Amazon
  • Flag any charge under $10 — small amounts are easy to ignore and easy to multiply
  • Note charges that vary month to month from the same vendor (metered usage)

Pro Tip: Search your email for “your subscription has been renewed” — this single phrase surfaces most annual renewals you’ve already paid for and forgotten.


How do you cancel, dispute, and request refunds?

Work through this in three stages: merchant cancel first, then payment-rail stop, then dispute if needed.

Merchant cancellation

Go directly to the vendor’s account settings and cancel. Most SaaS products have a Billing or Subscription page under account settings. If you can’t find it, use this script:

For app-store subscriptions, cancel through the App Store or Google Play — not through the app itself. Deleting the app does not cancel the subscription.

Stopping payment at the source

Action How to do it What it stops
Cancel PayPal billing agreement PayPal → Settings → Payments → Manage automatic payments → Cancel Future PayPal-billed charges
Remove card from vendor Vendor account → Billing → Remove payment method Future direct card charges
Stop ACH debit Contact your bank and request an ACH stop-payment Bank-account debits
Virtual card expiry Use a virtual card number for trials; let it expire Automatic trial-to-paid conversion

Disputes and chargebacks

Contact your card issuer if a merchant refuses to cancel or you’ve been charged after canceling. Provide the cancellation confirmation email, the charge date, and the amount. U.S. card issuers typically resolve disputes within 30–60 days, and provisional credit is often issued within 5–10 business days. Chargeback success is higher when you have written proof of cancellation.

For professional help reviewing billing agreements, a revenue audit service can identify charges you may have missed and advise on dispute timelines.


How do you stop hidden charges from coming back?

The right system is simple: a monthly quick check, a quarterly review, and a 14-month annual sweep to catch annual renewals.

Pro Tip: Treat every recurring payment like a quarterly bill. Put “Subscription Review” on your calendar every 90 days, and cancel anything you haven’t actively used in the past 30 days.

  • Use one dedicated card for all subscriptions. This makes every recurring charge visible in one place and makes it easy to spot new ones.
  • Avoid in-app purchases when direct billing is cheaper. App-store billing adds a platform fee that vendors sometimes pass on to you.
  • Cap add-on features at signup. Opt out of usage-based upgrades and metered overages wherever the vendor allows it.
  • Use a virtual card number for free trials. Set it to expire after 30 days so trial-to-paid conversions fail automatically.
  • Set a bill reminder for every annual subscription 30 days before its renewal date.

Which tools actually help you track and manage subscriptions?

Valapoint

Valapoint’s subscription-cost calculator lets you enter your active subscriptions and see their total monthly and annual cost in one view. The app’s recurring-spend detection connects to your accounts and flags charges automatically — no manual CSV sorting required. To use it: connect your bank or card account, open the Subscriptions tab, and review the flagged recurring items.

Apple App Store

Open the App Store → tap your profile photo → Subscriptions. Every active subscription shows its price, billing cycle, and next renewal date. You can cancel directly from this screen.

Google Play

Open the Play Store → tap your profile → Payments & subscriptionsSubscriptions. Same functionality as the App Store: price, cycle, and a one-tap cancel option.

PayPal

Log in → SettingsPaymentsManage automatic payments. This page lists every merchant with an active billing agreement tied to your PayPal account. Cancel any you don’t recognize or no longer use.

Bank CSV export

Most U.S. banks let you export 12–18 months of transactions as a CSV. Open it in Excel or Google Sheets, sort by description, and filter for repeating amounts. This method catches charges that bypass app stores entirely.


Valapoint finds what manual audits miss

Most people spend 2–3 hours on a manual subscription audit and still miss annual renewals buried in old statements. Valapoint’s automated recurring-spend detection does the same work in minutes, flagging every repeating charge across connected accounts and calculating the total annual cost so you know exactly what you’re spending.

Valapoint

Two features do the heavy lifting: the recurring-spend detector surfaces charges you’ve normalized and stopped noticing, and the subscription-cost calculator shows their combined monthly and annual impact in one number. That number is usually surprising.

Start your free audit with the Valapoint personal finance app and see every recurring charge in your accounts today.


Key Takeaways

Hidden recurring charges are easiest to stop when you audit 14 months of statements, check app-store subscriptions, and cancel PayPal billing agreements before they renew again.

Point Details
Review 14 months of statements Annual renewals are invisible in shorter windows; a 14-month export catches every cycle.
Check app stores directly App Store and Google Play subscriptions survive app deletion and must be canceled in settings.
PayPal has its own billing layer Billing agreements in PayPal don’t appear on card statements; check Manage Automatic Payments separately.
Cancel unused services Canceling an unused subscription can save about $300 per year if the monthly cost is $25, and most people have more than one subscription they aren’t using.
Use Valapoint to automate detection Valapoint’s recurring-spend detector and subscription-cost calculator surface and quantify every hidden charge.

The real cost of not looking

Most hidden recurring charges aren’t scams. They’re services you signed up for, forgot about, and kept paying. That distinction matters because it means the fix is entirely in your hands — no fraud claim needed, no waiting for a refund. You just have to look.

The harder truth is that the billing systems are designed to make not-looking easy. Platform-level billing hides vendor names. Annual renewals arrive when you’ve stopped thinking about the service. Trial periods end on a Tuesday with no reminder. None of that is accidental.

A quarterly audit habit changes the math permanently. Thirty minutes every 90 days is less time than most people spend looking for a lost charger. And the payoff — finding and canceling even two or three forgotten subscriptions — tends to be immediate and concrete.

If you want to start right now: open your Apple App Store subscriptions, count the active ones, and cancel any you haven’t used this month. That’s five minutes and a real result.


Useful sources

Track Subscriptions Draining Money: Quick Audit Guide

You can stop subscriptions from quietly draining your money in under 30 minutes by running a focused five-point audit and setting renewal alerts before the next billing cycle hits. The average adult spends a moderate amount each month on subscriptions, and a meaningful portion of that goes to services they barely use or have completely forgotten. The good news: most of that waste is recoverable once you know where to look.

Start with these three steps right now:

  • Open your banking app and scroll the last 60 days for any charge under $20 that repeats monthly or annually.
  • Set a calendar reminder for 3 days before each renewal date you spot.
  • Note any descriptor you don’t recognize — those cryptic strings like “VZWRLSS” or “AMZN MKTP” are often the ones costing you the most.

The full audit below uses a five-point process: bank CSV scan, email receipt search, App Store and Google Play subscription lists, connected payment platforms, and workspace app permissions. Run all five and you’ll have a complete picture of every recurring charge on your accounts.


Table of Contents

What should you do right now to stop the bleeding?

Before you run the full audit, a quick triage pass can stop new charges from hitting while you work. Consumer Reports recommends reviewing credit-card statements and using subscription-tracking tools as the first line of defense — and for good reason. Most people find at least one charge they can cancel within the first five minutes of looking.

Immediate actions to take:

  • Freeze or virtualize your card if you spot an unauthorized or suspicious recurring charge. Most banking apps let you freeze a card instantly without closing the account.
  • Search your bank app for the last 60–90 days and filter by small, round-dollar amounts ($4.99, $9.99, $14.99). These are the most common subscription price points.
  • Flag any descriptor you can’t identify. Tap the transaction for the full detail view — it often shows the merchant’s website or a customer service number.
  • Toggle off auto-renewals in your App Store or Google Play settings if you find subscriptions there you no longer want.
  • Check PayPal’s “Automatic Payments” section under Settings. PayPal can keep billing you even after you’ve deleted the app it was connected to.

Quick triage rule: If you haven’t opened or used a service in the last 30 days and can’t name a specific reason you’ll use it this month, cancel it now and revisit later if needed. Keeping it “just in case” is how subscription creep compounds.

Pro Tip: Cryptic billing descriptors are intentional. Merchants register short strings with card networks that often don’t match their consumer-facing brand name. If you can’t identify a charge from the descriptor alone, copy it into Google with the dollar amount — you’ll usually find a Reddit thread or consumer forum that names the merchant within seconds.

Infographic showing five-step subscription audit process


How do you run a full five-step subscription audit?

Man auditing subscriptions at office desk

A thorough audit covers five sources: your bank statements, your email inbox, your app store accounts, connected payment platforms, and any workspace or app permissions you’ve granted. Missing even one of these leaves gaps. Here’s how to work through each one.

Step 1: Download and scan your bank CSV

  1. Log into your bank or credit card’s web portal (not the mobile app).
  2. Export a full transaction CSV for the last 12 months — not just 30 days. Annual subscriptions only appear once a year.
  3. Open the file in a spreadsheet tool like Google Sheets or Excel.
  4. Sort by amount, then scan for identical or near-identical charges repeating at regular intervals.
  5. Flag every recurring line and add it to your audit tracker.

Exporting the full CSV finds far more than the mobile summary view, which often groups or truncates transactions. AI-based transaction scanning can flag hidden annual renewals, renamed charges, and forgotten trials that a quick scroll through the app will miss entirely.

Step 2: Search your email for receipts and renewal notices

  1. Search your inbox for keywords: “receipt,” “invoice,” “renewal,” “subscription,” “trial ending,” “billing.”
  2. Check your spam and promotions folders — many renewal notices land there.
  3. Look for emails from services you signed up for years ago. Annual renewals often go unnoticed because the gap between charges is long enough to forget.
  4. Note the service name, amount, and next renewal date for each one you find.

Step 3: Check App Store and Google Play subscription lists

  1. On iPhone: go to Settings → [Your Name] → Subscriptions.
  2. On Android: open the Google Play Store → Profile → Payments & Subscriptions → Subscriptions.
  3. Both lists show active and recently expired subscriptions with their next billing dates.
  4. Cancel directly from these screens for any service you no longer want.

Step 4: Audit connected payment platforms

PayPal, Apple Pay, and Google Pay can all carry active recurring billing agreements that survive app deletions. Check each one:

  • PayPal: Settings → Payments → Manage Automatic Payments.
  • Apple Pay: Settings → [Your Name] → Payment & Shipping (check for any merchant agreements).
  • Google Pay: pay.google.com → Subscriptions & Services.

Step 5: Review workspace and app permissions

If you use Google Workspace, Microsoft 365, or Slack, check the connected apps section for any third-party tools billed through those platforms. These are easy to miss because the charge shows up under the platform, not the app name.

Use this spreadsheet layout to track everything you find:

Date Descriptor Merchant Name Frequency Amount Next Renewal Owner Action
Jan 5 NFLX.COM Netflix Monthly $14.99 Feb 5 You Keep
Jan 12 AMZN PRIME Amazon Prime Annual You Review
ADOBE CC Adobe Creative Cloud Monthly $4.99 You Downgrade?
Feb 2 DUOLINGO+ Duolingo Plus Monthly $6.99 Mar 2 Partner Cancel

Pro Tip: Free tools like FindRecurring let you paste a bank statement directly into your browser and instantly detect recurring charges without creating an account. It runs entirely client-side, so your data doesn’t leave your device — a solid first pass before the deeper five-step audit.


How do you actually cancel a subscription once you find it?

Finding the charge is only half the work. Canceling it requires knowing which path to take, because merchants don’t make it easy. Subscription companies bury cancellation links, use retention pop-ups, and sometimes require a phone call specifically to slow you down.

Where to cancel, by source:

  • App Store subscriptions: Cancel directly in Settings → Subscriptions on iPhone. This is the only way to stop billing for apps purchased through Apple — canceling inside the app itself often doesn’t work.
  • Google Play subscriptions: Cancel in the Play Store under Payments & Subscriptions. Same rule applies: in-app cancellation buttons frequently don’t stop Google billing.
  • Merchant website: Look for “Account,” “Billing,” or “Manage Plan” in the settings menu. If you can’t find a cancel option, search “[service name] cancel subscription” — many have a direct cancellation URL.
  • PayPal: Cancel the automatic payment agreement directly in PayPal’s settings. This stops future charges even if the merchant’s own portal is confusing.
  • Bank or card issuer: If a merchant ignores your cancellation request, contact your bank to block future charges from that merchant. This is a last resort, not a first step — but it works.

Step-by-step cancellation flow:

  1. Identify the billing source (App Store, Google Play, merchant, PayPal).
  2. Cancel through that source’s native interface first.
  3. Screenshot the confirmation screen or save the confirmation email.
  4. Note the merchant’s case number if one is provided.
  5. If no confirmation arrives within 48 hours, follow up by email.

Sample email to merchant billing support:

Subject: Cancellation request — [Your Account Email]

Hi,

Please cancel my subscription for [Service Name] associated with [your email address], effective immediately. I am requesting written confirmation of this cancellation and the date my access ends. If a refund is applicable for the unused portion of a billing period, please process it to the original payment method.

Thank you,
[Your Name]

When to escalate to your bank: If a merchant charges you after a confirmed cancellation, that is a billing dispute. Contact your card issuer, reference your cancellation confirmation, and request a chargeback. Most card issuers resolve these within 5–10 business days.

Pro Tip: Always cancel before the renewal date, not after. Many services process renewals 24–48 hours early, and some won’t refund a charge that technically processed before your cancellation request.


Which approach fits your privacy comfort level?

Not everyone wants to hand their bank credentials to a third-party app. The right tool depends on how much automation you want versus how much data you’re comfortable sharing. There are three distinct approaches, each with real tradeoffs.

Approach How it works Privacy risk Time investment Best for
Manual / local tracker You enter subscriptions by hand or import a CSV you control Minimal — no external data sharing High (30–60 min setup) Privacy-first users
Bank-connected app App links to your bank via an aggregator like Plaid for real-time sync Moderate — credentials shared with aggregator Low (5–10 min setup) Time-poor users wanting automation
Upload-scanner tool You upload a PDF or CSV statement; tool scans and deletes after Low — one-time upload, no persistent access Medium (10–20 min per scan) Users wanting a middle path

Privacy-first tools exist that require no bank linking at all — they work entirely from manual entry or statement uploads. Some upload-scanner tools pair AI scanning with explicit data-deletion policies, so your statement isn’t stored after the scan completes.

Privacy checklist before connecting any app:

  • Does the app use Plaid or another aggregator? If yes, read Plaid’s data-sharing and retention policy.
  • Does the app store your transaction history on its servers, or process locally?
  • Can you delete your data on request?
  • Does the app sell anonymized transaction data to third parties?

Who should pick which approach:

  • Privacy-first users: Use a manual tracker or a browser-based upload scanner. The extra setup time is worth the peace of mind.
  • Time-poor users: A bank-connected app gives you real-time alerts and automatic detection. Understand the aggregator tradeoff before you connect.
  • Mixed-approach users: Run a manual baseline audit once, then use an occasional upload scan every quarter to catch anything new.

Pro Tip: A hybrid approach — manual baseline plus a quarterly CSV upload scan — gives you broad coverage without continuous credential sharing. You get the accuracy of automation without the ongoing privacy exposure of a persistent bank link.

The automatic bill tracking question comes down to this: how often do you want to check, and how much do you trust the aggregator holding your data? There’s no universally right answer, but knowing the tradeoff puts you in control.


How do you keep subscriptions under control every month?

Finding and canceling subscriptions once isn’t enough. New ones creep in — free trials convert, annual renewals surprise you, and price hikes go unnoticed. A short monthly routine prevents all three.

Monthly maintenance checklist (10–15 minutes):

  • Review any new recurring charges that appeared since last month.
  • Check for price increases on existing subscriptions (many services raise prices with minimal notice).
  • Confirm that canceled subscriptions didn’t restart.
  • Update your audit spreadsheet with any changes.

Set renewal reminders 3–7 days in advance. Most calendar apps let you create recurring events. For annual subscriptions, set the reminder 7 days out so you have time to decide before the charge hits. Spending notifications from your bank or a tracking app can automate this step entirely.

How to prioritize what to keep:

  1. Necessary and used daily: Keep without question (phone plan, internet, primary streaming service).
  2. Used occasionally but valuable: Keep and consider downgrading to a lower tier.
  3. Rarely used: Pause or cancel. Most services offer a pause option that’s easier to reverse than a full cancellation.
  4. Never used: Cancel immediately.

Negotiation script for retention discounts:

When you’re about to cancel a service you actually like but find too expensive, call or chat with customer support and say: “I’m planning to cancel because the price is outside my budget. Do you have a retention offer or a lower-tier plan I could move to?” Most subscription companies have unpublished retention discounts of 20–50% for users who ask. The worst they can say is no.

Pro Tip: Downgrading is almost always better than canceling when you use a service at least once a month. You keep access, reduce cost, and avoid the friction of re-subscribing later at a potentially higher price.


How does Vala help you find and stop subscription drains?

Valapoint’s Vala app is built specifically for the kind of recurring-charge detection this audit covers. It combines automated scanning with manual import options, so you choose how much bank access to grant.

Key features for subscription management:

  • Subscription detection: Vala scans connected accounts or imported statements to surface recurring charges, including annual renewals and renamed descriptors.
  • Bank integration options: Connect via secure bank link for real-time sync, or import a CSV manually if you prefer no persistent access.
  • Renewal reminders: Automated alerts before each renewal date, configurable by lead time.
  • Shared and family tracking: Split subscription costs across a group and see who’s paying for what.
  • Savings insights: Vala flags subscriptions you haven’t used recently and estimates annual savings from canceling them.
  • Subscription cost calculator: See the true annual cost of every recurring charge in one view.

Example workflow using Vala:

  1. Import your bank CSV or connect your account.
  2. Vala surfaces all detected recurring charges with merchant names corrected (no cryptic descriptors).
  3. Review the flagged list and mark each subscription as Keep, Review, or Cancel.
  4. Set renewal reminders for everything you keep.
  5. Use the savings estimate to see your projected annual savings from the cancellations.

Privacy posture: If you prefer no persistent bank access, Vala’s CSV import flow gives you the same detection without a live connection. Your data stays within the app. For users who do connect a bank account, Vala uses secure, read-only access — it cannot move money or initiate transactions.

Mini privacy FAQ:

  • Does Vala sell my transaction data? No. Vala uses your data to power your own insights, not for third-party advertising.
  • Can I use Vala without connecting my bank? Yes. The CSV import option gives you full subscription detection without a bank link.
  • What happens to my data if I delete the app? You can request full data deletion through the app settings.

Use Vala’s subscription cost calculator to see exactly how much your current subscriptions cost per year before you start canceling.


How do you set up automatic monitoring for new subscriptions?

The best defense against future subscription creep is a system that catches new charges before they compound. Manual monthly reviews work, but combining them with automated alerts closes the gaps between check-ins.

Three layers of ongoing monitoring:

Layer 1: Bank or card alerts. Most U.S. banks and credit card issuers let you set transaction alerts for any charge above a threshold (set it to $1 to catch everything). You’ll get a notification the moment a new recurring charge hits, not a month later when you’re reviewing statements.

Layer 2: App-based subscription tracking. A dedicated subscription tracker app like Vala monitors your connected accounts continuously and flags new recurring patterns automatically. Tools like ReSubs and TrackMySubs offer lightweight alternatives for users who want standalone bill management without a full finance app.

Layer 3: Calendar-based renewal system. For every subscription you keep, add a recurring calendar event 5–7 days before the renewal date. Label it with the service name and cost. This takes about two minutes per subscription and creates a reliable human checkpoint that no app can replace.

Putting it together:

Set up all three layers after your initial audit. The bank alert catches anything new immediately. The tracking app surfaces patterns across multiple accounts. The calendar reminder gives you a deliberate decision point before each renewal. Together, they make it nearly impossible for a new subscription to drain money unnoticed for more than a few days.

AI-driven spending pattern detection adds another layer for users who want it — it can identify a new recurring charge from a single transaction, before the second billing cycle even arrives.


Key Takeaways

Running a focused five-point audit and setting up a three-layer monitoring system is the most reliable way to find, stop, and prevent subscriptions from draining your money.

Point Details
Start with a quick triage Scan the last 60–90 days of transactions for small recurring charges before running the full audit.
Run the five-point audit Cover bank CSV, email receipts, App Store/Google Play, PayPal, and workspace permissions to find every charge.
Average monthly spend The average adult spends a moderate amount each month on subscriptions — a short audit can recover a meaningful portion of that.
Match your privacy comfort Choose manual, upload-scanner, or bank-connected tools based on how much data access you’re willing to grant.
Use Valapoint’s Vala app Vala detects recurring charges via CSV import or bank link, sends renewal reminders, and estimates annual savings.

The audit most people skip — and why it costs them

The conventional advice is to “check your subscriptions” once a year. That’s not wrong, but it misses the real problem: subscription companies are specifically designed to outlast your attention. They charge small amounts. They bill annually so the gap between charges is long enough to forget. They convert free trials on a Tuesday at 3 AM when you’re not watching. A once-a-year review catches the obvious ones. It misses the $6.99 app that’s been running for 14 months, the annual plan that renewed while you were traveling, and the trial you signed up for with a secondary email address.

The five-point audit in this article works because it covers all five sources where charges can hide, not just the one or two most people check. The email search alone typically surfaces two or three subscriptions that don’t appear in the bank statement view, because they’re billed through a payment platform or a secondary card.

Privacy is the other thing most guides gloss over. Bank-connected apps are genuinely useful, but handing read access to an aggregator is a real decision, not a formality. The hybrid approach — a manual baseline audit plus occasional upload scans — gives you most of the coverage with a fraction of the exposure. For most budget-conscious users, that’s the right balance.

The monthly routine is what makes the difference long-term. A 10–15 minute monthly check, combined with bank alerts and calendar reminders, means subscription creep never gets more than 30 days ahead of you. That’s a manageable problem. Letting it run unchecked for a year is not.


Vala makes subscription tracking clear and automatic

Most people finish a manual audit and think: “I don’t want to do that again every month.” That’s exactly what Valapoint’s Vala app is built for. Instead of repeating the CSV export and spreadsheet sort every quarter, Vala does the detection continuously — surfacing new recurring charges, correcting cryptic descriptors, and sending you a reminder before each renewal hits.

Valapoint

The privacy-first option matters here. You don’t have to connect your bank to get value from Vala. The CSV import flow gives you full subscription detection from a file you control, with no persistent account access. For users who do connect a bank account, Vala uses read-only access and never initiates transactions. Either way, you get the same clear view of every recurring charge, the same renewal alerts, and the same savings estimates.

Start with Vala’s personal finance app to run your first automated subscription scan, or use the subscription cost calculator to see your current annual recurring spend before you decide what to cut.


Useful sources and references

The following sources were used to build this article. Each one is worth bookmarking if you want to go deeper on any specific step.

Source What it covers
Consumer Reports — Find and Cancel Unwanted Subscriptions Statement review methods and cancellation tactics
WCPO — Subscription creep and average family waste Average monthly subscription spending figures
FindRecurring — Free bank statement scanner Browser-based recurring charge detection, no account required
Substract — Find and cancel forgotten subscriptions AI detection of renamed charges and annual renewals
ManageSubs — Privacy-first subscription tracker No-bank-link manual tracking option
SubStop — Statement upload scanner Upload-and-delete scanning with data deletion policy
ReSubs — Subscription manager Renewal reminders and one-tap cancel links
TrackMySubs — Subscription manager Lightweight standalone bill management
Valapoint subscription tracker Vala’s subscription tracking and reminder feature
Valapoint subscription cost calculator Tool to calculate annual recurring spend impact

How Shared Costs Are Settled: Roommates, Couples & Groups

The fastest reliable way to settle shared expenses is to agree on a split method, log every purchase in a shared ledger, and run one net settlement on a fixed date. That three-step rhythm keeps money clean and friendships intact. Roommates who stick to a clear cost-sharing agreement can save an average of roughly $6,500 per person annually compared to living solo, so protecting that arrangement with a simple system is worth the small upfront effort.

Start here:

  • Agree on rules in writing (what’s shared, how it splits, when you settle)
  • Choose a tracker: a shared spreadsheet, a ledger app, or Valapoint
  • Schedule a monthly settle-up date and stick to it

The rest of this guide walks through every method, the math, and the tools to make it work.


Table of Contents

What are the main ways to divide costs fairly?

Not every group splits the same way, and the right method depends on your situation. The primary splitting methods are equal split, proportional, usage-based, shares/ratio, and hybrid models.

  • Equal split: Everyone pays the same amount. Simple, fast, and works well when incomes and usage are roughly comparable. The main drawback: it feels unfair when one person has a much larger room or earns significantly more.
  • Proportional (income- or value-based): Each person pays a percentage tied to income or room size. A split where partners pay in proportion to their incomes, such as when one partner earns significantly more than the other, is a common example. More fair in theory, but it requires sharing financial details.
  • Usage-based: You pay for what you use. Works for utilities with individual meters or groceries bought separately. Tracking burden is high, so it suits situations where usage genuinely varies a lot.
  • Shares/ratio: Assign weighted shares (e.g., 2:2:1:1 for a four-person trip). Flexible for mixed groups where one person uses more or earns more. Slightly more math, but easy to automate.
  • Hybrid: Combine methods by category. Split rent proportionally by room size, utilities equally, and groceries by usage. This is the most accurate approach for long-term roommates with unequal rooms.

Quick rules of thumb: Use equal split when rooms and incomes are similar. Switch to proportional when income gaps exceed roughly 25–30% or room sizes differ meaningfully. Use ratio-based splits for short trips with mixed group sizes. Hybrid models pay off for arrangements lasting more than three months.


Infographic illustrating steps to settle shared costs

How do you settle shared costs step by step?

A net-settlement workflow keeps the process clean: track everything in one place, then settle with the fewest possible transfers. Here’s the full process.

  1. Agree on rules in writing. Define which expenses are shared, which split method applies to each category, the deadline for logging receipts, and your settle-up cadence (monthly works for most groups). A written roommate agreement prevents most disputes before they start.
  2. Choose your tracking method. A shared Google Sheet works for two people with low transaction volume. A ledger app or Valapoint handles larger groups, mixed split rules, and automatic balance calculations.
  3. Log expenses as they happen. Record the date, payer, amount, category, and split method. Tag each entry so you can filter by category at month-end.
  4. Run net settlement on the agreed date. Calculate each person’s net balance (what they paid minus their fair share). One person owes; one person collects. Settle with a single transfer per person rather than multiple back-and-forth payments.
  5. Reconcile and keep records. Match receipts to ledger entries, export a monthly report, and store copies in a shared folder. Update your rules if a new expense category comes up.

Simple ledger fields: Date | Payer | Amount | Category | Split method | Each person’s share | Running balance

Sample payment request message:
Settle-up checklist:

  • All receipts logged before the cutoff date
  • Net balances calculated and reviewed by all parties
  • Payment sent and confirmed
  • Ledger exported and saved

How do you handle small recurring household supplies without friction?

Toilet paper, dish soap, trash bags: these small purchases create outsized resentment when tracked individually. The fix is to stop tracking them one by one and use a system instead.

Three options:

  • Pooled household fund: Each person contributes $10–$20 per month into a shared cash envelope or a dedicated account. Whoever buys supplies draws from the fund. Top it up when it drops below $20 total. This works best for groups of three or more.
  • Rotating purchaser: One person buys all household supplies for a month, then the next person takes the next month. No tracking required. Works well for two-person households with similar consumption habits.
  • Recurring auto-buy: Set up a shared subscription (Amazon Subscribe & Save, for example) for staples. Split the charge equally at month-end as a single line item.

A monthly pooled fund of $10–$20 per person typically covers most household basics for a small apartment, with amounts adjusted based on the number of contributors. Review the fund every 90 days and adjust if it’s consistently running short or building up a surplus.

Pro Tip: Treat small consumables as a shared overhead, not individual IOUs. The moment you start logging who bought the last roll of paper towels, you’ve created a tracking burden that costs more in goodwill than the item is worth. A pooled fund or rotating system removes the friction entirely.

Couple managing household budgeting


What payment methods and tools work best for settling up?

Ledger apps and payment apps do different jobs, and mixing them up is where most groups run into trouble.

  • Ledger/tracker apps (including Valapoint): Record who paid what, calculate net balances, and support multiple split methods. They do not move money.
  • P2P payment apps (Zelle, Venmo, Cash App): Move money quickly but don’t reconcile multiple reciprocal IOUs. Sending five small payments back and forth is not net settlement.
  • Pooled accounts / joint checking: Useful for couples who share most expenses. Carries account-holder risk (see Section 6). Works best when both parties are named on the account.
  • Cash and IOUs: Fine for two people with high trust and low transaction volume. Hard to audit and easy to forget.

Recommended pairing: Use a ledger app to track and calculate, then settle once per month with a bank-linked transfer (Zelle is free and instant for most US bank accounts). This combination avoids credit-card funding fees and keeps a clean paper trail.

The core principle: Track in a ledger, settle with one transfer. Every extra payment you make mid-month adds friction, fees, and the chance of a mistake. Monthly net settlement is the method that reduces transactions and keeps relationships smoother long-term.


How do you keep transfers safe and records clean?

Security and record-keeping are where most groups cut corners, and that’s exactly when disputes get expensive.

P2P transfer safety:

  • Double-check the recipient’s username, phone number, or email before every transfer. Misdirected payments are often irreversible.
  • Enable two-factor authentication on every payment app you use.
  • Never initiate a transfer on public Wi-Fi.

Record-keeping:

  • Photograph receipts immediately and upload them to a shared Google Drive or Dropbox folder.
  • Export your ledger at the end of each month and save the file.
  • Set account alerts for any transaction above $50 on accounts used for shared payments.

Dispute prevention:

  • Put your cost-sharing agreement in writing, even a shared Google Doc works.
  • Set a hard deadline for logging receipts (e.g., within 48 hours of purchase).
  • Schedule a 10-minute monthly check-in to review balances before the settle-up.

Pro Tip: If only one person’s name is on a utility account, that person carries the legal and credit risk for late or missed payments. Spread account names across housemates where possible, or document in your written agreement who is responsible for each bill and what the reimbursement deadline is.

When furniture or appliances are bought jointly, define the exit terms at purchase: a buy-out price formula, a plan to sell and split proceeds, or a donation agreement. Waiting until someone moves out to figure this out is how shared costs turn into shared disputes.


Three worked examples showing the math

Roommates splitting a $3,600 apartment

Participant Room type Share % Monthly rent
Alex Master bedroom 40% $2,010
Jordan Standard room 33% $990
Sam Smaller room 33%
Total 100% $3,600

Utilities ($150/month) split equally: $50 each. Alex pays the most for rent but the same for utilities.

Couple with income-based split

Partner A earns $80,000; Partner B earns $40,000. Combined income: $120,000. Partner A’s share: 67%; Partner B’s: 33%. On $3,000 in monthly shared expenses, Partner A pays $2,010 and Partner B pays $990.

Weekend trip with ratio-based net settlement

Four friends share a $600 trip. Two friends (Maya and Chris) use a private room; two (Dana and Lee) share a bunk. Ratio: 2:2:1:1. Total shares: 6. One share = $100.

  • Maya: $200 | Chris: $200 | Dana: $100 | Lee: $100

Maya paid $350 upfront. Net: Maya is owed $150. One transfer from the group to Maya closes the trip.

Sample trip close-out message:

When should you automate instead of tracking manually?

Manual tracking works fine in simple situations. A ledger-first app pays off when complexity grows.

Automate when:

  • Your group has more than three people
  • You use different split methods for different expense categories
  • Purchases happen frequently (weekly or more)
  • You want to minimize the social friction of chasing payments
  • You’ve had at least one dispute about who paid what

Stay manual when:

  • It’s just two people with high trust
  • You share only one or two expense categories
  • Transaction volume is low (fewer than 10 shared purchases per month)

The practical path: start with a shared spreadsheet, switch to a real-time group tracking app once you hit three or more people or two or more split methods, then enable automated settle-up once the behavior is stable. Automating too early, before everyone agrees on the rules, creates confusion. Automating too late means you’re already managing resentment.


Key Takeaways

Settling shared costs smoothly requires one agreed method, a shared ledger, and a fixed monthly settle-up date — everything else is optional.

Point Details
Agree in writing first Define which costs are shared, the split method, and the settle-up date before any money moves.
Net settlement saves friction Calculate net balances monthly and settle with one transfer per person instead of multiple spot payments.
Pool small consumables Use a $10–$20 monthly pooled fund per person for household supplies to avoid micro-tracking and low-grade resentment.
Secure every transfer Double-check recipients, enable two-factor authentication, and keep exported ledger records each month.
Valapoint automates the workflow Valapoint tracks expenses, supports multiple split methods, and runs net settlements so you spend less time chasing and more time saving.

Why the “just Venmo me” approach keeps failing

Most groups skip the ledger and go straight to payment apps. The result: someone forgets a purchase, balances drift, and by month three nobody agrees on who owes what. The problem isn’t the payment app. It’s the absence of a ledger.

Net settlement works because it separates the tracking function from the payment function. You track continuously, you pay once. That single discipline eliminates the cognitive load of remembering every IOU and removes the social awkwardness of sending five small payment requests in a week.

The groups that handle shared money best aren’t the ones with the most sophisticated tools. They’re the ones who agreed on the rules early, wrote them down, and picked a settle-up date they actually keep. The tool just makes it easier to follow through.

A written agreement also protects the person whose name is on the lease or the utility accounts. That person carries real legal exposure if payments fall behind. Documenting responsibilities isn’t bureaucratic; it’s the minimum protection for the person taking on the most risk.


Valapoint makes settling shared costs straightforward

Tracking shared expenses manually works until it doesn’t. Missed receipts, forgotten reimbursements, and escalating balances are the predictable result of relying on memory and group chats. Valapoint is built to close that gap.

Valapoint

With Valapoint’s split-bills features, you get a shared ledger that supports equal, proportional, ratio, and hybrid splits in one place. The app logs expenses in real time, calculates net balances automatically, and schedules settle-ups so nobody has to chase anyone. It also flags recurring subscriptions and spending patterns that quietly drain shared budgets, which is the kind of visibility a spreadsheet won’t give you.

Key features that map directly to the problems covered here:

  • Shared ledger with multiple split methods — no more separate spreadsheets per category
  • Automated net settlement — one transfer per person, on your schedule
  • Receipt capture and record export — audit-ready records without the manual filing
  • Spending insights — spot financial leaks before they become disputes

Start tracking shared expenses with Valapoint for free and see how much smoother your next settle-up can be.

Why Income Tracking Matters for Your Financial Health

Income tracking matters because it turns guesswork into decisions you can act on right now. When you know exactly what’s coming in, you can build a budget that actually holds, prepare for tax season without scrambling, and spot problems before they become emergencies.

Here’s what consistent tracking gives you:

  • Budget control: Real numbers replace estimates, so every spending decision is grounded in what you actually earn.
  • Tax readiness: Organized records make filing faster and reduce the stress of matching deposits to 1099s or Schedule C entries.
  • Financial confidence: Knowing your numbers reduces anxiety and helps you make proactive choices instead of reactive ones.

The sections below cover what to track, how to track it, the most common mistakes, and a concrete 30-day plan to get started.

Pro Tip: If you have variable or gig income, tracking is even more valuable than it is for salaried workers. Your income isn’t predictable, so your records have to be.


Table of Contents

1. Why income tracking matters: the real benefits

Tracking your income does more than keep your books tidy. It changes how you relate to money.

Budget control starts with accurate income figures. When you know your actual monthly take-home, you can allocate money to rent, groceries, savings, and debt payoff with precision. Estimates lead to overspending; real numbers lead to real plans.

Man recording income in ledger at home office

Tax readiness is one of the most practical payoffs. U.S. sole proprietors report self-employment income on Schedule C, which requires a complete record of gross receipts. Missing deposits or unmatched 1099s are among the most common triggers for IRS notices. Keeping organized records throughout the year means tax season is a review, not a rescue operation.

Infographic illustrating 5 steps of income tracking benefits

There’s a psychological benefit too. According to a QuickBooks survey summarized by InfluenceFlow, 78% of freelancers reported less tax-related stress when they maintained good income tracking habits. That number reflects something real: clarity reduces anxiety. When you can answer “Can I afford this?” with data instead of a guess, financial decisions feel less stressful.

Regular tracking also helps you spot anomalies early — a missing deposit, a duplicate charge, or an unexpected dip in a revenue stream. Catching those early protects your finances before small problems compound.

  • Improved savings: You can only save consistently when you know what’s left after real expenses.
  • Debt payoff: Accurate income data helps you find extra dollars to direct toward balances.
  • Forecasting: Tracking over several months reveals patterns — seasonal dips, growth trends, and income floors.

2. What exactly should you track?

The goal isn’t to record every penny forever. It’s to capture enough detail that your records stay useful for budgeting and tax purposes.

Core items to record every month:

  • Gross salary or wages (before deductions)
  • Net pay (after taxes and benefits — your actual deposit)
  • Freelance or contract payments
  • 1099 income from any platform or client
  • Dividends and investment distributions
  • Rental income
  • One-time payments (bonuses, gifts, settlements)
  • Reimbursements (business expenses paid back by a client or employer)
  • Transfers from savings or other accounts (label these clearly — they are not income)

Gross vs. net: when to track which. Track gross income for tax planning, since that’s what the IRS sees. Track net income for cash-flow budgeting, since that’s what actually hits your account. Ideally, record both.

Source-level tracking vs. aggregated totals. If you have one employer and one paycheck, a single monthly total is fine. If you have multiple streams — a day job, a side client, and a rental — tracking by source lets you see which activities are actually profitable and which ones cost more than they earn. Aggregated totals hide that picture.

A practical framework: Sources → Categories → Tags. Assign each payment a source (who paid you), a category (salary, freelance, rental), and a tag for any special context (project name, property address, platform). This structure scales as your income grows more complex.

Pro Tip: Tag small or irregular streams the moment they arrive. A $200 payment from a new client is easy to forget by month-end. One quick label when you log it saves you 20 minutes of detective work later.

Tracking depth levels:

  1. Minimal: Total monthly deposits, labeled by source.
  2. Recommended: Gross and net per stream, monthly, with source tags.
  3. Granular: Per-project or per-property profit, with direct expenses assigned to each stream.

3. How to track your income: from notebook to automation

The best method is the one you’ll actually use. Start simple and upgrade when your income complexity demands it.

Method Best for Effort Limitations
Notebook / paper log Beginners, single income source Very low Hard to search; no calculations
Single spreadsheet 1–3 income sources, tech-comfortable Low Manual entry; no bank sync
Categorized spreadsheet Multiple streams, freelancers Medium Still manual; formulas help
Bank aggregation app Anyone with multiple accounts Low (after setup) May batch deposits; needs reconciliation
Dedicated finance app Variable income, gig workers, couples Low ongoing Subscription cost for premium features

Hands typing on laptop for automated income tracking

Starting manually is fine. A single Google Sheets tab with columns for date, source, gross amount, net amount, and category covers most people’s needs in the first month. No formulas required.

Scaling with spreadsheets means adding a category column, a tag column, and a simple SUMIF formula to total each stream. This takes about 30 minutes to set up and saves hours of mental math over the year.

Automated bank aggregation pulls transactions directly from your accounts. The catch: payment processors like PayPal or Stripe often batch multiple transactions into one deposit, so you still need to reconcile the deposit against your invoice records to maintain source-level visibility.

Dedicated finance apps handle the aggregation and add tagging, budgeting, and reporting on top. For anyone with variable income or more than two streams, the time savings are significant. For a comparison of budgeting and expense tracking apps, the key features to look for are bank sync, custom tags, and per-category reporting.

Recommended check schedule:

  1. Daily (2 minutes): Log any payment received the same day it arrives.
  2. Weekly (10 minutes): Reconcile your log against your bank statement; flag any gaps.
  3. Monthly (30 minutes): Run a source-level summary, compare to the prior month, and update your budget baseline.

4. How income tracking feeds your budget

Tracked income is the foundation of a budget that works. Without it, you’re allocating money you may not have.

Building a cautious baseline. For variable or gig income, track your low, average, and high months over at least three months. Then build your budget around the low figure. Recurring commitments — rent, utilities, loan payments — must be covered even in your worst month.

Sample budget calculation for variable income:

Month Gross income Net income
February $2,480
Cautious baseline $2,480

Budget your fixed expenses against the cautious baseline ($2,480 net in this example). Any month you earn above that floor, the surplus goes into a buffer account first, then toward savings goals or one-time costs.

Allocating recurring vs. flexible spending. Fixed commitments (rent, insurance, minimum debt payments) come off the top of your cautious baseline. What’s left is your flexible budget for food, transport, and discretionary spending. Converting irregular payments to monthly equivalents — for example, a quarterly freelance retainer divided by three — keeps your monthly picture accurate.

Pro Tip: When a high-income month arrives, move the surplus to a separate buffer account before you spend it. Treat it as invisible until your fixed expenses are covered for the next slow month.


5. Common income tracking mistakes and how to fix them

Most tracking systems break down in predictable ways. Here are the five most common errors and their fixes.

  • Treating income as fixed. Salaried workers sometimes skip tracking because they assume their pay never changes. But bonuses, overtime, tax withholding adjustments, and benefit changes all affect net pay. Fix: log every deposit, even when you expect it to be the same.

  • Lumping all income into one category. A single “income” line tells you nothing about which streams are growing and which are shrinking. Fix: assign a source tag to every payment from day one.

  • Mixing business and personal money. This is especially common for freelancers and sole proprietors. When business and personal transactions share an account, it’s nearly impossible to calculate profit per stream or prepare an accurate Schedule C. Fix: open a dedicated business checking account, or at minimum use strict tags to separate the two in your records.

  • Tracking revenue without assigning direct expenses. Knowing you earned $2,000 from a client project is only half the picture if you spent $600 on tools and software to complete it. Profit per stream — not gross revenue — reveals which activities actually fund your goals.

  • Ignoring red flags. Missing deposits, mismatched 1099 amounts, and unexplained gaps in your log are signals that your system has a hole. Check your records against your 1099s every January before filing.

The most expensive tracking mistake isn’t a wrong number — it’s a missing one. A deposit you forgot to log doesn’t just distort your budget; it can create a mismatch with IRS records that costs you time and money to resolve. Build the habit of logging income the day it arrives, and reconcile weekly so nothing slips through.


6. What research and practitioners say about income tracking

The evidence for consistent tracking is clear, and the U.S. tax context makes it essential for self-employed individuals.

A QuickBooks survey summarized by InfluenceFlow found that 78% of freelancers reported less tax-related stress when they maintained good income tracking habits. That’s not a small effect. Tax anxiety is one of the most common financial stressors for gig workers, and organized records are the most direct remedy.

For U.S. sole proprietors, the IRS requires self-employment income to be reported on Schedule C. This form asks for gross receipts, returns, and the cost of goods sold — all figures that require source-level records, not just a bank total. Practitioners consistently note that the most common Schedule C errors come from missing income entries, not from complex deductions.

Key practitioner takeaways:

  • Track low, average, and high income ranges over at least three months before setting a budget baseline.
  • Assign direct expenses to each income stream to calculate true profit, not just revenue.
  • Reconcile your records against bank deposits monthly to catch batching errors from payment processors.
  • Save all pay stubs and payment confirmations; monthly reconciliation is the simplest way to stay current.
Tracking behavior Reported benefit
Good income tracking habits 78% of freelancers reported less tax-related stress
Monthly reconciliation Reduces missed deposits and 1099 mismatches
Source-level tagging Enables profit-per-stream analysis
Cautious baseline budgeting Covers fixed costs even in low-income months

For a deeper look at how expense tracking best practices connect to income management, the Valapoint blog covers the full workflow for ages 18–45.


7. A practical 30-day plan to start tracking your income

You don’t need a perfect system on day one. You need a system you’ll actually use.

Week 1: Set up your foundation

  1. Open a spreadsheet (Google Sheets or Excel) with five columns: Date, Source, Gross Amount, Net Amount, Category.
  2. List every income source you currently have — job, freelance clients, platforms, rental, investments.
  3. Assign a short tag to each source (e.g., “Day Job,” “Client A,” “Rental 1”).
  4. Log all income received in the past 30 days from memory and bank statements.
  5. If you’re self-employed, open or designate a separate account for business income.

Week 2: Build the daily and weekly habit

  1. Log every payment the day it arrives — amount, source, and whether it’s gross or net.
  2. At the end of each week, compare your log to your bank statement and flag any gaps.
  3. Note any batched deposits from payment processors and break them down to the source level.
  4. Save or scan any pay stubs, invoices, or payment confirmations.

Week 3: Add depth and run your first report

  1. Add a column for direct expenses tied to each income stream.
  2. Calculate gross income and net income per source for the month.
  3. Identify your low, average, and high income figures across the streams you’ve tracked.
  4. Tag any one-time payments separately so they don’t inflate your baseline.

Week 4: Connect tracking to your budget

  1. Set a cautious budget baseline using your lowest monthly net income figure.
  2. Allocate fixed expenses first; assign the remainder to flexible spending categories.
  3. Move any surplus from above-baseline months to a buffer account.
  4. Schedule a recurring 30-minute monthly review in your calendar.

Pro Tip: The most common startup problem is falling behind after a busy week. If you miss a few days, don’t restart from scratch. Just log what you can from your bank history and keep going. An imperfect record is far more useful than no record.


Key Takeaways

Tracking your income consistently is the single most direct way to improve budget accuracy, reduce tax stress, and build financial confidence over time.

Point Details
Track gross and net separately Gross income supports tax planning; net income drives your actual budget.
Use source-level tags Tagging each payment by source reveals which streams are profitable and which aren’t.
Build from a cautious baseline Budget fixed expenses against your lowest monthly income to stay covered in slow months.
78% of freelancers reported less tax-related stress Freelancers with good tracking habits experienced less tax anxiety, according to a QuickBooks survey summarized by InfluenceFlow.
Valapoint automates the habit Valapoint’s Vala app syncs accounts, tags income streams, and surfaces spending patterns so your 30-day plan runs on autopilot.

The habit matters more than the system

Most financial advice focuses on the mechanics of tracking — which app, which spreadsheet, which formula. That’s useful, but it misses the bigger point.

The real value of tracking your income isn’t the spreadsheet. It’s the shift in how you make decisions. When you know your numbers, you stop reacting to money and start directing it. You negotiate from a position of knowledge. You don’t panic when a slow month arrives because you’ve already planned for it.

The readers who get the most out of income tracking aren’t the ones with the most sophisticated systems. They’re the ones who check in regularly, even when the numbers aren’t great. Consistency beats complexity every time. Start with a single spreadsheet column and one weekly check-in. That’s enough to change how you relate to your finances.


Vala makes income tracking a habit you’ll actually keep

Most people know they should track their income. The gap is between knowing and doing. Vala closes that gap by handling the parts that usually cause people to quit: manual entry, forgotten streams, and the effort of running reports.

Valapoint

With Vala, you connect your bank accounts once and the app automatically categorizes income by source, flags unusual deposits, and shows you a real-time view of what’s coming in across every stream. The tagging system mirrors the Sources → Categories → Tags framework described above, so your 30-day plan translates directly into the app. Bill reminders and recurring subscription reviews mean nothing slips through, and the AI-powered insights surface patterns you’d miss in a spreadsheet.

Whether you’re salaried, freelancing, or managing a mix of both, Vala’s personal finance app gives you the clarity to budget confidently and the records to make tax season straightforward. Start with the free plan and upgrade when you’re ready for advanced reporting and goal tracking.


Useful sources and further reading

Authoritative U.S.-focused resources used in this article:

  • IRS Schedule C (Form 1040) — About Schedule C: Official IRS guidance on reporting self-employment income and deductions for sole proprietors.
  • FHI 360 / CFPB-style income tracking guide: Classroom-tested exercises on converting irregular pay to monthly equivalents and building variable-income budgets.
  • Crown Financial Ministries — How to track your income: Practical guidance on saving pay stubs, monthly reconciliation, and budgeting from your lowest income month.
  • InfluenceFlow — Track your earnings effectively: Source for the QuickBooks freelancer survey data on tax stress reduction and the Sources → Categories → Tags framework.
  • Rising & Thriving — How to track multiple income streams: Detailed guidance on batched deposits, source-level visibility, and per-stream profit tracking.
  • MoneyLooms — A simple guide to tracking your income: Recommendations for monthly review cadence and low/average/high income range tracking.

Valapoint internal resources:

  1. Expense tracking best practices for ages 18–45 — Practical onboarding tips and habit advice aligned with the 30-day plan above.
  2. Where is my money going? Understanding your expenses — Connects income tracking to expense tagging and profit-per-stream analysis.
  3. Personal finance tools: budget, savings, and debt calculators — Quick utilities for building budget baselines from your tracked income figures.